

BYOD Is for Mobile Devices only right?
It really depends on your companies needs. For example many companies need to hire 1099 contractors and in such a case they come with their own devices but not the correct security settings or enforcements. Remember BYOD is a security construct. The idea here is that you should be securing the companies sensitive data in all forms.
You need to ensure its integrity, confidentiality and availability. Yes, the triad. You will see this come up again and again as a common theme. Securing against data leakage, accidental or intentional data deletion events and ensuring that the accuracy of the data is in tact. BYOD handles this by enforcing set security controls on the devices that store, process and transmit this sensitive data.
In many cases when you are architecting your program you really need to look at this as not just iOS and Andriod programs which in many cases they are. You need to consider what and how will you manage Windows, and macOS devices as well owned by contractors, employees, or staff members.
This is the first part in the series where I outline how I configured JAMF Pro to setup User Enrollment based BYOD program and all the settings that go along with it. In the next post I will outline how I configured JAMF Pro for macOS User Enrolled BYOD for scenerios where we have 1099 contractors who use their own macOS device. I will then cover our approach to Android and Windows management ia Microsoft Intune.
Part 1: Account Driven Enrollment with JAMF for iOS Devices
Implementing BYOD (Bring Your Own Device) for iOS devices using User Enrollment ensures a secure and seamless experience for both end users and IT administrators. This section outlines the specific steps required to set up BYOD for iOS User Enrollment, with a focus on the often-overlooked requirement of hosting a configuration file in the /.well-known/ path on a web host.
Prerequisites
Before proceeding, ensure the following requirements are met:
- Managed Apple IDs:
- Users need Managed Apple IDs to enable User Enrollment.
- These can be created and assigned in Apple School Manager or Apple Business Manager.
- Apple Push Notification Service (APNs) Certificate:
- Obtain and upload an APNs certificate to your Mobile Device Management (MDM) solution.
- User Enrollment JSON File:
- Host a service discovery file on a public web server at the path:
/.well-known/. - This file enables account-driven enrollment and allows iOS devices to discover the MDM server automatically.
- Host a service discovery file on a public web server at the path:
- MDM Configuration:
- Ensure your MDM supports User Enrollment and is configured to support BYOD.
- Test the process:
- Ensure you test the process of user based enrollment with BYOD.
In this article we will be talking about the steps taken with JAMF Pro. Your mileage may vary but these core concepts are pretty universal when it comes to BYOD management and end user enrollment into BYOD.
Steps for Managed Apple IDs
1. Configure Managed Apple IDs
- Log in to Apple School Manager or Apple Business Manager.
- Create Managed Apple IDs for your users. The easiest way to do this and the way that I did this is to enable directory sync with federation. This approach allows you to let users login to Apple with their IDP configuration. This page provides he steps you need to federate and sync your directory with Apple Business Manager.
Here is a video that was helpful for me in the process.
- NOTE when you federate you will run into issues where some users, who have setup Apple Accounts with their work email address will be asked to convert those non sanctioned accounts to allow Apple to reissue their work email address to their Apple Business Manager work sanctioned account.
- Communicate the Managed Apple IDs and their associated credentials to users.
Now that everyone has a managed Apple ID that allows them to login with their work email credentials user enrollment for iOS BYOD will be much more seamless.
Steps for Apple Push Notifications
2. Apple Push Notification Service (APNs) Certificate
The Apple Push Notification Service (APNs) Certificate is essential for enabling communication between Jamf Pro and Apple devices. Without a valid APNs certificate, Jamf Pro cannot push configurations, enforce policies, or manage devices effectively.
Why is the APNs Certificate Important in Jamf Pro?
- Device Management: APNs facilitates the connection between Jamf Pro and managed devices, enabling key features like app deployment, configuration profiles, and restrictions.
- User Enrollment: User Enrollment for BYOD relies on APNs for initiating and maintaining the MDM relationship.
- Secure Communication: It ensures secure and reliable interactions between Jamf Pro and Apple devices via Apple servers.
How to Upload or Renew the APNs Certificate in Jamf Pro
Follow these steps to configure or renew the APNs certificate in Jamf Pro:
- Generate a Certificate Signing Request (CSR):
- Log in to your Jamf Pro instance as an administrator.
- Navigate to Settings (gear icon) > Global Management > Push Certificates.
- Click Download Certificate Signing Request and save the CSR file to your computer.
- Obtain the APNs Certificate:
- Visit the Apple Push Certificates Portal.
- Log in with the same Apple ID used for your existing certificate. (This is crucial for renewing certificates.)
- Upload the CSR file you downloaded from Jamf Pro.
- Download the resulting APNs certificate (
.pemfile) to your computer.
- Upload the APNs Certificate to Jamf Pro:
- Return to Settings > Global Management > Push Certificates in Jamf Pro.
- Click Upload and select the
.pemfile you downloaded from the Apple Push Certificates Portal. - Verify the expiration date displayed in Jamf Pro after uploading the certificate.
- Verify Device Management:
- Test push notifications to ensure the new certificate is functioning correctly.
- For example, try deploying a configuration profile or sending a remote command to a test device.
Key Considerations
- Annual Renewal: APNs certificates expire annually. Use the same Apple ID for renewals to avoid device re-enrollment.
- Notification for Expiry: Jamf Pro will notify you about upcoming certificate expirations. Ensure your team acts promptly to renew.
- Source Consistency: If the Apple ID used for the initial certificate is unavailable, you must re-enroll all managed devices.
Troubleshooting Tips
- Upload Issues: If you encounter errors during the upload, ensure the
.pemfile corresponds to the CSR generated by Jamf Pro. - Device Connectivity Problems: Verify that the APNs certificate is active by testing communication with a managed device.
Steps for User Enrollment Configuration
3. User Enrollment JSON File
The remote management file is a simple JSON file that helps iOS devices locate the MDM server. Create a file named com.apple.remotemanagement.json with the following content:
{
"Servers": [
{
"Version":"mdm-byod",
"BaseURL":"https://JAMF_PRO_URL.com/servicediscoveryenrollment/v1/userenroll"
}
]
}- Replace
https://JAMF_PRO_URL.com/servicediscoveryenrollment/v1/userenrollwith your actual MDM server enrollment URL. Again I am using JAMF Pro here so I am following the instructions laid out in this well documented article by JAMF.
Host the File on the Web Server
-
Place the
com.apple.remotemanagement.jsonfile in the/.well-known/directory of your web server. The full path should be: https://your-domain.com/.well-known/com.apple.remotemanagement -
Ensure the web server is publicly accessible and uses HTTPS.
-
Verify the file is accessible by navigating to the URL in a browser.
I am providing a video that was helpful for me as I was navigating this process. Your process will vary based on the kind of hosting your company chooses to host its website. You also need to take into consideration caching which may slow down the propogation process. Remember the User enrolls on their device and the base domain from their work email is used as the website that will be used to look for this json file. So if the user enrolls and the file is not present then the enrollment will fail. If you have uploaded the file and its been a few days and you are still having issues you may need to purge the website cache for the file to be exposed. For me we used Cloudflare so that was the engine that was used for caching and once cleared the process connected and users were able to login.
This process also heavily leverages federated Apple ID’s. If your users are not using Federated Apple IDs then their experience will be to login once to the company domain (assuming thats connected to your MDM as an identity provider), then they are prompted to sign into Apple which will redirect them to their identity provider. For me thats Azure and they login again. If you are not using federation then they will need to know their manual username and password in Apple Business Manager to complete enrollment. I highly recommend setting up federation as this will streamline the entire BYOD user enrollment process.
4. Steps for MDM Configuration
Account-driven User Enrollment
For personally owned mobile devices is enabled via Jamf Pro’s user-initiated enrollment settings. Source: Enabling User Enrollment in JAMF
- In Jamf Pro, click Settings icon in the sidebar.
- In the Global section, click User-initiated enrollment
.
- Click the Edit icon .
- Click the Devices tab.
- Select the checkbox to enable account-driven User Enrollment for the type of personally owned devices you want to enroll.
- Click the Messaging tab and use the Language dialog to customize the way you want the Login page to display to users.
- Click the Save icon
.
Automatically Registering Managed Apple IDs with Volume Purchasing
This is an important step in the process of MDM configuration with JAMF. Check out this article as a resource.
Users with Managed Apple IDs can be automatically registered with volume purchasing without any end user interaction.
Requirements
The Automatically register with volume purchasing if users have Managed Apple IDs checkbox must be selected for the volume location used to invite and assign content to users with Managed Apple IDs. For more information, see Volume Purchasing Integration.
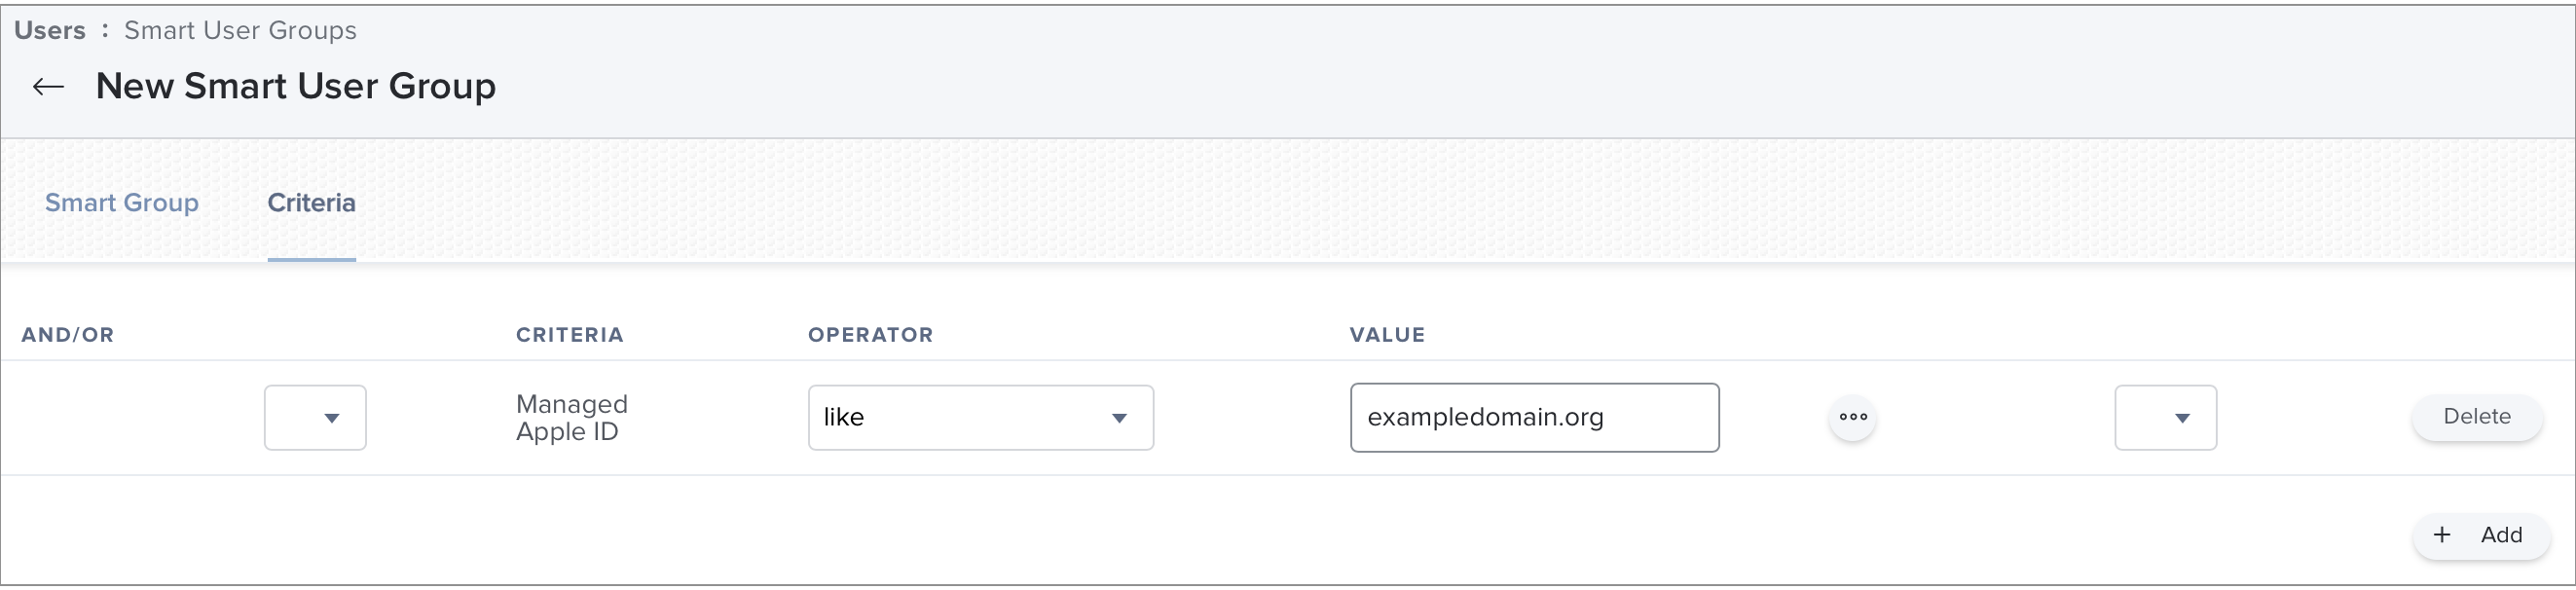
- In Jamf Pro, click Users
at the top of the sidebar.
- Click Smart User Groups
in the sidebar.
- Click New
.
- In the General pane, enter a Display Name, such as Managed Apple IDs.
- In the Criteria pane, add the following device criteria that includes all Managed Apple IDs in the smart group:
- Click Save
- In Jamf Pro, click Users
- Click Invitations.
- In the General pane, enter a Display Name, such as Invitation for Managed Apple IDs.
- Choose Automatically register only users with Managed Apple IDs and skip invitation from the Distribution Method pop-up menu.
- In the Scope pane, add your smart group that contains Managed Apple IDs as a target for the invitation.
- Click Save
Users with Managed Apple IDs are automatically registered with volume purchasing in Jamf Pro.
Creating a Volume Assignment
Create a volume assignment that assigns content to users.
- In Jamf Pro, click Users
- Click Volume Assignments
in the sidebar.
- Click New
Use the General payload to configure basic settings for the volume assignment, including the location.
Note: The assignment is automatically added to the site that the location belongs to.
Use the Apps and eBooks payloads to select the checkbox for each app and book you want to assign.
If a recently purchased app or book is not displayed in the list, follow the steps in the Recently Purchased Volume Content is not Displayed in Jamf Pro article to add that app or book to the list.
Click the Scope tab and configure the scope of the assignment.
Best Practice:To assign volume content to personally owned devices that have a Managed Apple ID, use a smart group that contains devices with Managed Apple IDs and add it to the scope of your volume assignment.
- Click Save
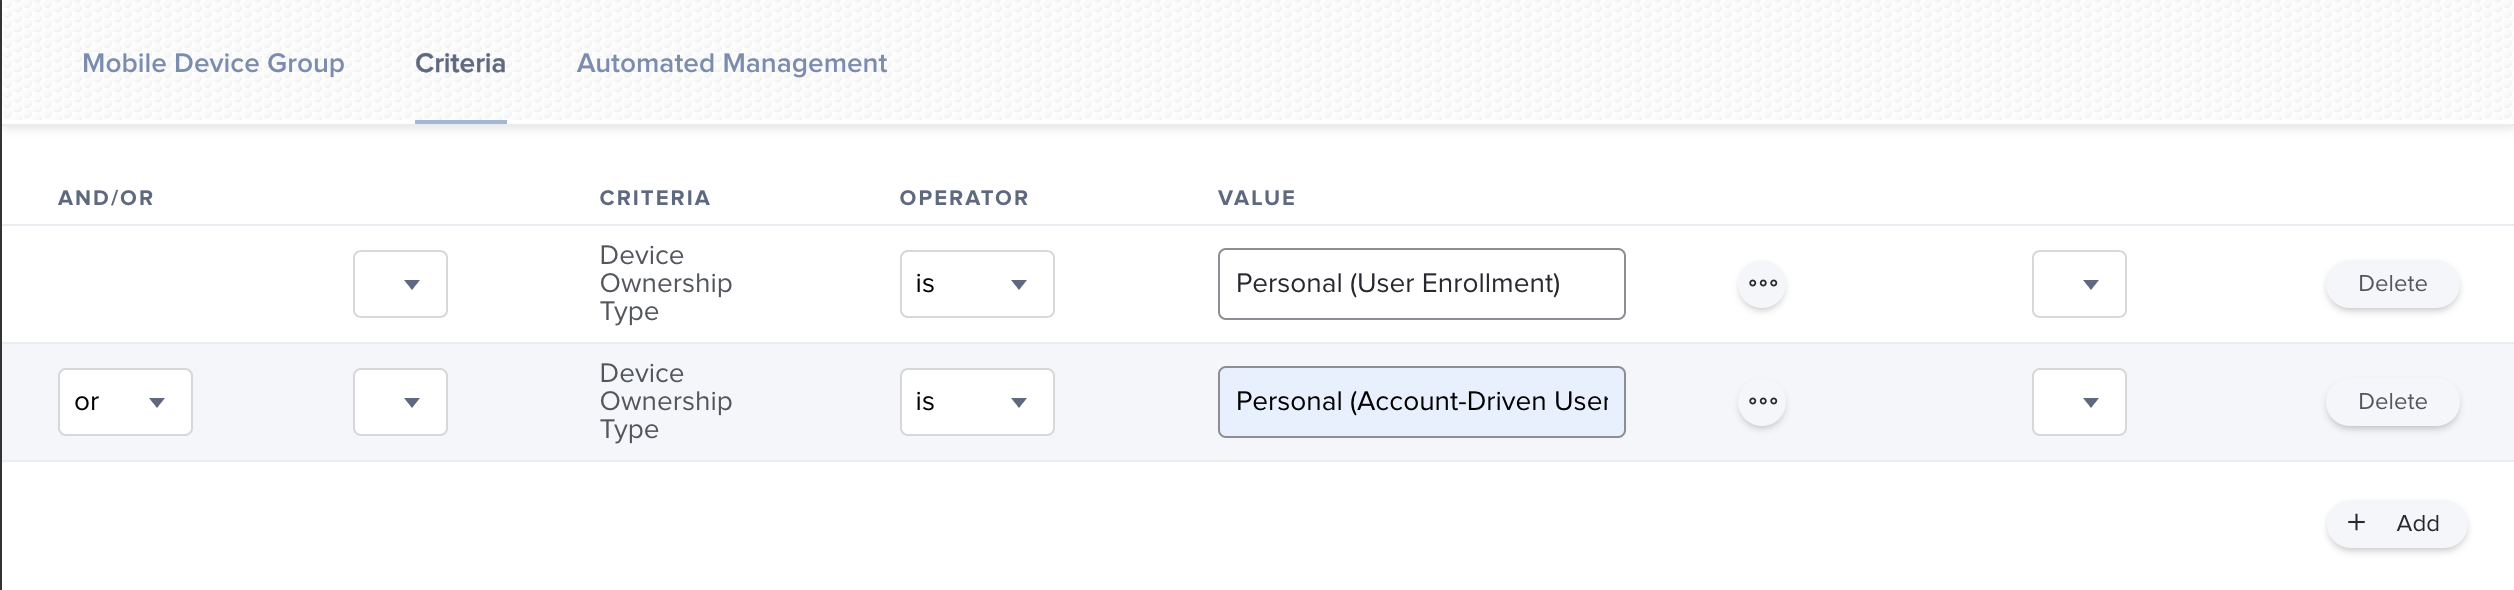
Creating a Smart Group for Personally Owned Devices
To help you distribute content to personally owned devices, create a mobile device smart group that includes all personally owned devices. You can then configure the scope of distributed content in the following scenarios: Use the smart group to target personally owned devices for user-assigned content.
Use the smart group to exclude personally owned devices from device-assigned content.
- In Jamf Pro, click Devices
at the top of the sidebar.
- Click Smart Device Groups
- Click New
- In the General pane, enter a Display Name.
- In the Criteria pane, add the the Device Ownership Type criteria:
- Click Save
Distributing Content to Personally Owned Devices
Apps that are assigned to users via volume assignment in Jamf Pro can be distributed to the user’s personal device. Keep the following in mind when you distribute apps and books to personally owned devices:
- Make sure the Make app managed if currently installed as unmanaged checkbox is deselected.
- Jamf recommends distributing content with Jamf Self Service for iOS to devices enrolled via User Enrollment. To do this, make sure Make Available in Self Service is chosen from the Distribution Method pop-up menu. If you choose Install Automatically/Prompt Users to Install and the user ignores the prompt, Jamf Pro prompts users every four hours or during the next inventory update.
- If you distribute an app to both institutionally owned and personally owned devices in your environment, add two separate instances of the app in Jamf Pro: one for each distribution type. You can then use a smart group that includes personally owned devices to do the following:
- Use the smart group to target personally owned devices for user-assigned content.
- Use the smart group to exclude personally owned devices from device-assigned content.
App: Self Service: Follow the steps here to deploy the JAMF Self Service App for iOS
App Config:
<dict>
	<key>INVITATION_STRING</key>
	<string>$MOBILEDEVICEAPPINVITE</string>
	<key>JSS_ID</key>
	<string>$JSSID</string>
	<key>SERIAL_NUMBER</key>
	<string>$SERIALNUMBER</string>
	<key>DEVICE_NAME</key>
	<string>$DEVICENAME</string>
	<key>MAC_ADDRESS</key>
	<string>$MACADDRESS</string>
	<key>MANAGEMENT_ID</key>
	<string>$MANAGEMENTID</string>
	<key>JSS_URL</key>
	<string>$JPS_URL</string>
</dict>
5. Test the Enrollment Process
- On an iOS device, navigate to Settings > General > VPN & Device Management.
- Select Enroll in Device Management and sign in with your Company Email and a Managed Apple ID.
- The device will automatically locate the MDM server using the service discovery file and complete the enrollment process. You can see a great example of how we BYO at JAMF that shows the enrollment process.
Sources
- Prepare for Account-Driven Enrollment with Managed Apple IDs and Service Discovery
- Overview of BYOD
- Jamf Documentation: Push Certificate Setup
- Apple Push Certificates Portal
- Federation with Apple Business Manager
- Enabling User Enrollment in JAMF
- Deploy the Self Service App for iOS
- Content Distribution to Personally Owned Devices
AI Usage Transparency Report
AI Era · Written during widespread use of AI tools
AI Signal Composition
Score: 0.53 · High AI Influence
Summary
BYOD management and end user enrollment into BYOD using JAMF Pro
Related Posts

Setting up Ollama on macOS
Recently, after some bad experiences with OpenAI's ChatGPT and CODEX, I decided to look into and learn more about running local AI models. On its face it was intimidating, but I had seen a lot of people in the MacAdmins community posting examples of macOS setups, which really helped lower the bar for me both in terms of approachability and just making me more aware of the local AI community that exists out there today.
AI Agent Constraints and Security
I really feel like in this era of AI it's essential to write about and share experiences for others who are leveraging AI, especially now that AI usage seems almost ubiquitous. Specifically, when it comes to AI in development and the rapid growth of AI-driven automations in the IT landscape, I believe there's a need for open discussion and exploration.

Vibe Coding with Codex: From Fun to Frustration
So there I was, a typically day, a typical weekend. As a ChatGPT customer, I had heard good things about Codex and had not yet tried the platform. To date my experience with agentic coding was simply snippit based support with ChatGPT and Gemeni where I would ask questions, get explanations and support with squashing bugs in a few apps that I work on, for fun, on the side. There were a few core features in one of the apps I built that I wanted to try implementing but the...
Turn Jamf Compliance Output into Real Audit Evidence
Most teams use Apple’s macOS Security Compliance Project (mSCP) baselines because they scale and they’re repeatable. Jamf’s tooling makes deployment straightforward and the Extension Attribute (EA) output is a convenient place to capture drift. What you don’t automatically get is the artifact an auditor will accept on a specific date—an actual document you can file that shows which endpoints are failing which items, plus a concise roll-up of failure counts you can act on. Smart Groups answer scope; they don’t produce evidence.

Secure Software, Secure Career: How I Passed the CSSLP
After passing the CISSP earlier this year, I decided to follow it up with the **Certified Secure Software Lifecycle Professional (CSSLP)** certification. For those unfamiliar, CSSLP is an ISC2 certification that focuses specifically on secure software development practices across the full SDLC—from requirements and design to coding, testing, deployment, and maintenance. My goal in pursuing this certification was to further develop my skills in ensuring the security of software throughout its entire lifecycle.

Good Cybersecurity policies, procedures, guidelines take time. They're not rushed and aren't rubber stamped
Cybersecurity is no longer a luxury or an afterthought—it's an absolute necessity. But how can you tell if the company you work for, as a security professional, truly values cybersecurity? Let's explore some clear indicators that demonstrate a company's commitment to implementing robust security practices in-house. A genuine commitment will be reflected in the organization's policies and procedures, which should be regularly reviewed and updated to address emerging threats.
Managing Bring Your Own Device (BYOD) for Android with Microsoft Intune
Alright, so today we're going to be talking about the management of bring your own device BYOD for Android devices. There's a lot of information out there for the management of iOS devices and you can do that with pretty much any Apple MDM on the market. We just happen to use Jamf where I work, but you could use anything from Braavos to SimpleMDM to Kanji or JumpCloud. Mosyle is also a great option.
Securing BYOD Email Access: Exploring Strategies in Microsoft 365
In today’s mobile-first world, organizations increasingly rely on Bring Your Own Device (BYOD) programs to empower employees while optimizing costs. However, this flexibility introduces unique challenges, particularly around securing email access. To mitigate risks, we are implementing a comprehensive strategy to block email access on non-company devices by default and ensure only sanctioned apps can access organizational email accounts. This approach will help prevent unauthorized access and data breaches, aligning with our commitment to maintaining the security and integrity of company communications.
How I Conquered the CISSP Exam: 9 Months, Top Resources, and Proven Strategies
Passing the CISSP (Certified Information Systems Security Professional) exam is no small feat. It’s known for its breadth, depth, and ability to test not just your knowledge but your practical understanding of cybersecurity. After nine months of intense preparation, I’m thrilled to say I’ve joined the ranks of CISSP-certified professionals! Here's a detailed account of my experience, including the resources I used, some tips that helped me along the way, and what I learned from the process itself.
Enhancing Cybersecurity on macOS: Empowering Users for a Safer Digital Journey!
macOS has earned a strong reputation for built-in security, but the real value of the platform is not just that protections exist. It is that Apple continues pushing the operating system toward more context-aware security decisions that help users make better choices before a problem becomes a breach. This approach allows users to understand and mitigate potential risks in real-time, rather than simply reacting to threats after they've occurred.
