

Modern device management isn’t just about enforcing policies—it’s about communicating effectively with users at the right time. In JAMF Pro, Smart Groups give you powerful visibility into device state, but they don’t natively solve the problem of proactive, automated user communication. Whether you’re trying to prompt users to restart their machines, complete updates, or take action on compliance issues, bridging that gap requires a flexible and scalable notification system.
In this post, we’ll walk through how to integrate JAMF Pro with SendGrid to automatically send targeted email notifications based on Smart Group membership. While the example focuses on weekly restart reminders, the underlying pattern can be applied to virtually any workflow driven by JAMF metrics. By combining Smart Groups, SendGrid’s API, and a lightweight script, you’ll build a reusable automation framework that turns JAMF data into actionable user engagement.
Step 1: Identify the Right JAMF Metric
Everything in this workflow starts with choosing the right signal inside JAMF Pro. In this case, we’re using the “User last logged in - Computer timestamp” field, which gives us a reliable indicator of when a machine was last actively used. This is important because it allows us to target real user behavior rather than relying on less accurate signals like uptime or policy execution history.
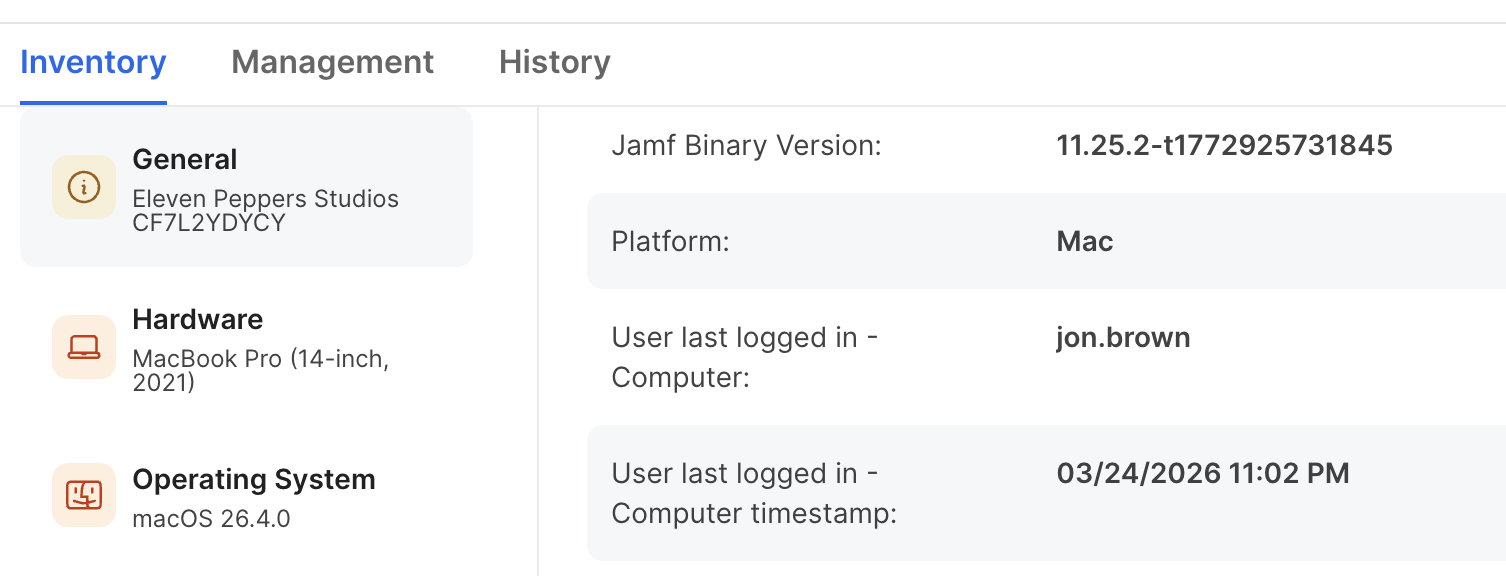
In the inventory record for a device, you can see both the username and the exact timestamp of the last login. This becomes the foundation for determining whether a machine has gone too long without a restart. Since macOS systems can stay up for extended periods, using login activity as a proxy helps ensure you’re targeting actively used devices that may be overdue for maintenance.
The key takeaway here is that this metric isn’t just useful for restart reminders—it can be reused for any workflow where user activity matters. For example:
- Detecting stale devices
- Triggering compliance reminders
- Identifying inactive endpoints
- Driving cleanup or deprovisioning workflows
Once you understand how to leverage this timestamp, you unlock a flexible way to build behavior-driven automation inside JAMF.
Step 2: Create a JAMF Smart Group
With the metric identified, the next step is to translate it into a Smart Group. This is where JAMF does the heavy lifting—automatically grouping devices that meet your defined criteria.
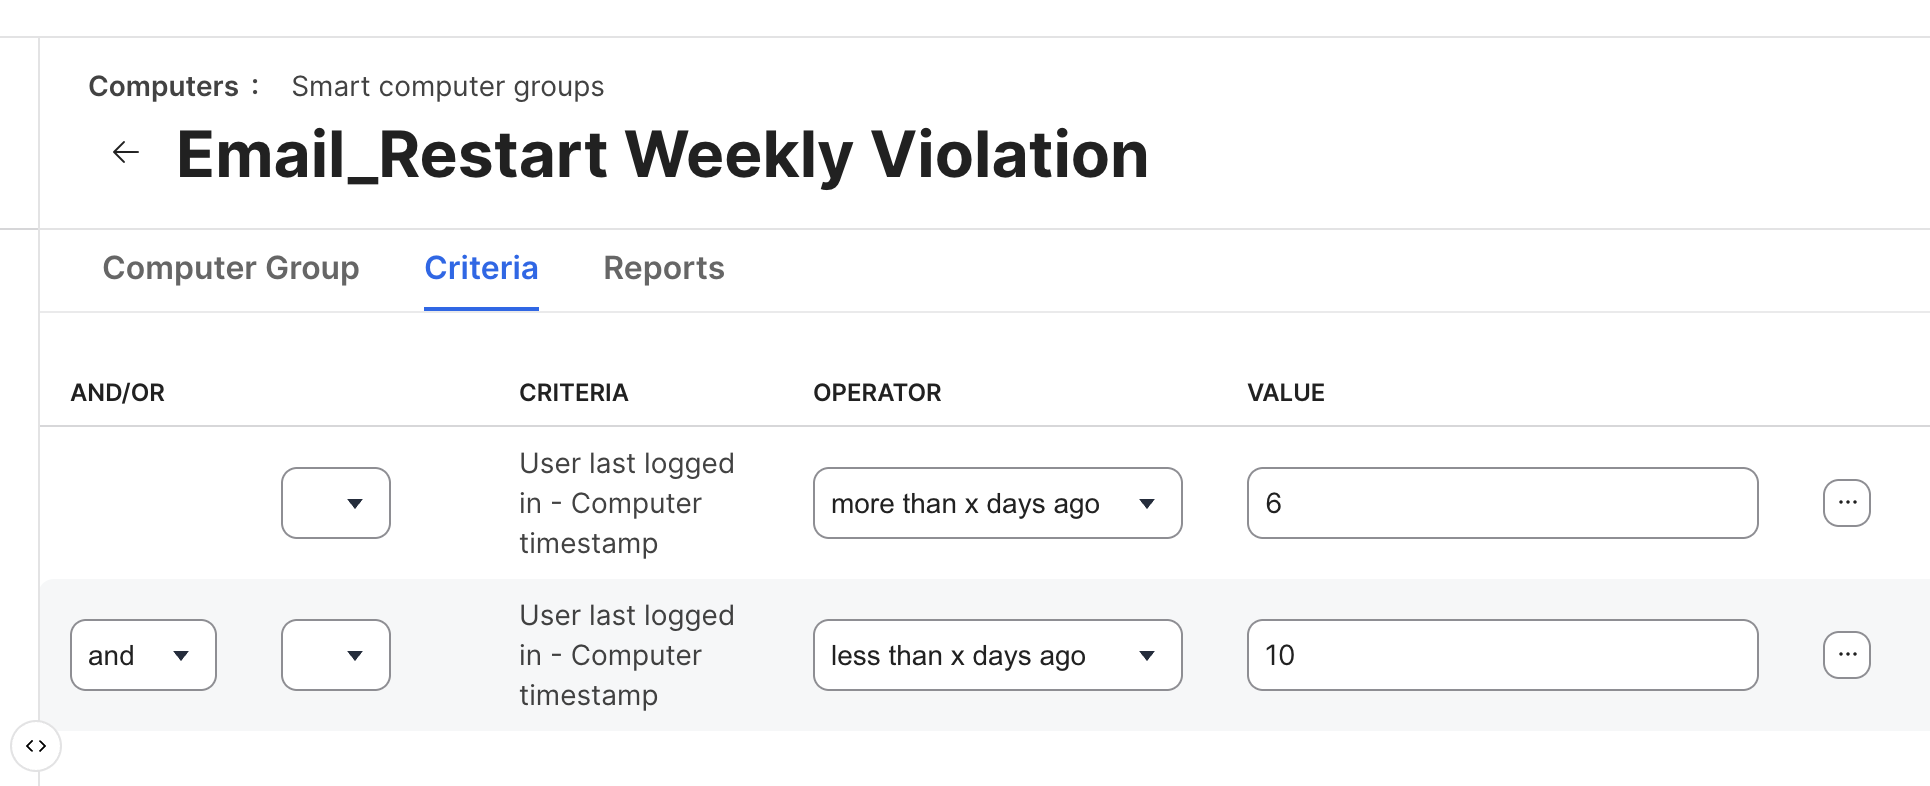
In this example, we’re defining a window:
- More than 6 days ago
- Less than 10 days ago
This creates a rolling target group of machines that haven’t been restarted recently but are still actively in use. The benefit of this approach is that it avoids spamming users daily while still maintaining consistent enforcement.
When configuring your Smart Group:
- Use “User last logged in - Computer timestamp” as your criteria
- Combine conditions with logical operators (
and) to create a time window - Tune the day range based on your organizational policy (weekly, bi-weekly, etc.)
How to Get the Smart Group ID
The Smart Group ID is critical because it’s what your script will use to query JAMF via the API.
To find it:
- Navigate to your Smart Group in JAMF Pro
- Look at the URL in your browser
- You’ll see something like: https://yourjamfurl/jamfPro/computers.html?id=123&o=r
- The number after
id=is your Smart Group ID
In this example: id=123 → Smart Group ID = 123
You’ll use this ID later in your script to dynamically pull all devices (and associated users) that match your criteria.
At this point, you’ve defined who should receive notifications. Everything that follows builds on this—SendGrid will handle delivery, but JAMF is responsible for determining the audience.
Step 3: Sign Up for a SendGrid Account
To begin, navigate to the official SendGrid signup page:
Start for Free – SendGrid Signup
From there, click “Start for Free” and complete the initial registration form with your name, email address, and password. You’ll be required to accept the terms of service and complete a CAPTCHA challenge before proceeding. Once submitted, SendGrid will send a verification email—open it and confirm your account to activate access. Read more here:
After email verification, you’ll be prompted to complete additional account validation steps, which may include phone verification and basic profile setup. This is part of SendGrid’s anti-abuse and deliverability protection model, ensuring that only legitimate senders are allowed onto the platform. Once completed, you’ll land in the SendGrid dashboard, where you can begin configuring your email infrastructure and API access.
At this stage, you don’t need to configure anything yet—just ensure your account is fully activated and accessible. In the next steps, we’ll generate an API key, configure sender authentication, and prepare SendGrid to integrate cleanly with JAMF-driven automation.
Step 4: Create a SendGrid API Key
With your SendGrid account ready, the next step is to generate an API key that your automation script will use to send emails. This key acts as your authentication mechanism, so it’s critical to scope it correctly and treat it like a secret.
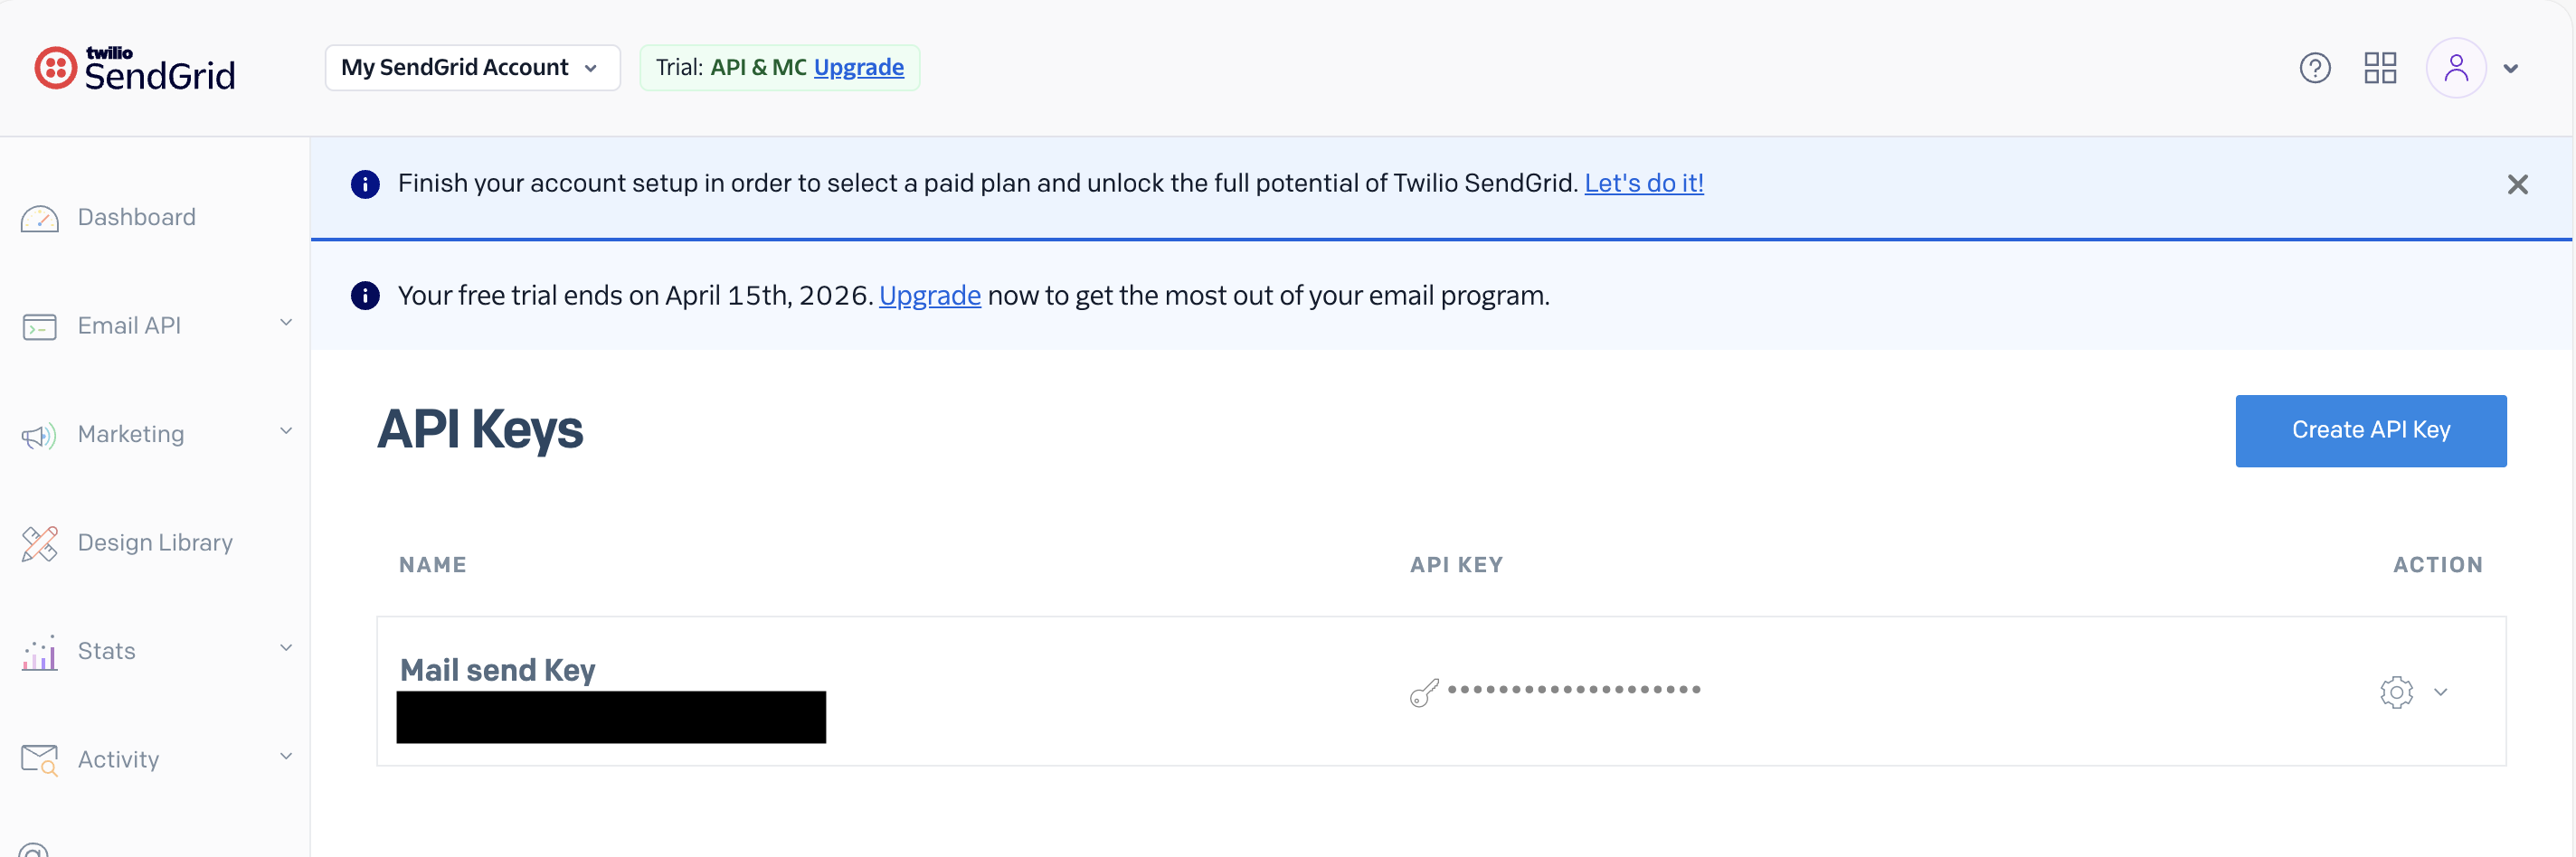
Navigate to Settings → API Keys in the SendGrid dashboard, then click “Create API Key.” Give your key a clear, descriptive name such as jamf-mailer or weekly-restart-notifications. Naming matters here—especially as your automation footprint grows—because you’ll likely manage multiple keys over time.
Use Custom Access (Not Full Access)
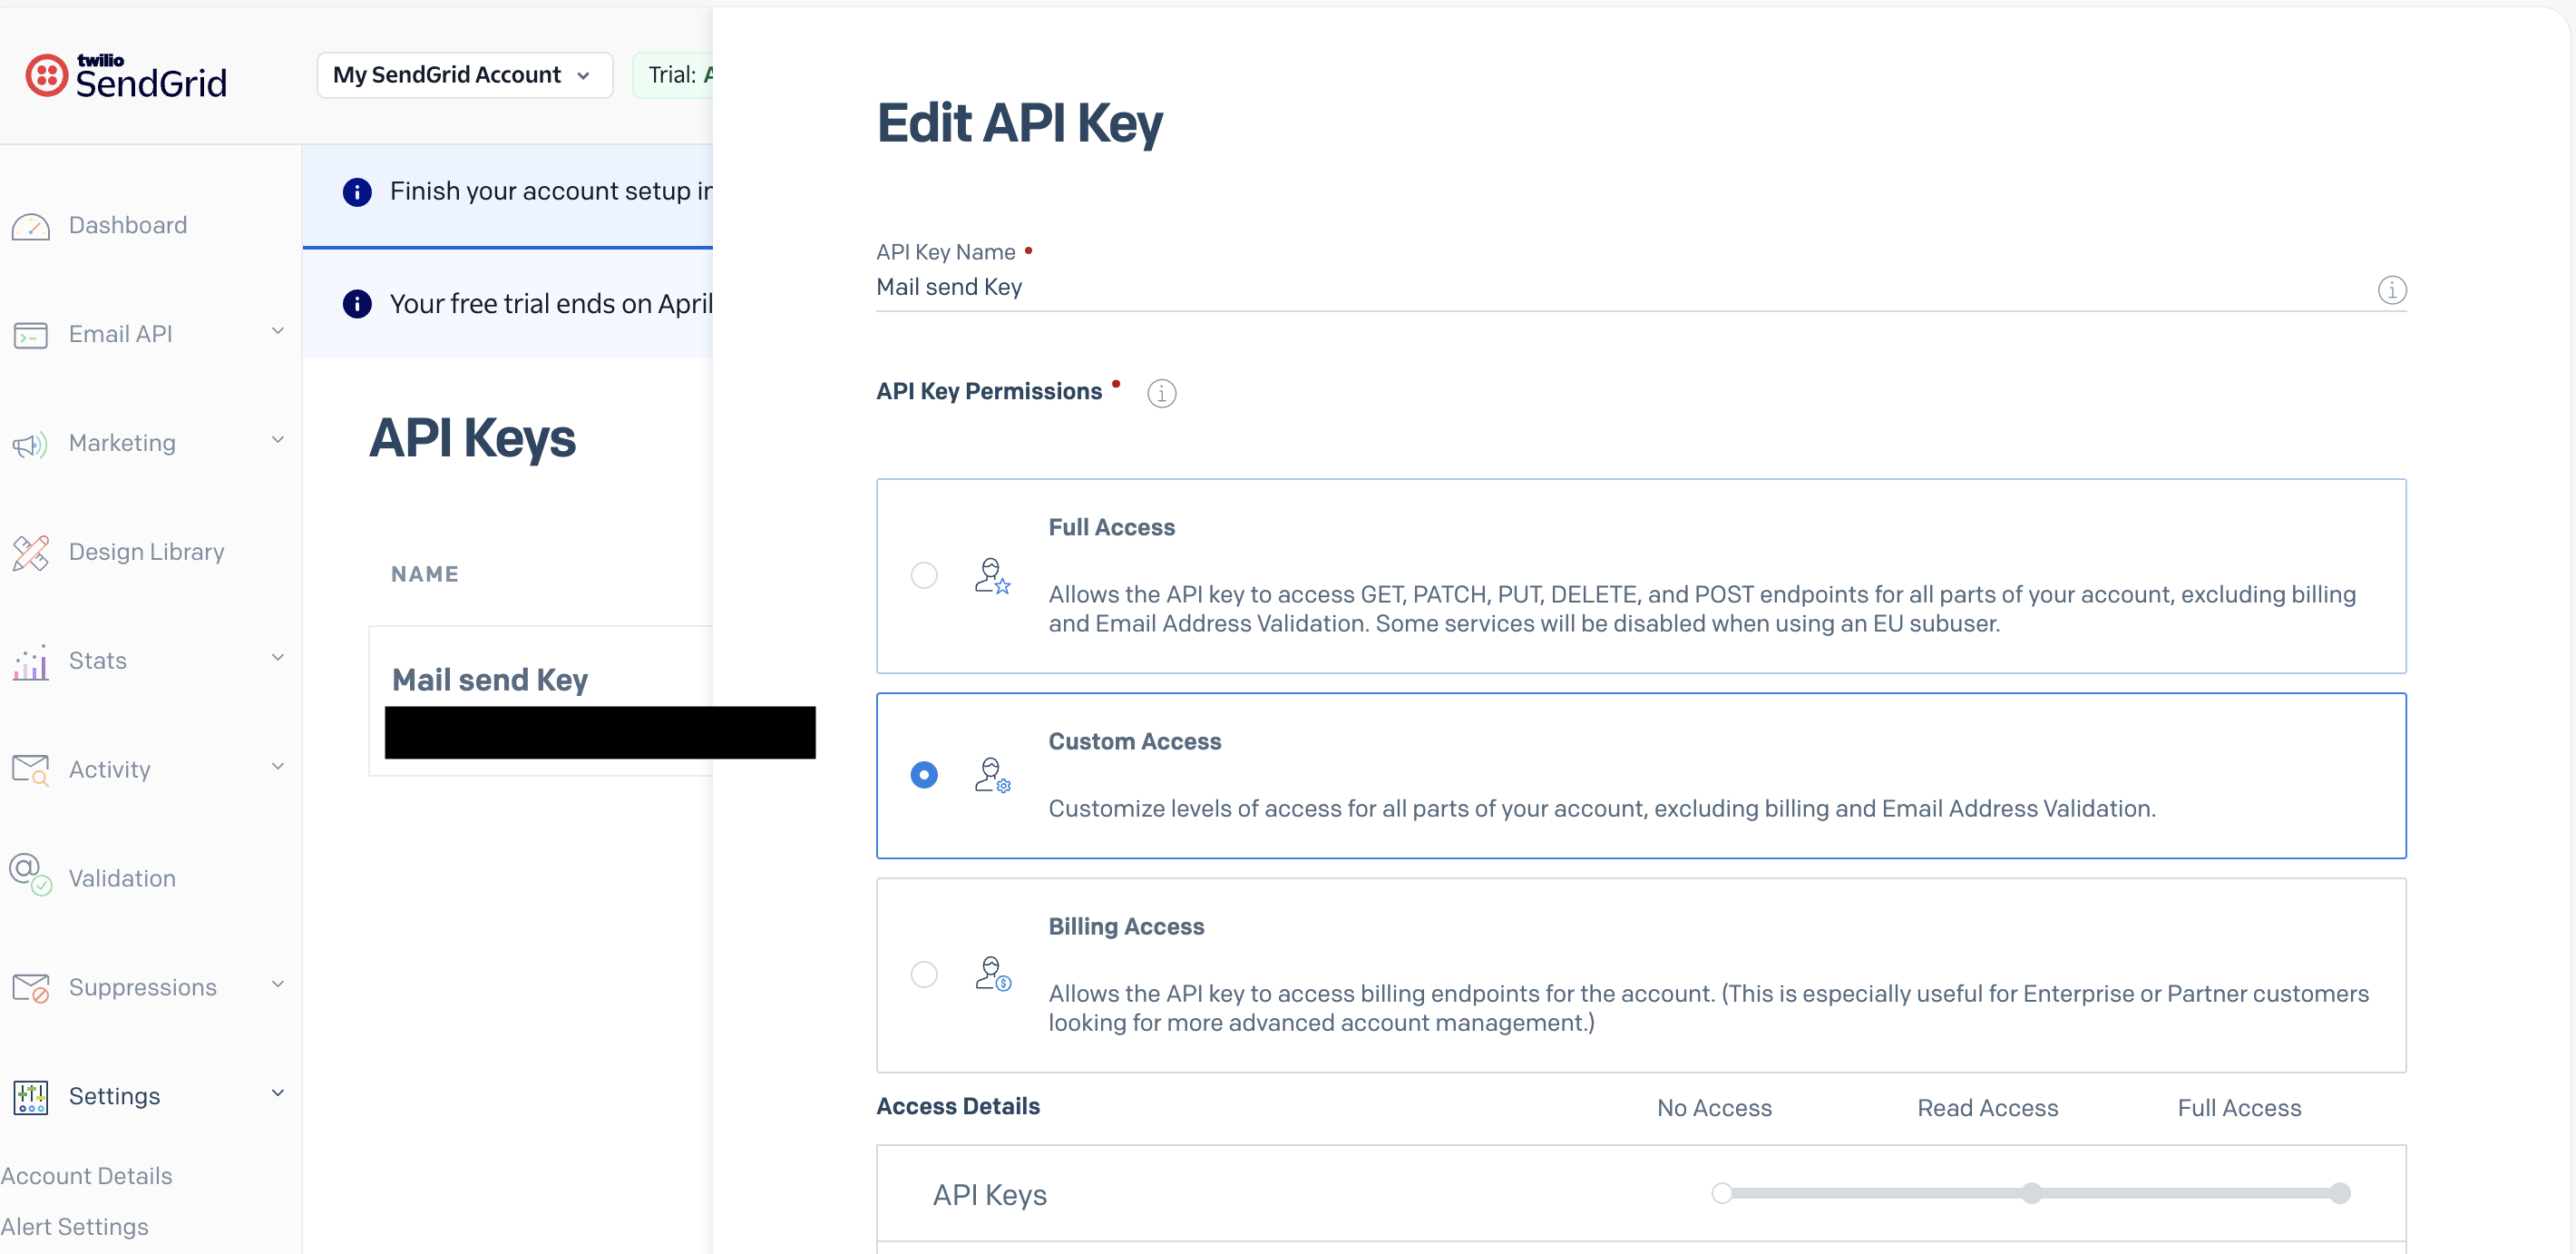
When prompted for permissions, avoid selecting Full Access. Instead, choose Custom Access. This is a best practice from a security standpoint—your script should only have the minimum permissions required to function.
Using Custom Access allows you to tightly control what the key can do, reducing risk if the key is ever exposed.
Enable Only What You Need
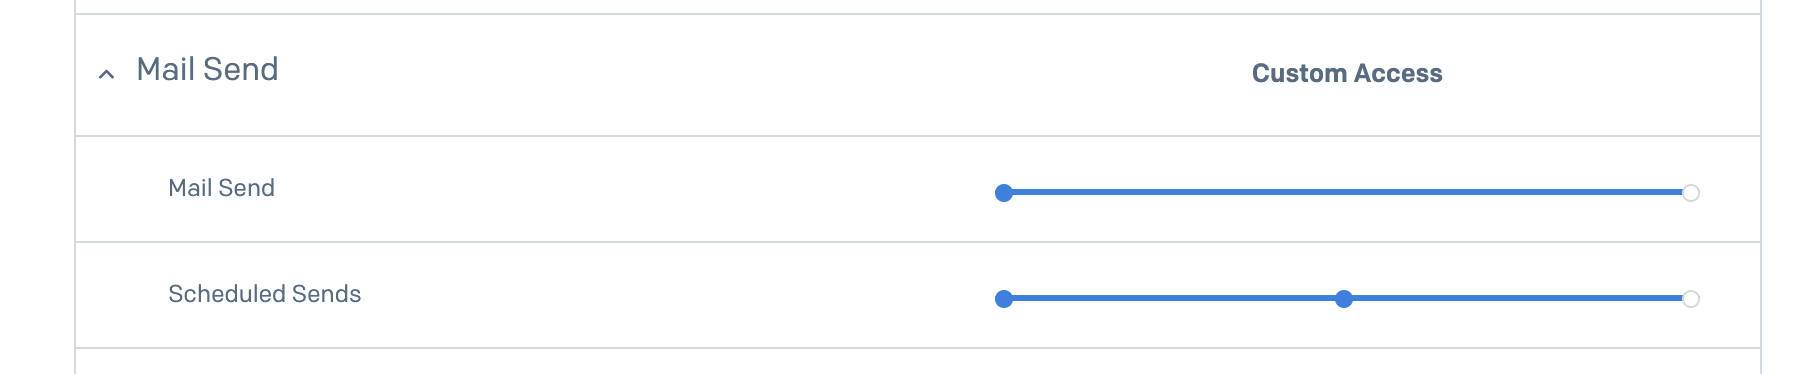
Under the permissions configuration:
- Set Mail Send → Full Access
- Set Scheduled Sends → Full Access
These are the only permissions required for this workflow. Your script will use the Mail Send API to deliver emails, and Scheduled Sends gives you flexibility if you later decide to queue or delay messages.
Once created, copy the API key immediately—SendGrid will not show it again. Store it securely (environment variables, secret manager, etc.), as this key will be used directly in your script to authenticate API requests.
At this point, SendGrid is ready to accept authenticated requests. Next, we’ll configure sender identity and domain authentication to ensure your emails are trusted and properly delivered.
Step 5: Set Up a Verified Sender in SendGrid
Before you can reliably send emails through SendGrid, you must configure a verified sender identity. This tells SendGrid (and receiving mail servers) that you are authorized to send email from a specific address or domain.

To create a verified sender, navigate to:
Settings → Sender Authentication → Single Sender Verification
Or go directly here:
SendGrid Sender Identity Setup
Click “Create New Sender” and fill out the required fields:
- From Name (e.g., IT Support or Device Compliance)
- From Email Address (must be valid and accessible)
- Reply-To Address
- Physical Mailing Address (required for compliance)
- Company Name
Once submitted, SendGrid will send a verification email to the address you provided. You must click the verification link to activate the sender identity.
Why This Step Matters
This is not optional—if you skip sender verification, your emails will either:
- Fail to send entirely, or
- Be flagged as spam, or
- Be rejected by recipient mail servers
Modern email systems (Google Workspace, Microsoft 365, etc.) enforce strict anti-spoofing policies like SPF, DKIM, and DMARC. Without a verified sender:
- Your emails lack trust signals
- Your domain reputation suffers
- Deliverability drops significantly
In a JAMF automation context, this becomes critical. If your restart reminders or compliance notifications don’t reach users reliably, the entire workflow breaks down.
Single Sender vs Domain Authentication
While Single Sender Verification is the fastest way to get started, it’s best suited for testing or small-scale deployments. In production environments, you should move toward Domain Authentication, which we’ll cover next. This allows SendGrid to sign emails on behalf of your domain, dramatically improving deliverability and trust.
Step 6: Authorize Your Domain in SendGrid
While a verified sender gets you up and running, domain authentication is what makes your email delivery reliable at scale. This step ensures that emails sent through SendGrid are fully aligned with your domain, improving trust, branding, and deliverability.
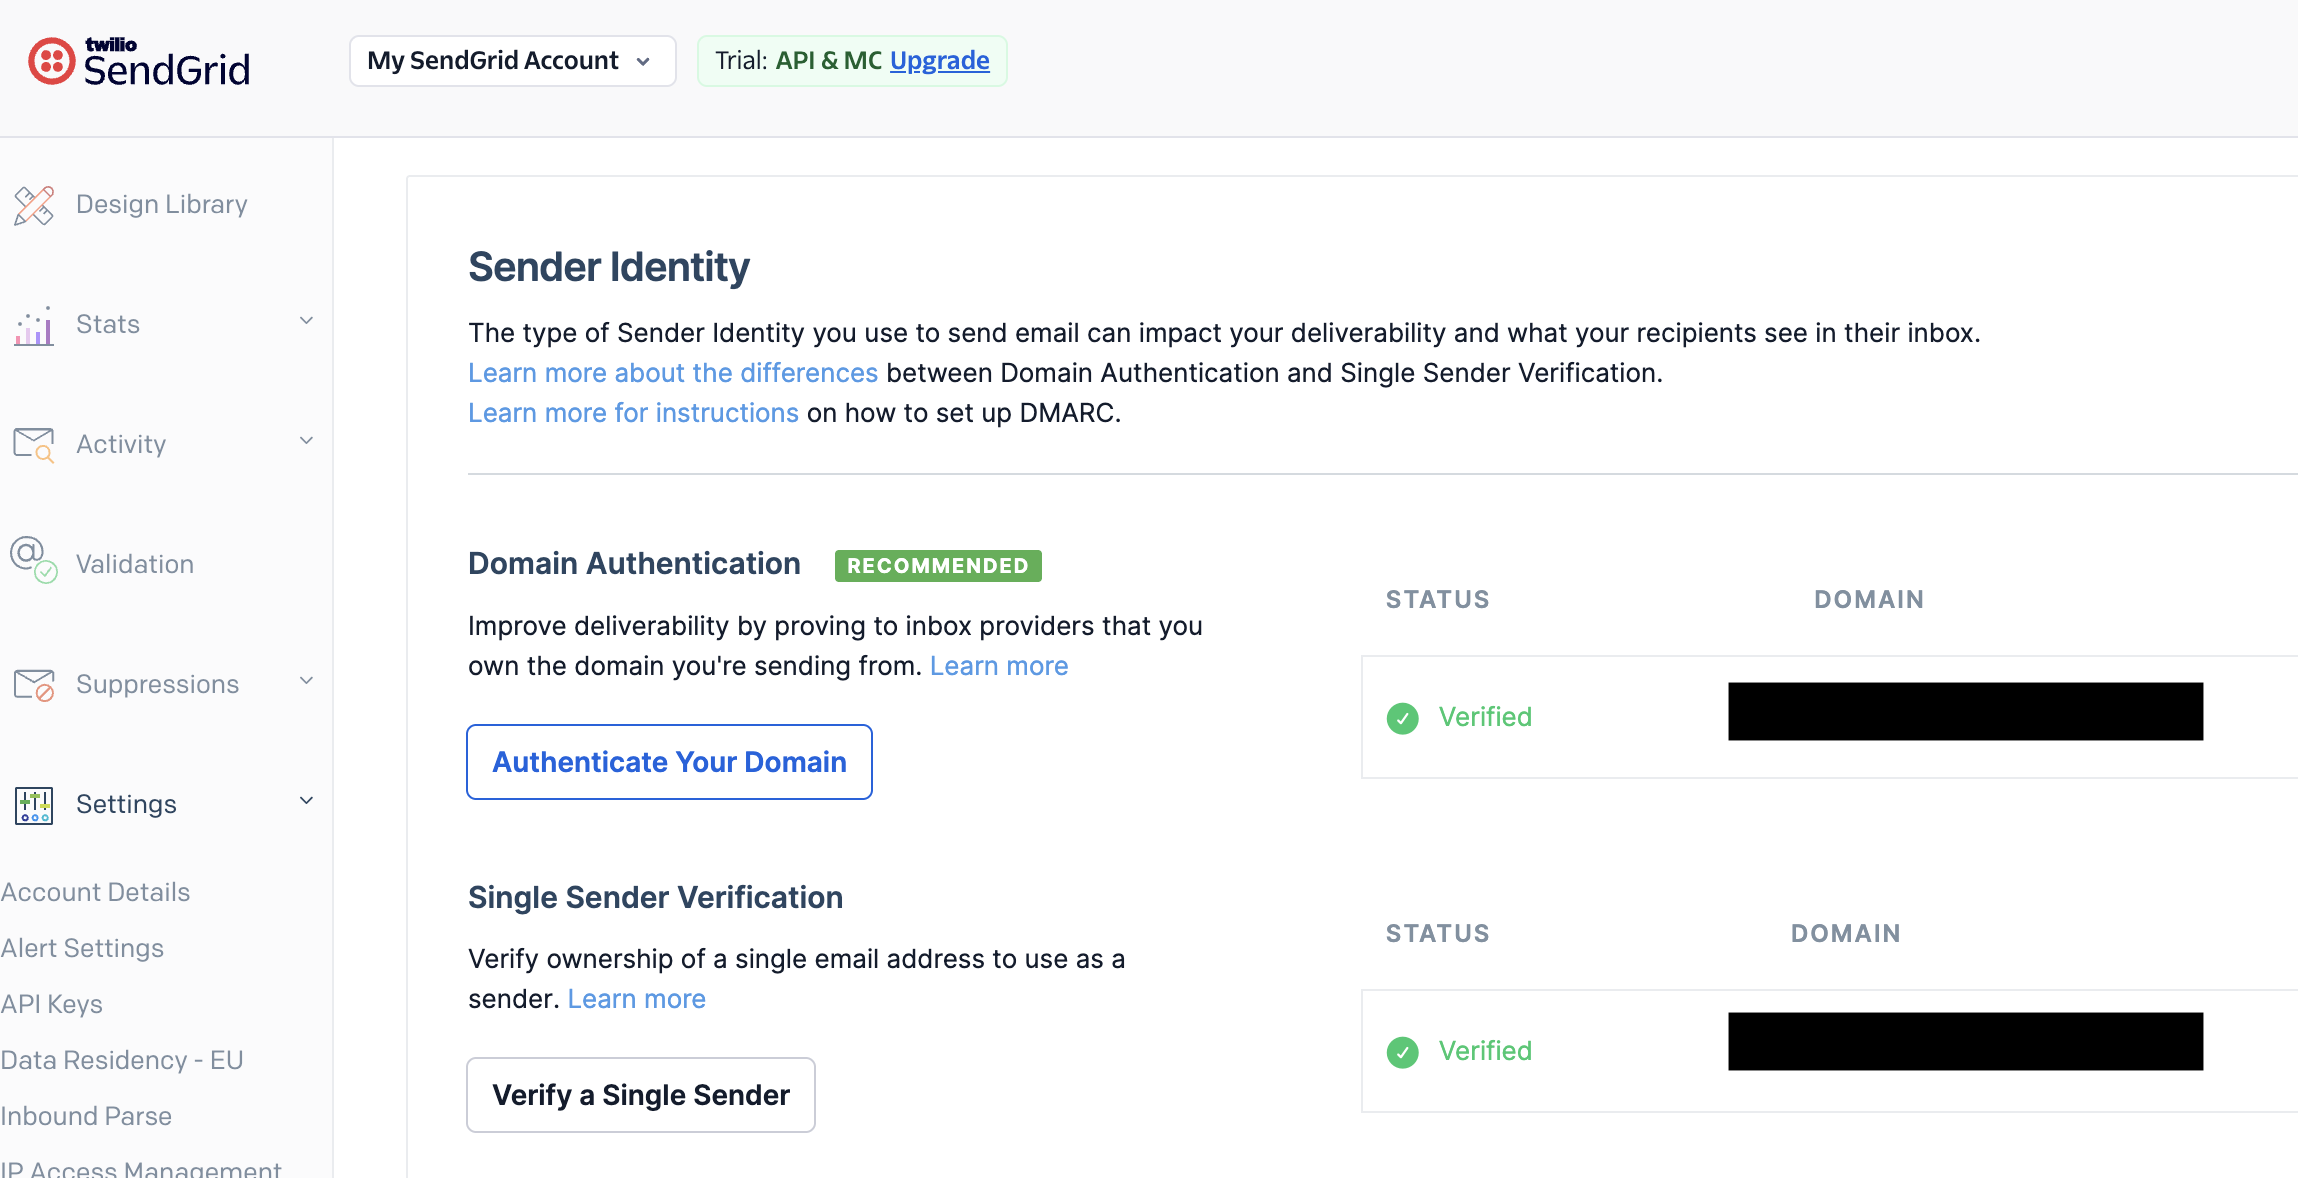
To begin, navigate to:
Settings → Sender Authentication → Domain Authentication
Or go directly here:
Authenticate Your Domain
Click “Authenticate Your Domain” and follow the guided setup:
- Select your DNS provider (or choose “Other Host” if not listed)
- Enter your domain (e.g.,
yourcompany.com) - Choose whether to use a branded subdomain (recommended, e.g.,
mail.yourcompany.com) - Generate DNS records
SendGrid will provide a set of CNAME records that you must add to your DNS provider (Cloudflare, GoDaddy, Route53, etc.). Once added, return to SendGrid and click Verify.
Why Domain Authentication Matters
Without domain authentication:
- Emails are often flagged as spam
- Your messages may show “via sendgrid.net” instead of your domain
- SPF/DKIM alignment may fail, reducing trust
- Deliverability becomes inconsistent across providers (especially Google and Microsoft)
With domain authentication:
- Emails are cryptographically signed (DKIM)
- Your domain reputation improves over time
- Messages land in the inbox instead of spam
- Your branding remains consistent and professional
In short, this step moves you from “sending email” to operating a trusted email system.
Step 6.1: Set Up Link Branding

After domain authentication, configure Link Branding. This rewrites all tracking links in your emails to use your domain instead of sendgrid.net.
To configure:
- Navigate to Settings → Sender Authentication → Link Branding
- Click “Brand Your Links”
- Choose a subdomain (e.g.,
links.yourcompany.com) - Add the provided DNS records (typically CNAME)
- Verify the configuration
Why Link Branding Is Critical
If you skip this step:
- Links in your emails will point to
sendgrid.net - Users may see unfamiliar domains and lose trust
- Security tools (like Microsoft Defender or Proofpoint) may flag links as suspicious
- Click-through rates can drop significantly
With link branding:
- All URLs appear to come from your domain
- Users are more likely to trust and click links
- Security systems are less likely to block or rewrite your messages
- Your emails maintain a consistent, professional identity
Step 7: Set Up a Dynamic Email Template
With your email infrastructure fully configured, the next step is to create a dynamic email template in SendGrid. This is where your messaging lives—and more importantly, where you inject real-time data from JAMF into each email.
Navigate to:
Email API → Dynamic Templates
Or go directly here:
https://app.sendgrid.com/email_templates
Click “Create a Dynamic Template”, give it a name like Weekly Restart Notification, and then click “Add Version.” This is where you define both the subject and the HTML content of the email.
Add a Dynamic Subject Line
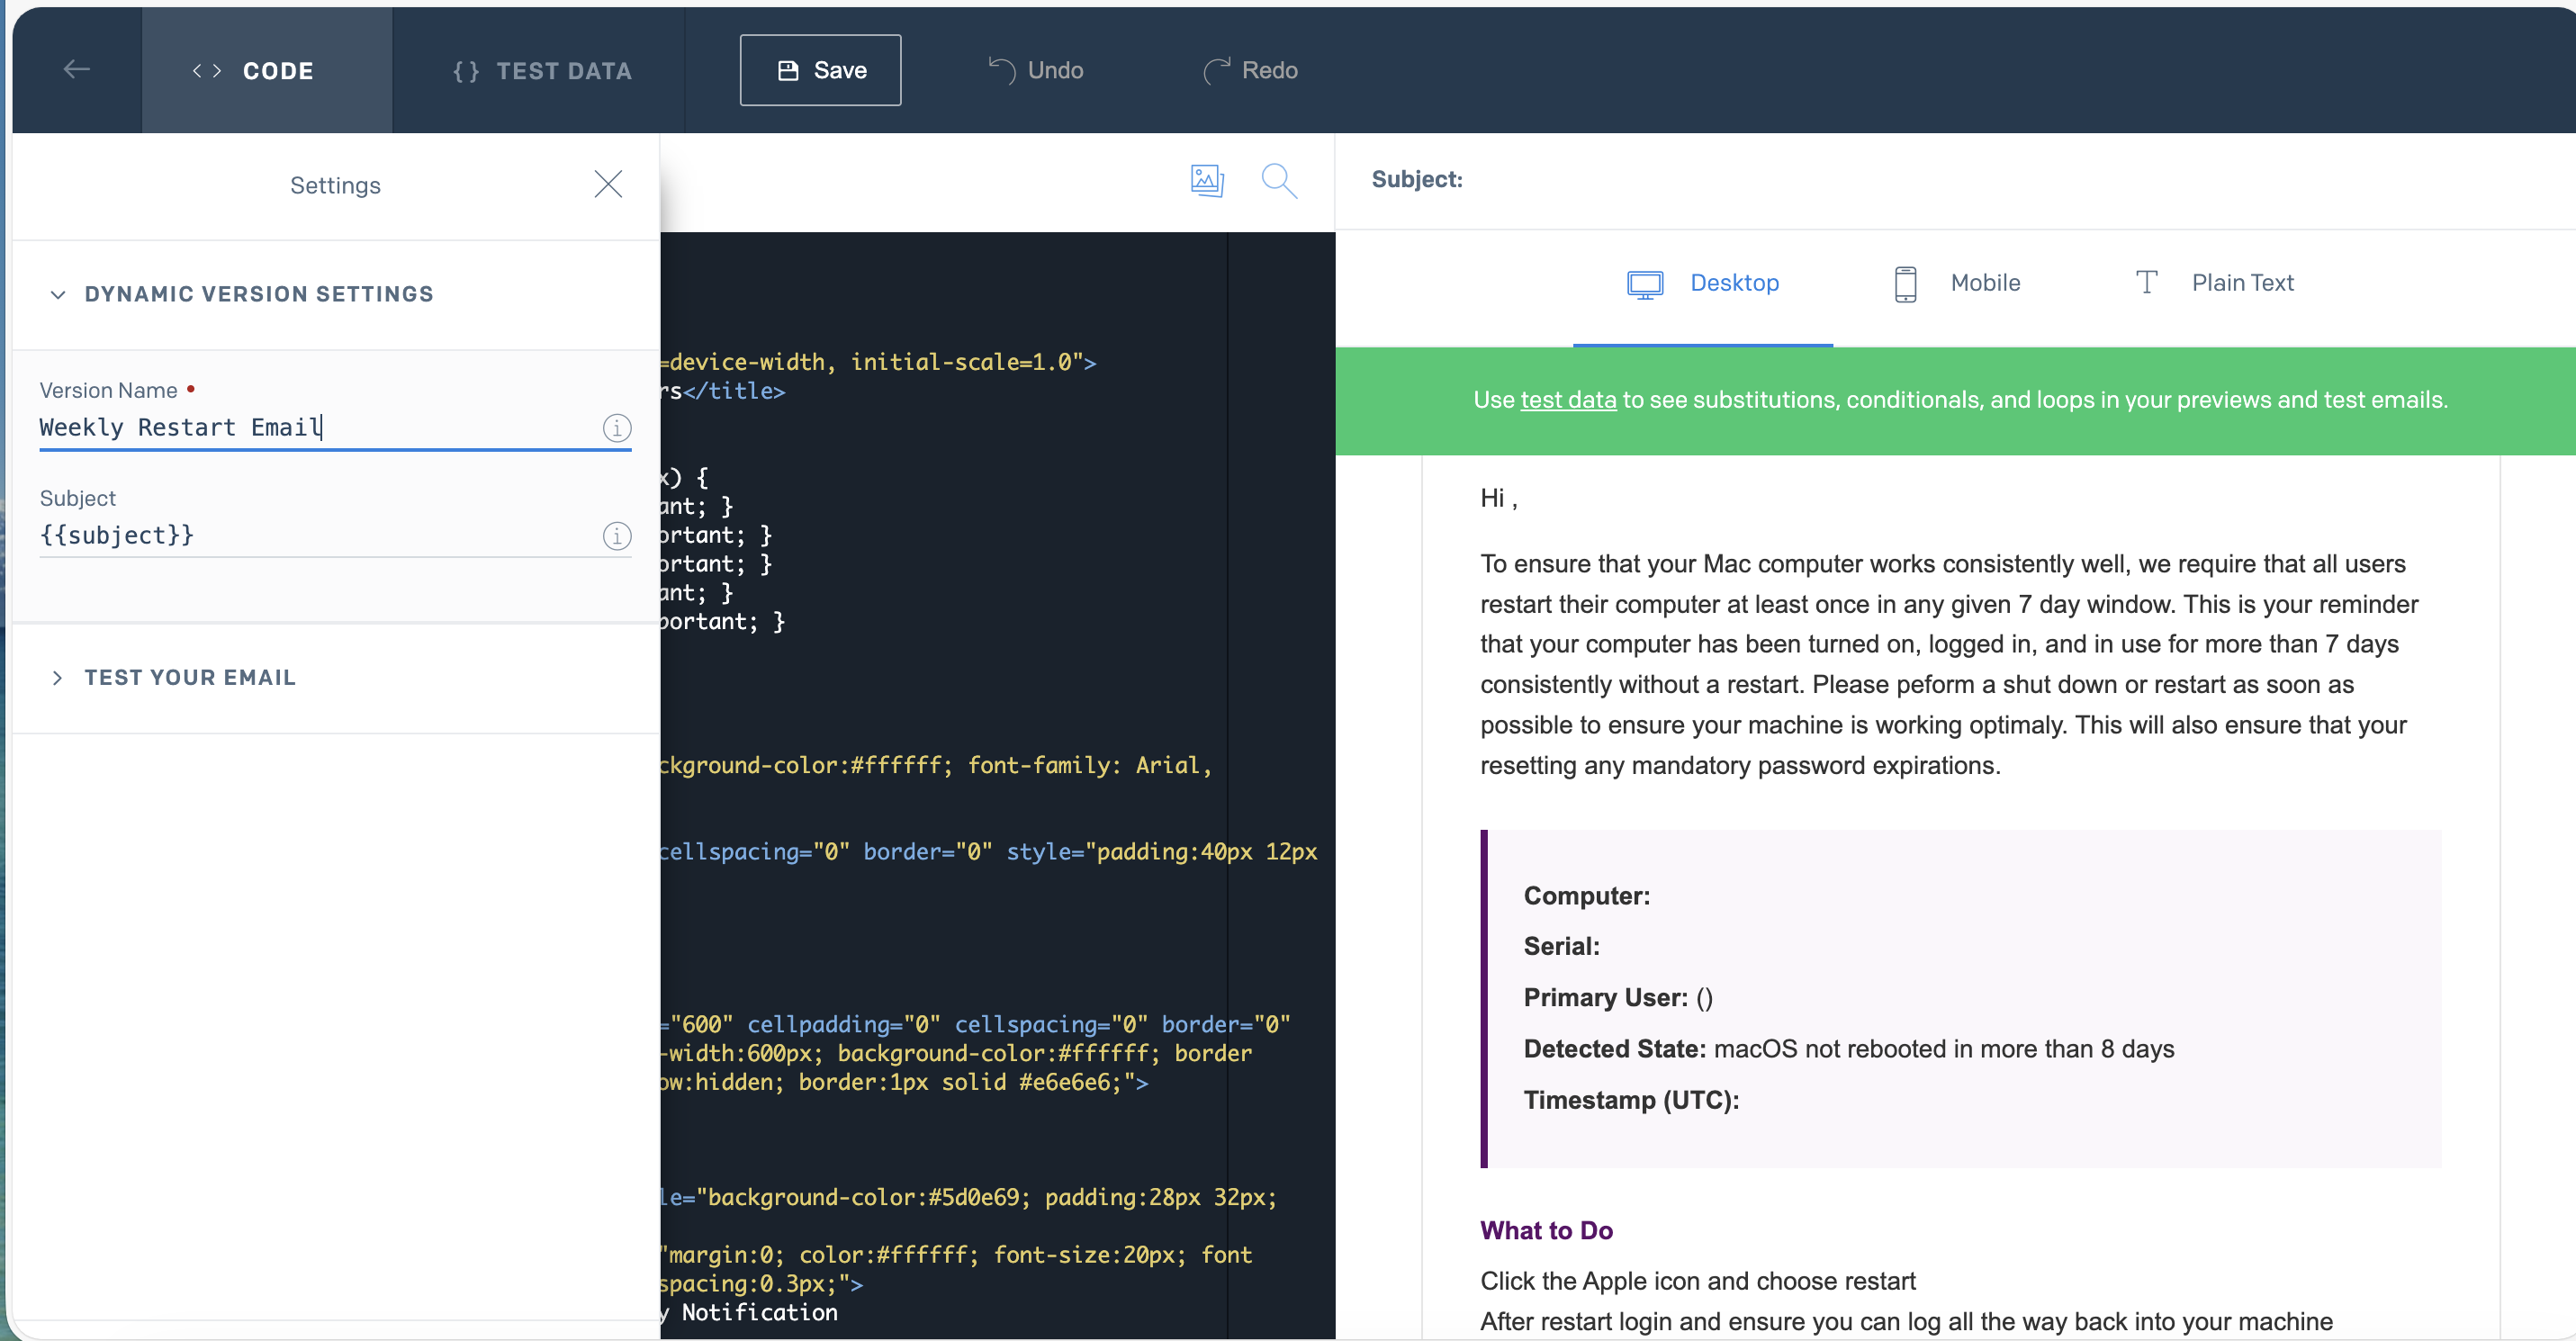
When configuring your template version, set the subject to a variable placeholder:
{{subject}}
This allows your script to dynamically control the subject line at send time. Instead of hardcoding messaging in SendGrid, you keep control in your automation layer—making the system far more flexible and reusable across multiple workflows.
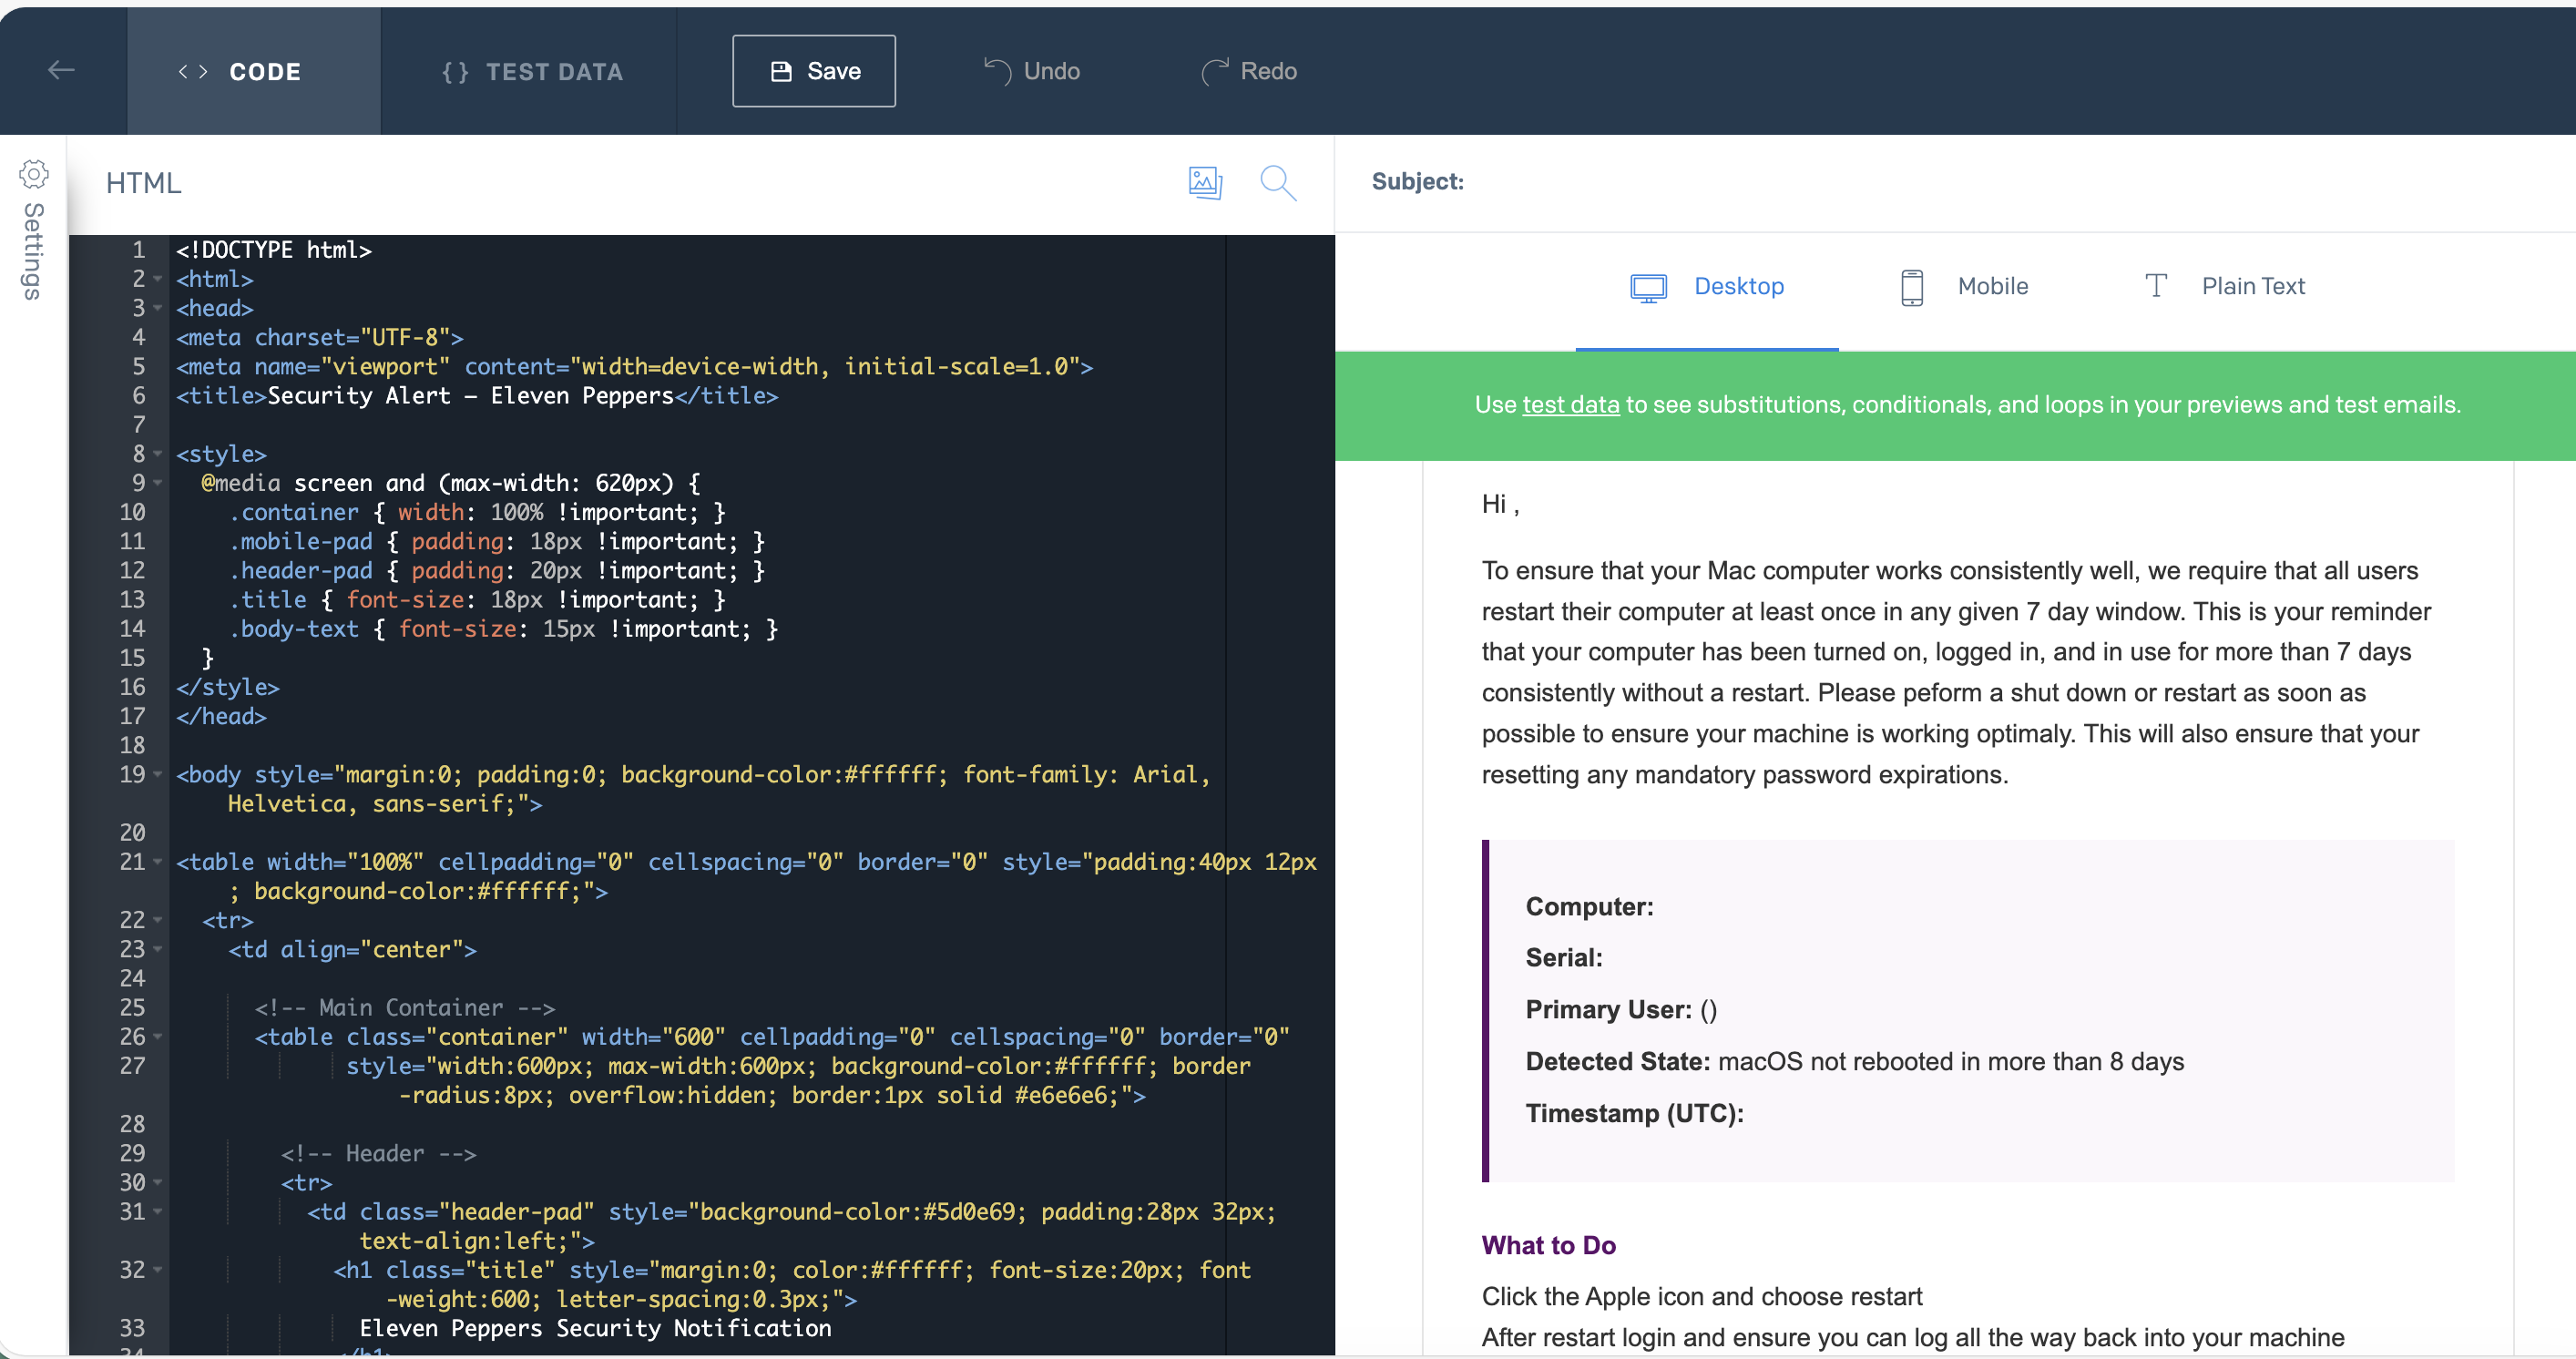
Build the Email Body with Dynamic Variables
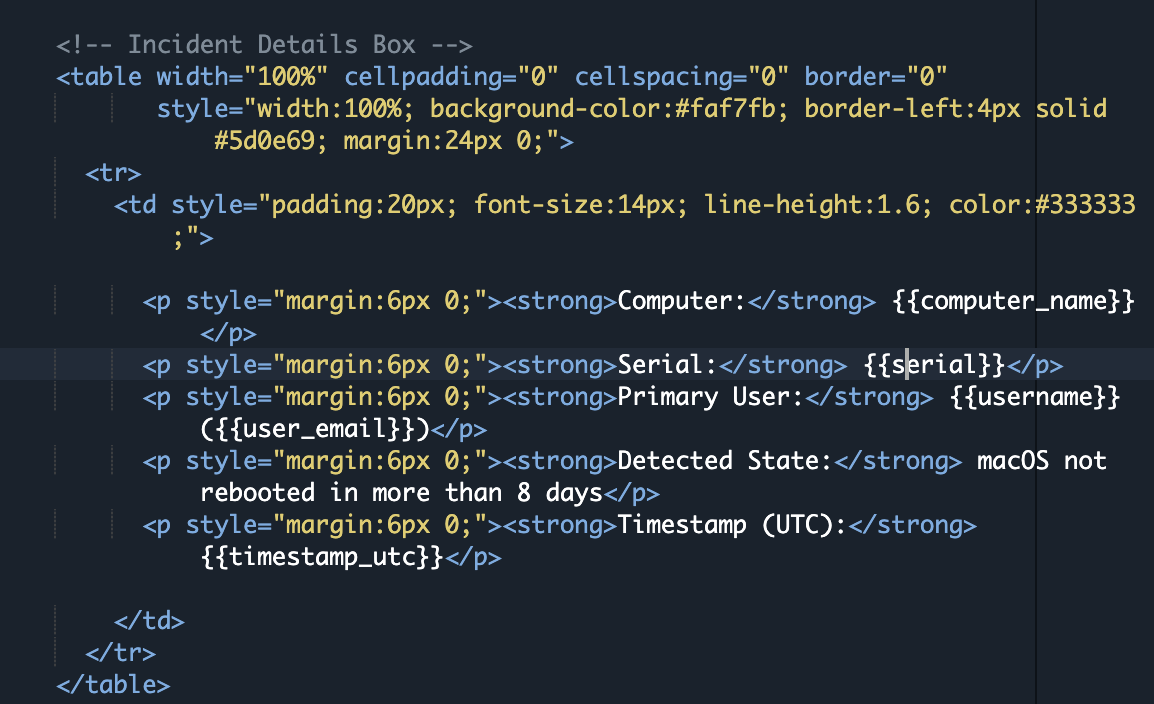
Inside the HTML editor, you’ll use placeholder variables that SendGrid replaces at send time. These are typically structured using Handlebars-style syntax and allow you to inject real data from JAMF into each email.
For example, your template might include placeholders for:
- Computer Name
- Serial Number
- Primary User
- User Email
- Timestamp
<!DOCTYPE html>
<html>
<head>
<meta charset="UTF-8">
<meta name="viewport" content="width=device-width, initial-scale=1.0">
<title>Security Notification</title>
<style>
@media screen and (max-width: 620px) {
.container { width: 100% !important; }
.mobile-pad { padding: 18px !important; }
.header-pad { padding: 20px !important; }
.title { font-size: 18px !important; }
.body-text { font-size: 15px !important; }
}
</style>
</head>
<body style="margin:0; padding:0; background-color:#ffffff; font-family: Arial, Helvetica, sans-serif;">
<table width="100%" cellpadding="0" cellspacing="0" border="0" style="padding:40px 12px; background-color:#ffffff;">
<tr>
<td align="center">
<!-- Main Container -->
<table class="container" width="600" cellpadding="0" cellspacing="0" border="0"
style="width:600px; max-width:600px; background-color:#ffffff; border-radius:8px; overflow:hidden; border:1px solid #e6e6e6;">
<!-- Header -->
<tr>
<td class="header-pad" style="background-color:#333333; padding:28px 32px; text-align:left;">
<h1 class="title" style="margin:0; color:#ffffff; font-size:20px; font-weight:600; letter-spacing:0.3px;">
Security Notification
</h1>
</td>
</tr>
<!-- Alert Banner -->
<tr>
<td style="background-color:#eeeeee; padding:12px 32px; font-size:13px; color:#333333; font-weight:600;">
Action Required: Restart your computer
</td>
</tr>
<!-- Body Content -->
<tr>
<td class="mobile-pad body-text" style="padding:32px; color:#333333; font-size:14px; line-height:1.6;">
<p style="margin-top:0;">Hi ,</p>
<p>
To ensure your computer operates reliably, users are required to restart their system at least once within a defined time period. This notification indicates that your device has been active for an extended duration without a restart. Please perform a restart as soon as possible to maintain system performance and apply any required updates or security changes.
</p>
<!-- Details Box -->
<table width="100%" cellpadding="0" cellspacing="0" border="0"
style="width:100%; background-color:#f7f7f7; border-left:4px solid #333333; margin:24px 0;">
<tr>
<td style="padding:20px; font-size:14px; line-height:1.6; color:#333333;">
<p style="margin:6px 0;"><strong>Computer:</strong> </p>
<p style="margin:6px 0;"><strong>Serial:</strong> </p>
<p style="margin:6px 0;"><strong>Primary User:</strong> ()</p>
<p style="margin:6px 0;"><strong>Detected State:</strong> System has not restarted within the required timeframe</p>
<p style="margin:6px 0;"><strong>Timestamp (UTC):</strong> </p>
</td>
</tr>
</table>
<!-- Call To Action -->
<p style="margin-bottom:6px; font-weight:600; color:#333333;">What to Do</p>
<p style="margin-top:0;">
Click the system menu and choose restart.<br>
After restarting, log back in and ensure your system is functioning normally.<br>
If you need assistance, contact your IT support team.
</p>
</td>
</tr>
<!-- Footer -->
<tr>
<td class="mobile-pad" style="background-color:#333333; padding:22px 32px; font-size:12px; line-height:1.6; color:#cccccc;">
<p style="margin:0 0 8px 0; color:#ffffff; font-weight:600;">
— IT Operations
</p>
<p style="margin:0;">
This is an automated notification generated by a device management system.
If you believe this message was sent in error, please contact your IT department.
</p>
<div data-role="module-unsubscribe" class="module" role="module" data-type="unsubscribe"
style="color:#cccccc; font-size:12px; line-height:20px; padding:16px 0 0 0; text-align:center;">
</div>
</td>
</tr>
</table>
<!-- End Container -->
</td>
</tr>
</table>
</body>
</html>Important: Computers in JAMF must be associated with a user with a valid first, last name and email for the placeholders in the template to work.
The key concept is that your email is no longer static. Each message is dynamically generated with context pulled directly from JAMF, which makes your notifications significantly more actionable and relevant to the end user.
Retrieve Your Template ID
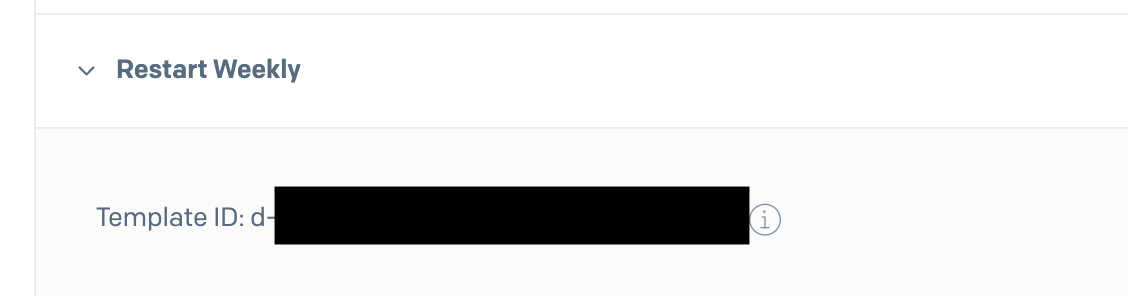
Once your template is created, SendGrid assigns it a Template ID (e.g., d-167dc4ee2cdf44d1bbe4015a9ba6042f).
To retrieve it:
- Open your dynamic template
- Locate the Template ID displayed in the UI
- Copy and store it securely
You will need this ID in your script to tell SendGrid which template to use when sending emails.
Why Dynamic Templates Matter
Dynamic templates allow you to separate presentation from logic:
- JAMF determines who gets notified
- Your script determines what data is sent
- SendGrid determines how the message is rendered and delivered
This separation gives you flexibility to update messaging, branding, or formatting without modifying your automation code. It also allows you to reuse the same template structure across multiple JAMF-driven workflows.
Step 8: The Script and How to Run It
At this point, you’ve built the full pipeline:
- JAMF defines who should be notified
- SendGrid defines how the message looks
- Now the script ties everything together and actually sends the emails
This script is responsible for:
- Querying JAMF for devices in your Smart Group
- Extracting user and device data
- Formatting that data for SendGrid
- Sending emails using your dynamic template
Export Required Environment Variables
Before running the script, you need to define a set of environment variables. These provide authentication, configuration, and runtime behavior for both JAMF and SendGrid.
Rather than hardcoding credentials directly into your script (which is a security risk), you export them into your shell environment or store them in a separate file.
Your environment file will include variables for:
- JAMF URL and API credentials
- SendGrid API key and Template ID
- Sender email address
- Email subject
- Smart Group ID
- Optional controls like cooldown timing
export JAMF_URL="https://your-jamf-instance.jamfcloud.com"
export JAMF_USER="api_user"
export JAMF_PASS="your-secure-password"

export SENDGRID_API_KEY="SG.your_sendgrid_api_key_here"
export SENDGRID_TEMPLATE_ID="d-your-template-id"
export SENDGRID_FROM_EMAIL="noreply@yourdomain.com"

export EMAIL_SUBJECT="Your computer has not restarted within the required timeframe"
export SUPPORT_CC_EMAIL="support@yourdomain.com"
export EMAIL_DOMAIN="yourdomain.com"

export SMART_GROUP_ID="123"
export NOTIFY_COOLDOWN_DAYS="0"
You can load these variables in one of two ways:
- Export them directly in your terminal session (Shown Above)
- Store them in a file (e.g.,
/etc/your_env_file) and source it before execution
This approach keeps your script clean and allows you to reuse the same logic across environments without modifying code.
How the Script Works
#!/usr/bin/env python3
import os
import json
import time
import sys
import requests
from datetime import datetime, timezone
from typing import Any, Dict, List, Optional
# ----------------------------
# Required environment vars (NO FALLBACKS)
# ----------------------------
JAMF_URL = os.environ["JAMF_URL"].rstrip("/")
JAMF_USER = os.environ["JAMF_USER"]
JAMF_PASS = os.environ["JAMF_PASS"]
SENDGRID_API_KEY = os.environ["SENDGRID_API_KEY"]
SENDGRID_TEMPLATE_ID = os.environ["SENDGRID_TEMPLATE_ID"]
SENDGRID_FROM_EMAIL = os.environ["SENDGRID_FROM_EMAIL"]
EMAIL_SUBJECT = os.environ["EMAIL_SUBJECT"]
EMAIL_DOMAIN = os.environ["EMAIL_DOMAIN"]
# Optional env vars
SMART_GROUP_ID = int(os.environ.get("SMART_GROUP_ID", "256"))
NOTIFY_COOLDOWN_DAYS = int(os.environ.get("NOTIFY_COOLDOWN_DAYS", "7"))
STATE_FILE = os.environ.get("STATE_FILE", "/var/tmp/jamf_sg256_notify_state.json")
SUPPORT_CC_EMAIL = os.environ.get("SUPPORT_CC_EMAIL")
TIMEOUT = 30
DRY_RUN = (
"--dry-run" in sys.argv
or os.environ.get("DRY_RUN", "").lower() in ["1", "true", "yes"]
)
# ----------------------------
# Helpers
# ----------------------------
def utc_now_iso() -> str:
return datetime.now(timezone.utc).strftime("%Y-%m-%dT%H:%M:%SZ")
def days_since(ts_iso: str) -> float:
try:
then = datetime.fromisoformat(ts_iso.replace("Z", "+00:00"))
return (datetime.now(timezone.utc) - then).total_seconds() / 86400.0
except Exception:
return 999999.0
def load_state() -> Dict[str, Any]:
try:
with open(STATE_FILE, "r") as f:
return json.load(f)
except FileNotFoundError:
return {}
except Exception as e:
print(f"⚠️ Could not read state file {STATE_FILE}: {e}")
return {}
def save_state(state: Dict[str, Any]) -> None:
if DRY_RUN:
return
try:
tmp = STATE_FILE + ".tmp"
with open(tmp, "w") as f:
json.dump(state, f, indent=2)
os.replace(tmp, STATE_FILE)
except Exception as e:
print(f"❌ Failed to write state file {STATE_FILE}: {e}")
# ----------------------------
# Jamf auth (Bearer token via /api/v1/auth/token), then Classic API calls
# ----------------------------
def jamf_get_bearer_token() -> str:
"""
Jamf Pro bearer token via basic auth:
POST /api/v1/auth/token (basic auth JAMF_USER/JAMF_PASS)
Returns JSON: { "token": "...", "expires": "..." }
"""
url = f"{JAMF_URL}/api/v1/auth/token"
r = requests.post(url, auth=(JAMF_USER, JAMF_PASS), timeout=TIMEOUT)
r.raise_for_status()
body = r.json()
token = body.get("token")
if not token:
raise RuntimeError(f"Jamf token response missing 'token': {body}")
return token
def jamf_invalidate_token(token: str) -> None:
# Best-effort cleanup
try:
url = f"{JAMF_URL}/api/v1/auth/invalidate-token"
headers = {"Authorization": f"Bearer {token}"}
requests.post(url, headers=headers, timeout=TIMEOUT)
except Exception:
pass
def jamf_classic_get_json(path: str, token: str) -> Dict[str, Any]:
"""
Classic API GET using Bearer token:
GET /JSSResource/...
"""
url = f"{JAMF_URL}{path}"
headers = {"Accept": "application/json", "Authorization": f"Bearer {token}"}
r = requests.get(url, headers=headers, timeout=TIMEOUT)
if not r.ok:
body = r.text[:1000]
# Jamf classic sometimes returns HTML on 401/403
if "<html" in body.lower():
raise requests.HTTPError(f"GET {path} -> {r.status_code}: HTML error page returned", response=r)
try:
details = json.dumps(r.json())
except Exception:
details = body
raise requests.HTTPError(f"GET {path} -> {r.status_code}: {details}", response=r)
return r.json()
def get_smart_group_members(token: str) -> List[int]:
data = jamf_classic_get_json(f"/JSSResource/computergroups/id/{SMART_GROUP_ID}", token)
comps = data.get("computer_group", {}).get("computers", [])
ids: List[int] = []
for c in comps:
if "id" in c:
try:
ids.append(int(c["id"]))
except Exception:
continue
return ids
def get_computer_record(token: str, computer_id: int) -> Dict[str, Any]:
# Classic computer record
return jamf_classic_get_json(f"/JSSResource/computers/id/{computer_id}", token)
def normalize_fields_from_classic(record: Dict[str, Any]) -> Dict[str, str]:
comp = record.get("computer", {}) or {}
general = comp.get("general", {}) or {}
location = comp.get("location", {}) or {}
hardware = comp.get("hardware", {}) or {}
computer_name = general.get("name") or ""
serial = general.get("serial_number") or hardware.get("serial_number") or ""
username = (
location.get("username")
or location.get("user_name")
or location.get("ldap_username")
or ""
)
email = (
location.get("email_address")
or location.get("email")
or ""
)
real_name = location.get("real_name") or location.get("realname") or ""
# Clean username (DOMAIN\user or user@domain)
if username:
username = username.strip()
if "\\" in username:
username = username.split("\\")[-1]
if "@" in username:
username = username.split("@")[0]
# Derive email from exported domain (NO HARDCODE)
if (not email) and username:
email = f"{username}@{EMAIL_DOMAIN}"
# Derive first name
first_name = ""
if real_name:
first_name = real_name.strip().split()[0]
elif email and "@" in email:
first_name = email.split("@")[0].split(".")[0].title()
elif username:
first_name = username.split(".")[0].title()
return {
"first_name": first_name or "there",
"computer_name": computer_name or "(unknown)",
"serial": serial or "(unknown)",
"username": username or "(unknown)",
"user_email": email or "",
}
# ----------------------------
# SendGrid
# ----------------------------
def build_sendgrid_payload(to_email: str, dynamic_data: Dict[str, Any]) -> Dict[str, Any]:
personalization: Dict[str, Any] = {
"to": [{"email": to_email}],
"subject": EMAIL_SUBJECT,
"dynamic_template_data": {
**dynamic_data,
"subject": EMAIL_SUBJECT, # supports {{subject}} in template subject
},
}
if SUPPORT_CC_EMAIL:
personalization["cc"] = [{"email": SUPPORT_CC_EMAIL}]
return {
"from": {"email": SENDGRID_FROM_EMAIL},
"personalizations": [personalization],
"template_id": SENDGRID_TEMPLATE_ID,
}
def send_sendgrid_email(to_email: str, dynamic_data: Dict[str, Any]) -> None:
payload = build_sendgrid_payload(to_email, dynamic_data)
if DRY_RUN:
print("\n================ DRY RUN ================")
print(f"Would send to: {to_email}")
print(json.dumps(payload, indent=2))
print("=========================================\n")
return
url = "https://api.sendgrid.com/v3/mail/send"
headers = {
"Authorization": f"Bearer {SENDGRID_API_KEY}",
"Content-Type": "application/json",
}
r = requests.post(url, headers=headers, json=payload, timeout=TIMEOUT)
if not r.ok:
try:
details = json.dumps(r.json())
except Exception:
details = r.text[:1000]
raise requests.HTTPError(f"SendGrid POST -> {r.status_code}: {details}", response=r)
# ----------------------------
# Main
# ----------------------------
def main() -> None:
if DRY_RUN:
print("***** RUNNING IN DRY-RUN MODE (NO EMAILS WILL BE SENT, NO STATE WRITTEN; COOLDOWN IGNORED) *****\n")
state = load_state()
token = jamf_get_bearer_token()
try:
computer_ids = get_smart_group_members(token)
print(f"[{utc_now_iso()}] Smart Group {SMART_GROUP_ID} members: {len(computer_ids)}")
for cid in computer_ids:
record = get_computer_record(token, cid)
fields = normalize_fields_from_classic(record)
if not fields["user_email"]:
print(
f" - CID {cid}: missing user_email, skipping "
f"(computer={fields['computer_name']}, serial={fields['serial']}, username={fields['username']})"
)
continue
key = fields["serial"] if fields["serial"] and fields["serial"] != "(unknown)" else f"cid:{cid}"
last_sent = state.get(key, {}).get("last_sent_utc")
# Cooldown only for real sends; dry-run ignores cooldown
if (not DRY_RUN) and last_sent and days_since(last_sent) < NOTIFY_COOLDOWN_DAYS:
print(f" - {fields['computer_name']} ({key}): last sent {last_sent}, still in cooldown")
continue
if DRY_RUN and last_sent and days_since(last_sent) < NOTIFY_COOLDOWN_DAYS:
print(f" - {fields['computer_name']} ({key}): last sent {last_sent}, still in cooldown (IGNORED IN DRY RUN)")
dynamic = {
**fields,
"timestamp_utc": utc_now_iso(),
}
try:
send_sendgrid_email(fields["user_email"], dynamic)
if DRY_RUN:
print(f" 🧪 DRY RUN: would mark notified for {fields['computer_name']} ({key})")
else:
print(f" ✅ emailed {fields['user_email']} for {fields['computer_name']} ({key})")
state[key] = {
"last_sent_utc": utc_now_iso(),
"email": fields["user_email"],
"computer": fields["computer_name"],
}
save_state(state)
time.sleep(0.2)
except Exception as e:
print(f" ❌ failed for {fields['user_email']} / {fields['computer_name']} ({key}): {e}")
print("Done.")
finally:
jamf_invalidate_token(token)
if __name__ == "__main__":
main()At a high level, the script performs the following steps:
-
Authenticate to JAMF Pro
Uses API credentials to request data from your instance -
Query Smart Group Membership
Pulls all devices that match your Smart Group criteria - Collect Device and User Data
For each device:- Computer name
- Serial number
- Username
- Email address
- Timestamp data
-
Construct SendGrid Payload
Maps JAMF data to your dynamic template variables - Send Email via SendGrid API
Uses your API key and Template ID to deliver the message
This design keeps everything modular—JAMF controls targeting, SendGrid controls presentation, and the script handles orchestration.
Running the Script Manually
To test the workflow, run the script directly:
python3 jamf_sg256_sendgrid_notify.pyFor safe testing, you can use a dry-run mode (if implemented), which will:
- Print output instead of sending emails
- Allow you to validate data mapping
- Confirm Smart Group targeting
python3 jamf_sg256_sendgrid_notify.py --dry-runThis is strongly recommended before enabling automation.
Automating with Cron
Once validated, you can schedule the script to run automatically using cron.
A typical setup might run the script once per day at a specific time:
0 9 * * * /usr/bin/env bash -lc 'source /etc/jamf_sg256_env && /usr/bin/python3 /path/jamf_sg256_sendgrid_notify.py >> /var/log/jamf_sg256_notify.log 2>&1'This ensures:
- Users are notified consistently
- New devices entering the Smart Group are picked up automatically
- The system operates without manual intervention
You can also redirect output to a log file for visibility and troubleshooting.
Security Considerations
This workflow involves sensitive credentials, so follow these best practices:
- Never store API keys directly in scripts
- Restrict access to your environment file
- Rotate API keys periodically
- Use least-privilege permissions (as configured earlier)
Final Thoughts
What we’ve built here is more than just a weekly restart reminder—it’s a reusable automation pattern that turns JAMF Pro into a proactive communication engine. By combining Smart Groups, SendGrid, and a lightweight script, you now have a system that can detect state, target users, and deliver meaningful, contextual notifications without manual effort.
The real power of this approach is its flexibility. Today it’s restart compliance, but tomorrow it could be anything—FileVault enforcement, OS upgrade campaigns, security alerts, or device lifecycle notifications. Once this pipeline is in place, you’re no longer limited by JAMF’s native notification capabilities. You’re defining your own.
As environments scale, communication becomes just as important as configuration. This workflow bridges that gap—giving you a clean, scalable way to reach users with the right message at the right time, backed by real device data.
Resources
- Start for Free – SendGrid Signup
- SendGrid Account Creation Guide
- SendGrid Sender Identity Setup
- SendGrid Domain Authentication
- SendGrid Dynamic Templates
Ready to take your Apple IT skills and consulting career to the next level?
I’m opening up free mentorship slots to help you navigate certifications, real-world challenges, and starting your own independent consulting business.
Let’s connect and grow together — Sign up here
AI Usage Transparency Report
AI Era · Written during widespread use of AI tools
AI Signal Composition
Score: 0.51 · High AI Influence
Summary
Integrate JAMF Pro with SendGrid to automate targeted email notifications based on Smart Group membership.
Related Posts

The Day I Unmanaged a Mac Into a Corner
There are a few kinds of mistakes you make as a Mac admin. There are the ones that cost you time, the ones that cost you sleep, and then there are the ones that leave you staring at a perfectly good laptop thinking, “How did I possibly make this *less* manageable by touching it?” These mistakes often stem from a lack of understanding or experience with macOS, but they can also be the result of rushing through tasks or not taking the time to properly plan and test.

Updating Safari on macOS with Jamf Pro: Three Practical Strategies
Keeping Safari updated is one of the simplest ways to harden a macOS fleet. Apple ships security fixes for Safari frequently, and those patches often land before a full macOS point release. This means that by keeping Safari up-to-date, you can ensure your users have access to the latest security protections without having to wait for a major operating system update. If Safari is lagging behind, your users are browsing the web with a larger attack surface than necessary.

Hunting Down Jamf Profile Payloads with Python
If you've spent enough time living inside Jamf Pro, you eventually run into the same problem: someone set a configuration somewhere, sometime, and nobody remembers where. It might be something obscure – a certificate payload, a conditional SSO predicate, or that one security preference quietly misbehaving on three machines in accounting. And when you have dozens of configuration profiles, each with multiple payloads, nested keys, and XML-wrapped values, finding that setting can feel like forensic archaeology.

Keeping Jamf Security Cloud Current for Microsoft 365: Updated Routing Policies
When I first wrote about troubleshooting Standard Routing Policies in Jamf Security Cloud, the goal was simple: help admins keep Microsoft Teams and Microsoft 365 traffic flowing smoothly through Jamf Trust + App-Based VPN. This straightforward objective remains unchanged, as the complexities of network configurations can often lead to frustrating issues that hinder productivity.

Cleaning House in Jamf Pro: A Friendly Auditor Script for Real-World Hygiene
There’s a tipping point in every Jamf Pro environment where the policy list begins to feel like a junk drawer. Everyone means well. Nobody deletes anything. And then, months later, you’re trying to answer simple questions like: *Which policies are actually scoped? What’s no longer referenced? Why are there five versions of the same script?* This post covers a small, practical script I wrote to help you **see** what’s stale, **explain** why it’s stale, and (optionally) **park** it safely out of the way—without deleting a thing.

Turn Jamf Compliance Output into Real Audit Evidence
Most teams use Apple’s macOS Security Compliance Project (mSCP) baselines because they scale and they’re repeatable. Jamf’s tooling makes deployment straightforward and the Extension Attribute (EA) output is a convenient place to capture drift. What you don’t automatically get is the artifact an auditor will accept on a specific date—an actual document you can file that shows which endpoints are failing which items, plus a concise roll-up of failure counts you can act on. Smart Groups answer scope; they don’t produce evidence.

The Power of Scripting App Updates Without Deploying Packages
Keeping macOS environments up-to-date in a seamless, efficient, and low-maintenance way has always been a challenge for IT admins. Traditional package deployment workflows can be time-consuming, prone to versioning issues, and require extensive testing and repackaging. This can lead to frustration and wasted resources as IT teams struggle to keep pace with the latest updates and patches. But there's another way—a more elegant, nimble approach: scripting.

Detecting Invalid Characters and Long Paths in OneDrive on macOS
Microsoft OneDrive is widely used for syncing documents across devices, but on macOS, it can silently fail to sync certain files if they violate Windows filesystem rules — like overly long paths or invalid characters. This creates frustrating experiences for end users who don’t know why files aren’t syncing.

Using a script to Enable FileVault via JAMF: A Word of Caution
Enabling FileVault is a critical step in securing macOS devices, particularly in managed environments like schools, enterprises, and remote teams. For administrators using **Jamf Pro**, automating this process can simplify device onboarding and ensure compliance with disk encryption policies. This automation also helps reduce the administrative burden associated with manually configuring each device, allowing IT staff to focus on other tasks while maintaining a secure environment.
Automating Script Versioning, Releases, and ChatGPT Integration with GitHub Actions
Managing and maintaining a growing collection of scripts in a GitHub repository can quickly become cumbersome without automation. Whether you're writing bash scripts for JAMF deployments, maintenance tasks, or DevOps workflows, it's critical to keep things well-documented, consistently versioned, and easy to track over time. This includes ensuring that changes are properly recorded, dependencies are up-to-date, and the overall structure remains organized.
