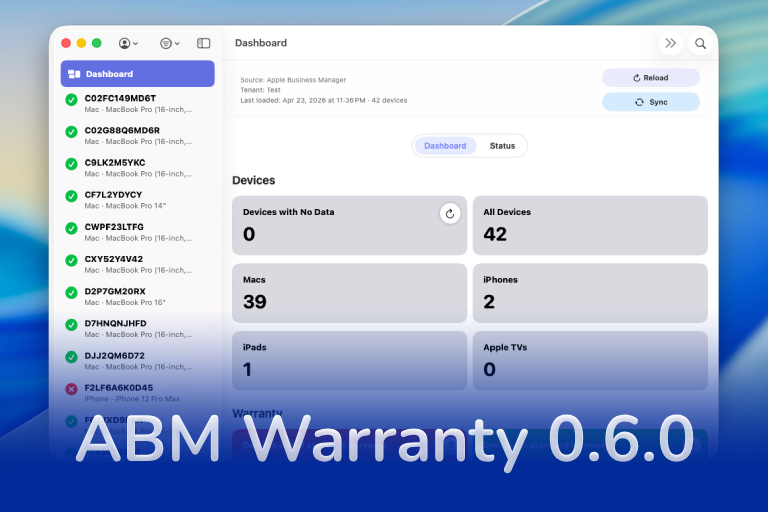

ABM Warranty 0.6.0 is now available, and the headline feature is tenant-aware scheduling. You can schedule Apple Business or Apple School Manager imports, follow them with outbound connection syncs, and choose whether ABM Warranty or your MDM owns execution.
The useful part is not simply that a sync can start at a particular time. Scheduling in 0.6.0 understands tenants, inbound and outbound job types, mapped connections, execution ownership, and job history. A team can give each environment its own cadence while keeping every run visible and auditable.
In this walkthrough, we will build a practical weekday workflow: import current Apple data at 8:00 AM, send the refreshed records to Jamf Pro at 9:00 AM, verify the saved definitions from Terminal, and look at how the same jobs can be handed to an MDM.
Understanding Inbound and Outbound Syncs
Before configuring a schedule, it helps to define the direction in which the data is moving:
- Inbound sync brings device, purchase, and coverage data from Apple Business Manager or Apple School Manager into ABM Warranty. This refreshes the tenant database with the latest information available from Apple.
- Outbound sync sends data from ABM Warranty to a configured external system. An outbound destination might be Jamf Pro, Snipe-IT, or another API connection configured and mapped inside ABM Warranty.
Think of ABM Warranty as the middle of the workflow:
Apple Business Manager / Apple School Manager
                    |
                    |  Inbound sync
                    v
              ABM Warranty
                    |
                    |  Outbound sync
                    v
          Jamf Pro, Snipe-IT, or another
             configured destination
Inbound and outbound schedules are separate because they perform different jobs. An inbound run asks Apple for current data and updates ABM Warranty. An outbound run takes the data held by ABM Warranty and sends the mapped values to the selected destination connections.
For many environments, the safest sequence is inbound first and outbound second. That gives ABM Warranty time to finish refreshing its tenant database before it sends data elsewhere. In the example used throughout this article, the inbound import begins at 8:00 AM and the outbound Jamf Pro sync begins at 9:00 AM.
Tenants do not have to use both directions. A tenant can run inbound schedules without sending data to another system, use outbound schedules after data has been refreshed manually, configure both directions, or leave scheduling disabled entirely.
Before You Begin
Make sure the tenant already has a working Apple Business or Apple School Manager credential. If you plan to schedule outbound work, create and enable the destination connections first, then map them to the tenant in the order they should run.
Decide where the schedule will execute:
- Runs in ABM Warranty is the simplest option when the app will remain open at the scheduled time. A run missed while the app is closed is not backfilled.
- Managed by MDM lets Jamf Pro or another MDM invoke exported jobs. The MDM must run the command in the logged-in tenant owner’s user context so ABM Warranty can reach the correct Keychain items and tenant database.
It is also worth thinking about the order of operations. When inbound and outbound work run on the same day, leave enough time between them for the inbound import to finish. That prevents an outbound job from starting against data that is still being refreshed. The right buffer depends on fleet size, API behavior, and the number of outbound connections involved.
Start with the Tenant, Not the Clock
Open Sync Scheduling, then choose a tenant from Schedule Tenant. This selection only changes the schedule you are editing; it does not activate that tenant elsewhere in the app.
Next, select Runs in ABM Warranty or Managed by MDM. Inbound and outbound definitions are saved separately for every tenant, so one Mac can maintain different schedules for different organizations.
That separation is important for MSPs and teams managing multiple Apple environments. One tenant can import every weekday, another can run once a week, and a third can remain entirely manual. Their selected connections, time zones, next occurrences, and histories do not overlap.
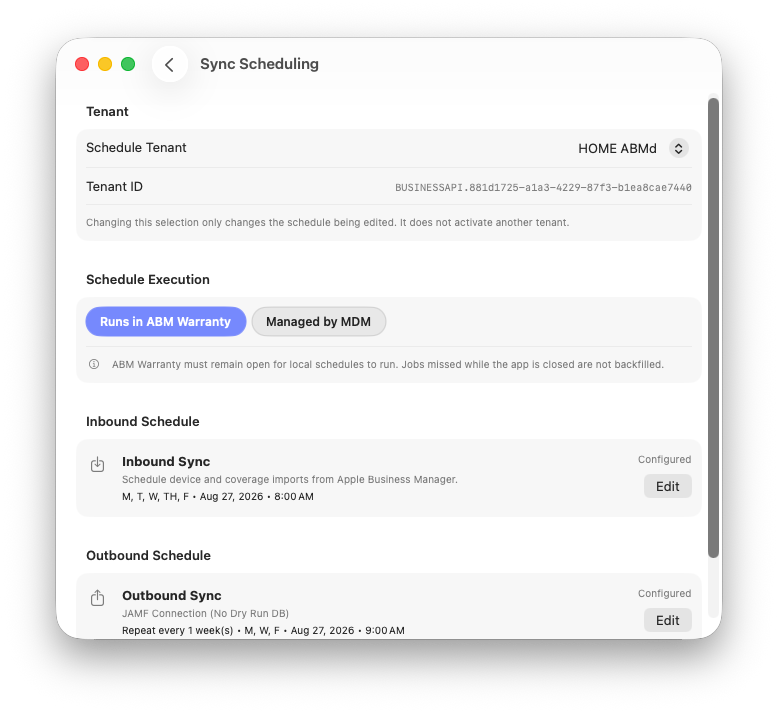
The schedule summary keeps the selected tenant, execution authority, inbound definition, and outbound definition together.
The summary view is also the quickest place to catch an incorrect tenant or execution mode before editing anything. Confirm both of those values first, especially on a shared administration Mac.
Build the Inbound Cadence
Select Edit beside Inbound Sync, turn on Enabled, and choose Daily, Weekly, or Monthly. Set the start date, time, and applicable weekdays or monthly date, then select Apply Schedule.
The example below runs at 8:00 AM every Monday through Friday. Each tenant can have one optional inbound schedule.
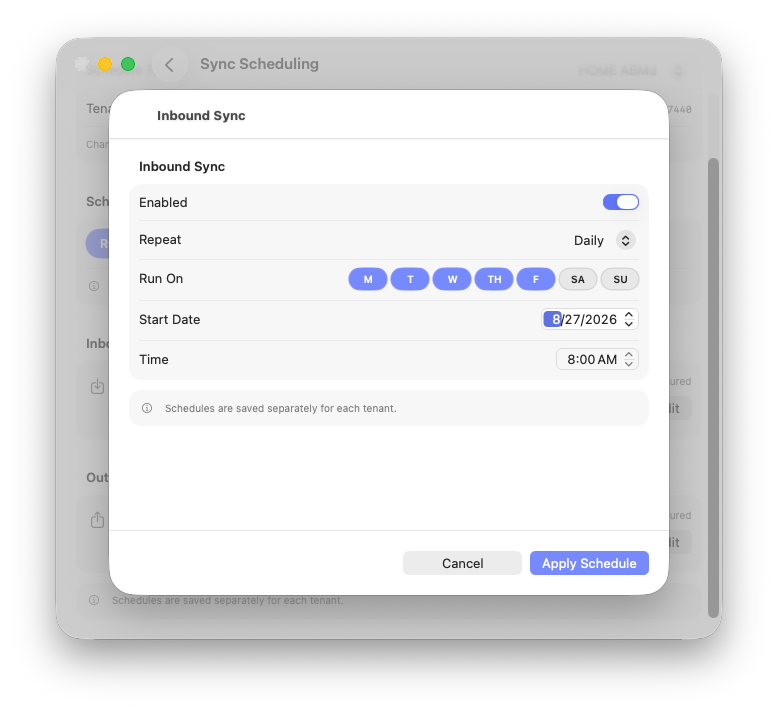
A weekday inbound schedule keeps Apple Business or Apple School Manager device and coverage data current for the selected tenant.
The schedule is tenant-specific. Changing the schedule for one tenant does not alter the recurrence, timing, or execution mode used by another tenant.
Daily, weekly, and monthly modes cover different operational needs. A weekday schedule works well for environments where purchasing, enrollment, or coverage data changes throughout the week. Weekly schedules can reduce unnecessary API activity in stable fleets. Monthly schedules are useful for reporting or lower-touch environments where a particular calendar date matters more than a weekday cadence.
The schedule time zone is stored with the definition. This makes the intended local time explicit and avoids relying on whichever time zone happens to be active on the Mac later. When tenants operate in different regions, review the time zone alongside the displayed next occurrence before applying the schedule.
Follow the Import with Outbound Work
Select Edit beside Outbound Sync. Under Mapped Connections, enable each destination the schedule should use. Available connections are not selected automatically, and at least one mapped connection is required.
Turn on Enabled, choose the recurrence, set the start date and time, and select Apply Schedule. The example below runs the selected Jamf Pro connection at 9:00 AM on Monday, Wednesday, and Friday.
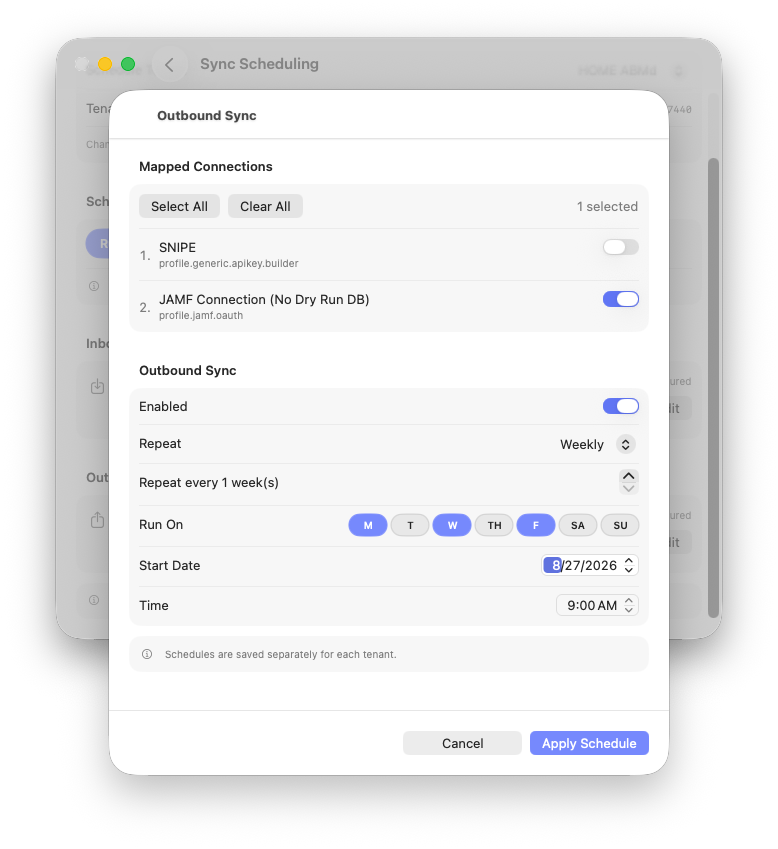
Choose the mapped connections that should run and keep them in the intended execution order.
Before a scheduled outbound run begins writing, ABM Warranty validates the full selected set. Every connection must still exist, be enabled, and remain mapped to the scheduled tenant. If any connection fails validation, correct the configuration before retrying.
Outbound schedules are deliberately explicit. Creating a connection or mapping it to a tenant does not silently add it to an existing schedule. This prevents a newly created destination from receiving data before an administrator has reviewed its mapping and decided where it belongs in the execution order.
When several outbound connections are selected, their saved order becomes part of the workflow. Put destinations in the order that makes operational sense for the environment, and use each connection’s dry-run capability before allowing scheduled writes. A successful manual or dry run is a much better starting point than discovering a mapping problem during the first unattended execution.
For the example workflow, the one-hour gap between the 8:00 AM inbound import and the 9:00 AM outbound run is intentional. It creates a simple sequence: refresh the tenant database first, then send that refreshed state to Jamf Pro.
Confirm What Was Saved from Terminal
Use the CLI to discover the tenant ID rather than copying a display name into automation:
abm-warranty --list-tenantsThen inspect the saved inbound or outbound definition. Every schedule command requires an explicit tenant ID.
abm-warranty schedules show \
  --tenant-id <TENANT_ID> \
  --kind inbound

abm-warranty schedules show \
  --tenant-id <TENANT_ID> \
  --kind outbound
The inbound example returns the enabled state, recurrence, selected weekdays, start date, time zone, revision, and next occurrence:
schedule tenant=<TENANT_ID> kind=inbound enabled=true
frequency=daily interval=1 weekdays=mon,tue,wed,thu,fri
start=2026-08-27 time=08:00 timezone=America/New_York
connections= revision=2 next=2026-09-28T12:00:00Z
You can also review schedule history in a human-readable or machine-readable form:
abm-warranty schedules history --tenant-id <TENANT_ID>
abm-warranty schedules history --tenant-id <TENANT_ID> --json
The CLI is not limited to inspection. It can configure schedules, enable or disable them without deleting their definitions, and remove definitions while preserving historical run records. That makes it suitable for scripted rollouts and for troubleshooting a Mac where the graphical configuration and the expected runtime behavior do not appear to agree.
For example, a schedule can be paused during maintenance and restored afterward without rebuilding its recurrence:
abm-warranty schedules disable \
  --tenant-id <TENANT_ID> \
  --kind outbound

abm-warranty schedules enable \
  --tenant-id <TENANT_ID> \
  --kind outbound
The explicit tenant and job kind are intentional safeguards. Display names are convenient for people, but stable tenant IDs are the safer contract for automation.
Direct Support for Jamf Pro
ABM Warranty 0.6.0 includes a direct Jamf Pro path for managed scheduling. This complements the prebuilt Jamf outbound connection already available in the app: the connection defines where warranty data is sent, while Copy JAMF JSON packages the tenant’s saved inbound and outbound schedules for Jamf Pro to invoke.
The JSON option is specifically for Jamf Pro. For another MDM, use the managed-preferences plist or unsigned mobileconfig available under Export….
Switch the tenant to Managed by MDM, save the schedule, and select Copy JAMF JSON. The copied document includes the tenant ID, minimum supported app version and build, schedule definitions, selected outbound connections, and the CLI arguments for each job.
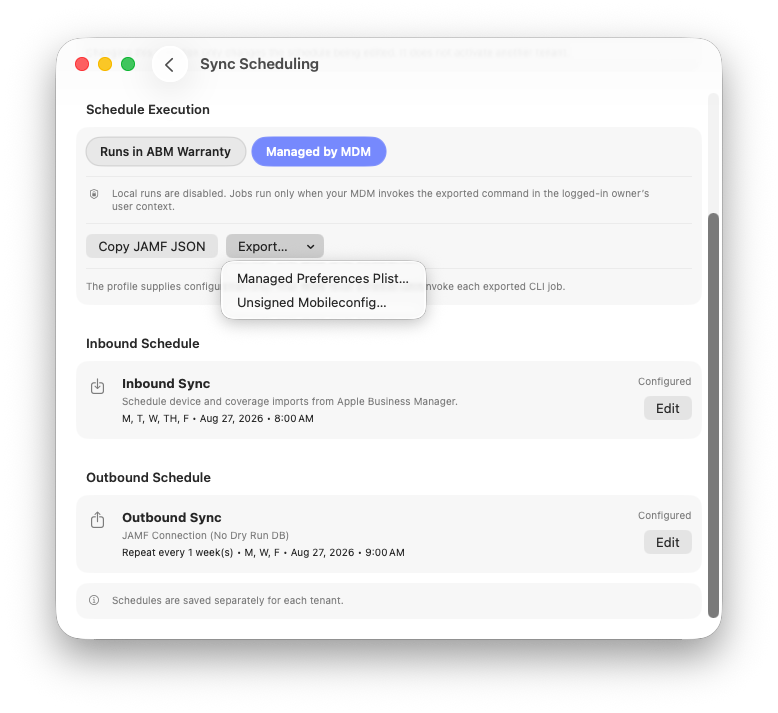
Managed mode disables local execution for the tenant while preserving the schedule definitions for MDM invocation.
Choosing managed execution changes who starts the job; it does not change the recurrence you built or create the Jamf deployment automatically. ABM Warranty remains responsible for validating the tenant, schedule revision, due occurrence, and selected connections. Jamf Pro is responsible for delivering the managed configuration or policy and invoking the job on the correct Mac at the correct time.
The exported JSON contains both the schedule definition and the CLI arguments Jamf Pro should invoke. A shortened inbound example looks like this:
{
  "jobs": [
    {
      "arguments": [
        "schedules",
        "managed-run",
        "--tenant-id",
        "<TENANT_ID>",
        "--kind",
        "inbound",
        "--configuration",
        "-"
      ],
      "enabled": true,
      "frequency": "daily",
      "interval": 1,
      "kind": "inbound",
      "time": "08:00",
      "timeZone": "America/New_York",
      "weekdays": ["mon", "tue", "wed", "thu", "fri"]
    }
  ],
  "minimumAppVersion": "0.6.0",
  "minimumBuild": "31",
  "schemaVersion": 1,
  "tenantID": "<TENANT_ID>"
}
Jamf Pro can use the exported schedule in two ways. A configuration profile is the cleanest choice when you want Jamf to manage the settings under the app’s preference domain. A policy script is useful when you want the policy to supply the exported configuration directly at invocation time.
Option 1: Build a Jamf Pro Configuration Profile
For the profile approach, the copied JSON becomes a custom configuration-profile payload. Jamf Pro uses it to build and deliver managed preferences for ABM Warranty under the app’s preference domain:
breelabs.ABM-WarrantyThe managed preference written for that domain is ManagedSyncConfiguration. Its value is the complete JSON object copied from ABM Warranty:
Preference domain: breelabs.ABM-Warranty
Managed key:      ManagedSyncConfiguration
Value type:       Dictionary / JSON object
Value:            The complete output from Copy JAMF JSON
To build the profile in Jamf Pro:
- In ABM Warranty, select the tenant, choose Managed by MDM, save the schedules, and select Copy JAMF JSON.
- In Jamf Pro, open Computers > Configuration Profiles and create a new computer configuration profile.
- Configure the profile’s General settings with a recognizable name, such as
ABM Warranty Managed Schedules - HOME ABMd. - Open Application & Custom Settings, add an external or custom application payload, and enter
breelabs.ABM-Warrantyas the preference domain. - Add the
ManagedSyncConfigurationmanaged preference and paste the complete JSON copied from ABM Warranty as its dictionary value. Jamf Pro uses those settings to build the profile payload. - Review the resulting property-list or profile preview. Confirm that
ManagedSyncConfigurationcontains the tenant ID, schedule definitions, selected connections, minimum app version, and minimum build shown in the copied JSON. - Scope the profile to the Mac that owns the ABM Warranty tenant and save it.
The target shape inside the managed preference domain is equivalent to:
{
  "ManagedSyncConfiguration": {
    "jobs": [
      {
        "kind": "inbound",
        "enabled": true,
        "frequency": "daily",
        "time": "08:00",
        "timeZone": "America/New_York"
      },
      {
        "kind": "outbound",
        "enabled": true,
        "frequency": "weekly",
        "time": "09:00",
        "timeZone": "America/New_York",
        "connections": [
          {
            "id": "<CONNECTION_ID>",
            "profileID": "profile.jamf.oauth"
          }
        ]
      }
    ],
    "minimumAppVersion": "0.6.0",
    "minimumBuild": "31",
    "schemaVersion": 1,
    "tenantID": "<TENANT_ID>"
  }
}
This example is shortened for readability. Use the full, unmodified output from Copy JAMF JSON when building the real profile; it includes schedule identifiers, revisions, recurrence details, display information, selected connection order, and the managed CLI arguments.
Jamf Pro’s Application & Custom Settings payload is designed to deploy managed settings for third-party macOS apps using their preference domains. Jamf’s current documentation covers the profile and scope workflow in Deploying Custom Computer Configuration Profiles Using Application & Custom Settings.
The configuration profile supplies the schedule definitions to ABM Warranty. After it is installed, confirm that the intended Mac appears as successfully scoped in Jamf Pro and that ABM Warranty recognizes the managed configuration for the correct tenant.
The JSON contains schedule configuration but no API credentials, private keys, tokens, authentication secrets, outbound secrets, or connection URLs. Treat it as managed configuration and generate a fresh copy whenever the tenant’s schedules or selected connections change.
Option 2: Supply the Configuration with a Jamf Policy Script
The alternative is to keep the exported JSON with a Jamf policy script and pass it directly to ABM Warranty through standard input. This avoids deploying a separate managed-preferences profile and keeps the configuration alongside the command that invokes it.
In Jamf Pro:
- Open Settings > Computer management > Scripts and create a script.
- Give it a clear name such as
ABM Warranty - Scheduled Inbound - HOME ABMd. - Paste the wrapper below into the script editor.
- Replace
<TENANT_ID>, setjob_kindtoinboundoroutbound, and paste the complete output from Copy JAMF JSON between theABM_JSONmarkers. - Save the script, then add it to a policy under Computers > Policies using the Scripts payload.
- Configure the policy’s trigger, execution frequency, and scope so it runs on the Mac that owns the tenant during the managed invocation window.
Jamf policy scripts normally run as root. ABM Warranty needs the logged-in tenant owner’s context to reach that user’s Keychain credentials and tenant database, so the wrapper finds the console user and launches the app executable in that context:
#!/bin/zsh

tenant_id="<TENANT_ID>"
job_kind="inbound"
abm_warranty="/Applications/ABM Warranty.app/Contents/MacOS/ABM Warranty"
console_user=$(/usr/bin/stat -f '%Su' /dev/console)

if [[ -z "$console_user" || "$console_user" == "root" || "$console_user" == "loginwindow" ]]; then
  echo "No eligible logged-in user; ABM Warranty schedule was not invoked."
  exit 1
fi

if [[ ! -x "$abm_warranty" ]]; then
  echo "ABM Warranty is not installed at the expected path."
  exit 1
fi

console_uid=$(/usr/bin/id -u "$console_user")

/usr/bin/cat <<'ABM_JSON' | \
  /bin/launchctl asuser "$console_uid" \
  /usr/bin/sudo -u "$console_user" \
  "$abm_warranty" schedules managed-run \
    --tenant-id "$tenant_id" \
    --kind "$job_kind" \
    --configuration -
PASTE_THE_COMPLETE_JSON_COPIED_FROM_ABM_WARRANTY_HERE
ABM_JSON
Use separate policy invocations for inbound and outbound jobs when they run at different times. Both may use the same full tenant export; --kind inbound or --kind outbound selects the job ABM Warranty should run.
The policy must invoke the job during the 15 minutes after its configured occurrence. For an 8:00 AM schedule, the valid window is approximately 8:00 through 8:15 AM. Early invocations are not yet due, late invocations are missed, and missed occurrences are not backfilled. Verify the first run in both the Jamf policy log and ABM Warranty’s Scheduled Sync Jobs view.
Jamf’s current documentation explains how to store reusable scripts and attach them to the Scripts payload of a policy: Jamf Pro Scripts and Running Scripts Using a Policy.
Other MDM Platforms
For an MDM other than Jamf Pro, choose Export… and use the managed-preferences plist or unsigned mobileconfig. The portable CLI contract remains standard input:
cat /path/to/managed-schedules.plist | \
abm-warranty schedules managed-run \
  --tenant-id <TENANT_ID> \
  --kind inbound \
  --configuration -
Mobileconfig exports are unsigned; review and sign them according to your security requirements before deployment. As with Jamf Pro, the profile supplies configuration but the MDM must invoke each exported CLI job separately.
After changing a managed schedule, export and deploy a fresh configuration. The export includes schedule revisions and minimum version information, so treating old and new exports as interchangeable can lead to confusing validation failures. Keeping the profile and MDM command aligned with the saved schedule makes troubleshooting much easier.
Follow the Work After It Runs
Open Scheduled Sync Jobs to see projected occurrences and completed scheduled activity in one place. Expand a historical row to inspect its statistics and errors. The underlying work also appears in Inbound Sync Jobs or Outbound Sync Jobs with its trigger origin:
scheduledmeans ABM Warranty executed the local schedule.managed-scheduledmeans an MDM invoked the managed job.
If a run does not appear, confirm that you are viewing the correct tenant, the schedule is enabled, the execution mode matches the invocation method, and job filters are not hiding scheduled activity.
For a completed run, review more than the final status. The expanded statistics show how much work was completed, skipped, or failed, while the detailed errors identify records or connections that need attention. A job that technically completed may still deserve follow-up if its result counts differ substantially from the normal baseline for that tenant.
Failed managed runs should be investigated from both sides. Check the MDM policy log to confirm that the command ran in the correct user context and within the invocation window, then use ABM Warranty’s scheduled and underlying job history to inspect validation or sync errors. That division usually makes it clear whether the failure happened before ABM Warranty accepted the occurrence or during the actual data operation.
A Practical Operating Pattern
The feature is flexible enough to support many schedules, but a conservative rollout is usually the most reliable:
- Configure and run the inbound workflow manually until its normal duration and results are understood.
- Configure each outbound connection, validate its mapping, and complete a dry run.
- Enable local schedules for a single tenant and observe several occurrences in Scheduled Sync Jobs.
- Leave a safe buffer between inbound completion and outbound start time.
- Move execution to MDM only after the schedule itself is proven, then verify the first managed occurrence from both the MDM and ABM Warranty histories.
This approach separates connection problems, schedule problems, and MDM invocation problems instead of introducing all three at once.
0.6.0 Scheduling Checklist
- Confirm the Apple Business or Apple School Manager credential works for the tenant.
- Map and enable every outbound connection before adding it to a schedule.
- Choose the tenant before editing either schedule.
- Select local or MDM-managed execution for that tenant.
- Apply the inbound and outbound schedules separately.
- Verify each definition with
abm-warranty schedules show. - After every managed schedule change, export and deploy fresh configuration.
- Review upcoming work and completed results in Scheduled Sync Jobs.
Complete Guide Reference
- Schedule Apple Business Imports
- Schedule Outbound Connection Syncs
- Manage Sync Schedules with the CLI
- Review Inbound Jobs
- Review Outbound Jobs
- Mac Admins Slack — #abm-warranty channel

Support Indie Development
These apps are built in my free time.
I build and maintain these tools as an indie developer outside of client work and day-to-day responsibilities. If you find these apps useful and want to help fund continued development, updates, support, and new releases, you can sponsor the work directly.
Monthly support helps me keep shipping improvements, maintain compatibility, and invest more time into building practical software for the Apple admin and consultant community.
AI Usage Transparency Report
AI Era · Written during widespread use of AI tools
AI Signal Composition
Score: 0.4 · Moderate AI Influence
Summary
ABM Warranty 0.6.0 is now available, and the headline feature is tenant-aware scheduling.