
Are you among the millions of people planning to get a new iPhone 14? It’s exciting, we know, but don’t move too fast when getting started with your new iPhone, or you might cause yourself headaches. Instead, follow these instructions once you’re ready to transfer your data to the new iPhone:
-
Make sure you know your Apple ID and password! You will likely have to enter them at least once during this process.
-
If you have an Apple Watch, it’s safest to unpair it from your old iPhone, which automatically backs up your Apple Watch. (In theory, unpairing shouldn’t always be necessary, but it never hurts.)
There are two caveats when unpairing. First, if you have a cellular Apple Watch, you’ll be asked if you want to keep or remove your plan. Assuming that you’re keeping your Apple Watch to re-pair with your new iPhone, keep the plan. Second, if you use a transit card in the Wallet app, Apple recommends removing your transit card from your Apple Watch before unpairing.
Using the Watch app on your old iPhone, go to the My Watch tab, tap All Watches (at the top left of the screen), tap the ⓘ button next to your Apple Watch, and tap Unpair Apple Watch.
{width=”6.5in” height=”3.3in”}
-
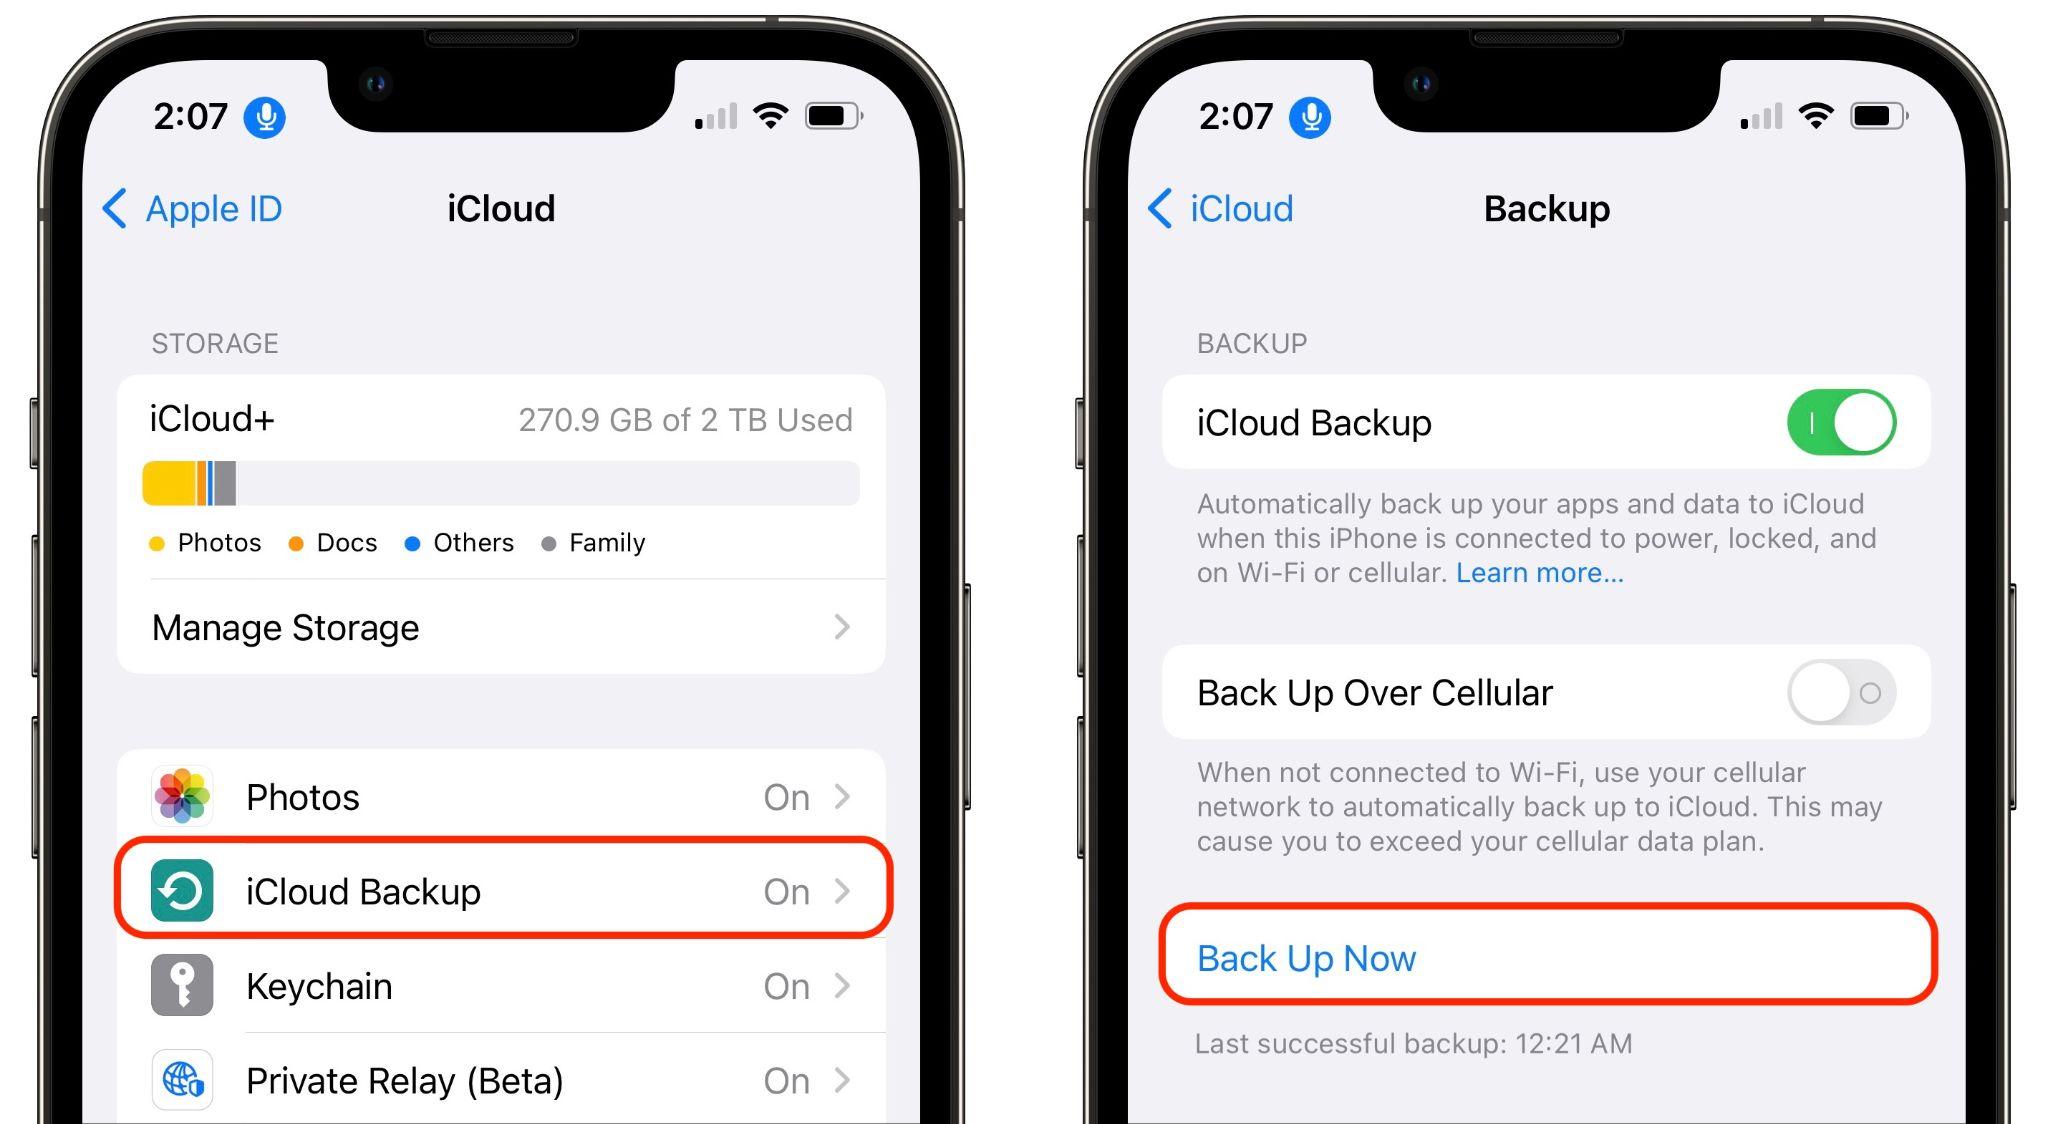
Make a backup of your old iPhone to iCloud or your Mac. (If you back up to a Mac, be sure to encrypt the backup, or else it won’t include saved passwords, Wi-Fi settings, browsing history, Health data, and call history.) Or back up to both, for safety’s sake. We prefer iCloud backups because they’re easier and don’t introduce additional variables. Apple will even give you temporary iCloud storage to make a backup when moving to a new iPhone. To initiate an iCloud backup, go to Settings > Your Name > iCloud > iCloud Backup and tap Back Up Now.
-
You may need to transfer your SIM card from your old iPhone to your new one. However, that’s highly unlikely if you ordered through Apple and connected to your cellular carrier account during purchase; if you did that, activating the new iPhone should cause it to take over your phone number. Even if that isn’t the case, it’s better to contact your carrier and get them to activate the new SIM in the new iPhone because old SIMs don’t always support all current cellular features, such as full 5G support.
-
Transfer your data, settings, apps, and purchased content in one of these three ways. None of them will be quick, so do the transfer when you have time:
- Quick Start:
With the Quick Start feature, content from your old iPhone
copies directly from your old iPhone to your new one. We
recommend this technique because it generally preserves app
logins, something that’s less true when restoring from an iCloud
backup. Put your iPhones next to each other (and plugged into
power), use the old iPhone to scan the animation on the new one,
and then follow the rest of the steps.

- iCloud: With this technique, the new iPhone will download your content from your old iPhone’s iCloud backup. Once you’ve joined a Wi-Fi network on the new iPhone and tapped the Restore from iCloud Backup button, you’ll have to select the correct backup—likely the most recent one you just made. Keep your new iPhone plugged into power the entire time to ensure that all your content syncs during this step.
- Finder or iTunes: With this approach, you’ll restore your old iPhone’s content from a backup made to your Mac. Connect your new iPhone to your Mac using an appropriate cable, open a Finder window (or iTunes on an old Mac), select your device, click Restore Backup, and choose the appropriate backup—likely the most recent one.
- Quick Start:
With the Quick Start feature, content from your old iPhone
copies directly from your old iPhone to your new one. We
recommend this technique because it generally preserves app
logins, something that’s less true when restoring from an iCloud
backup. Put your iPhones next to each other (and plugged into
power), use the old iPhone to scan the animation on the new one,
and then follow the rest of the steps.
-
Perform post-transfer tasks. Ensure that you can make and receive a phone call. Pair your Apple Watch with the new iPhone if necessary. You’ll also need to pair your Bluetooth accessories—including AirPods—with your new iPhone. Plus, some app data needs to sync to your new iPhone, so open the Mail, Contacts, and Calendar apps and check if they have your data. It could take a few minutes for them to fill up. Apps may ask for notification permissions again, and you may need to download content and in-app purchases.
-
Finally, and this post-transfer task is becoming increasingly important, if you use two-factor authentication with an app like 1Password, Authy, or Google Authenticator, make sure that you can get your 2FA codes using your new iPhone. 1Password and Authy should be good about providing access to your 2FA codes from multiple devices—just log in to your account from each device—but Google Authenticator may require some additional setup since it didn’t originally offer any way to transfer codes to a new phone or among multiple devices.
Although Apple works hard to make the process of transferring from an old iPhone to a new one as painless as possible, some things may fail to transfer seamlessly. For that reason, we strongly recommend holding onto your old iPhone for a week or so to ensure the new one can do everything the old one could. During that time, put the new iPhone through its paces with an eye toward checking every app you need.
AI Usage Transparency Report
Pre-AI Era · Written before widespread use of generative AI tools
AI Signal Composition
Score: 0.07 · Low AI Influence
Summary
Transferring data from an old iPhone to a new one can be a complex process, but following these steps can help ensure a smooth transition.
Related Posts
How I Finally Passed the PMP Exam (After 12 Years of Waiting)
Back in 2013, I registered for a PMI membership with every intention of pursuing my PMP certification. I downloaded the handbook, bookmarked the eligibility requirements, and even told a few friends that I was going to do it "soon." At the time, I thought getting certified would be a straightforward process, but little did I know what lay ahead in terms of studying and preparation.
10 Things You Didn't Know You Could Do With Apple Configurator (That Save Mac Admins Hours)
Most of us treat Apple Configurator like a fire extinguisher: break glass, DFU, restore, move on. But it can do a lot more, and when you know the edges, you can turn a bricked morning into a ship-it afternoon. Below are ten things I regularly use (or wish I’d used sooner) that demonstrate its capabilities beyond just emergency recovery.
The Evolution of Apple Certification: A Journey Through Versions, Challenges & Growth
When I recently passed the Apple Certified Support Professional (ACSP) exam again, I paused to reflect — not just on this milestone, but on the long path I’ve walked through Apple’s certification landscape. My first certification dates back to macOS 10.5, and over the years, I’ve earned credentials across nearly every version since. In that time, the exams — and Apple itself — have transformed significantly.

Secure Software, Secure Career: How I Passed the CSSLP
After passing the CISSP earlier this year, I decided to follow it up with the **Certified Secure Software Lifecycle Professional (CSSLP)** certification. For those unfamiliar, CSSLP is an ISC2 certification that focuses specifically on secure software development practices across the full SDLC—from requirements and design to coding, testing, deployment, and maintenance. My goal in pursuing this certification was to further develop my skills in ensuring the security of software throughout its entire lifecycle.
Managing Bring Your Own Device (BYOD) for Android with Microsoft Intune
Alright, so today we're going to be talking about the management of bring your own device BYOD for Android devices. There's a lot of information out there for the management of iOS devices and you can do that with pretty much any Apple MDM on the market. We just happen to use Jamf where I work, but you could use anything from Braavos to SimpleMDM to Kanji or JumpCloud. Mosyle is also a great option.

BYO with me in 2025: iOS with User Enrollment in JAMF Pro
It really depends on your company's needs. For example, many companies need to hire 1099 contractors and in such a case they come with their own devices but not the correct security settings or enforcements. Remember BYOD is a security construct. The idea here is that you should be securing the company's sensitive data in all forms. This may involve implementing policies for contractor-owned devices, ensuring that all devices accessing company data meet minimum security standards, and regularly reviewing and updating these standards to stay ahead of emerging threats.
Securing BYOD Email Access: Exploring Strategies in Microsoft 365
In today’s mobile-first world, organizations increasingly rely on Bring Your Own Device (BYOD) programs to empower employees while optimizing costs. However, this flexibility introduces unique challenges, particularly around securing email access. To mitigate risks, we are implementing a comprehensive strategy to block email access on non-company devices by default and ensure only sanctioned apps can access organizational email accounts. This approach will help prevent unauthorized access and data breaches, aligning with our commitment to maintaining the security and integrity of company communications.
How I Conquered the CISSP Exam: 9 Months, Top Resources, and Proven Strategies
Passing the CISSP (Certified Information Systems Security Professional) exam is no small feat. It’s known for its breadth, depth, and ability to test not just your knowledge but your practical understanding of cybersecurity. After nine months of intense preparation, I’m thrilled to say I’ve joined the ranks of CISSP-certified professionals! Here's a detailed account of my experience, including the resources I used, some tips that helped me along the way, and what I learned from the process itself.

Get more out of scripting than you may expect
Expect is an extension to the Tcl scripting language written by Don Libes. The program automates interactions with programs that expose a text terminal interface. Expect, originally written in 1990 for the Unix platform, has since become available for Microsoft Windows and other systems. Its functionality allows users to interact with these programs through scripted commands, eliminating the need for manual input.
Cybersecurity is more than having the right tools
Processes, cybersecurity is 99% documentation, writing, that's what it is. If you don't enjoy writing policies and procedures, or enforcing them, be aware that this may lead to conflicts with your coworkers. You'll need to communicate clearly and consistently, which can be a challenge for some people.
