How to Set Up Jamf Network Relay and Jamf Protect


At JNUC 2026, I attended “Phish This! Securing Access with Jamf Using Device Trust and Network Relay.” Jamf gave us a managed Mac that could open a protected resource. We downloaded EICAR, the harmless file used to test malware defenses. Jamf Protect caught it, and the Mac lost access. I wanted to know what had to be configured for that sequence to work: a Relay connection, a Protect detection, and a Security Cloud rule that changes the answer from allow to deny.
How Jamf Trust gets a Mac into Security Cloud
Start with a Mac enrolled in Jamf Pro, the system your IT team uses to manage Macs and deliver apps and settings. Jamf Security Cloud decides which protected websites and apps the Mac may reach and where to send approved traffic. Jamf Trust is the Mac app that activates those services. It opens an encrypted connection using WireGuard, the network protocol behind Jamf’s user sign-in workflow.
First, connect your company sign-in system, such as Microsoft Entra ID or Okta, to Security Cloud. In Security Cloud > Devices > Activation profiles, create a profile with Network access and User credentials (SSO). The activation profile is the set of settings that tells Jamf Trust which Security Cloud tenant to join, which services to turn on, and how the user must sign in. Jamf’s identity-based provisioning guide describes this sign-in path.
Next, in Jamf Pro > Computers > Mac apps, add Jamf Trust from the Mac App Store, set it to install automatically, and scope it to the Macs you want to connect. In Security Cloud, open the saved activation profile, choose Managed Deployment > Jamf Pro, and download its macOS configuration profile. Upload that file in Jamf Pro > Computers > Configuration Profiles and scope it to the same Macs. Jamf’s Mac app guide and profile deployment guide show both deployments. Jamf Pro installs the app and settings. The employee completes activation in Jamf Trust.
The employee opens Jamf Trust on the Mac and signs in with the company account. That sign-in activates the device in Security Cloud and lets Jamf Trust establish its WireGuard connection. When the employee opens a protected site, Security Cloud checks the site’s Access Policy before forwarding the request. The site handles its own login. This is the setup many admins already have working before they consider Relay.
What Network Relay is
Network Relay is a connection service Jamf runs in Security Cloud using Apple’s Network Relay feature built into macOS. Jamf described the service in January 2025 and announced a release candidate for Macs and Apple mobile devices on June 2, 2025. It lets Jamf Pro deliver the network connection through a configuration profile. macOS activates the route when the profile arrives.
An admin delivers a Relay configuration profile through Jamf Pro. The profile names the destinations whose traffic should use the Relay and starts the Mac’s certificate request. When the Mac connects to one of those destinations, macOS sends that traffic through an encrypted connection to Jamf’s Relay service. Security Cloud checks the destination’s Access Policy and forwards an approved request through its configured gateway. Jamf describes the route as domain-specific traffic carried over HTTP/3. The enrollment steps below show where the certificate and route come from.
Jamf continues to document Jamf Trust and WireGuard for ZTNA. As of November 2026, Jamf has announced no WireGuard retirement date in the guidance I found.
What changes when you move from WireGuard to Relay
For IT, every new or replacement Mac loses one onboarding step: waiting for the employee to open Jamf Trust and activate it. That also matters on shared Macs. The managed-device route is available to everyone using the Mac, while each person signs in to the protected site with their own account. Security Cloud applies the Access Policy’s device group and risk checks; the site applies each employee’s permissions.
This gives you a useful way to trace an access failure. If the site never loads, check the Relay profile and certificate on the Mac, then the device group, risk rule, and gateway in Security Cloud. If the site loads but refuses an employee’s sign-in, check that employee’s access at the site. Keep Jamf Trust on Macs where you use its content controls or network security services.
Enroll a test Mac in Network Relay
For a Mac already using WireGuard, Jamf’s migration procedure calls for a new activation profile and re-enrollment. Pick one test Mac. Create the Relay profile below, remove that Mac from the WireGuard profile assignment, and scope the Relay profile in Jamf Pro. Keep the previous assignment ready while you verify the new route. Review any Jamf Trust assignments for content controls or network security and retain the services you use.
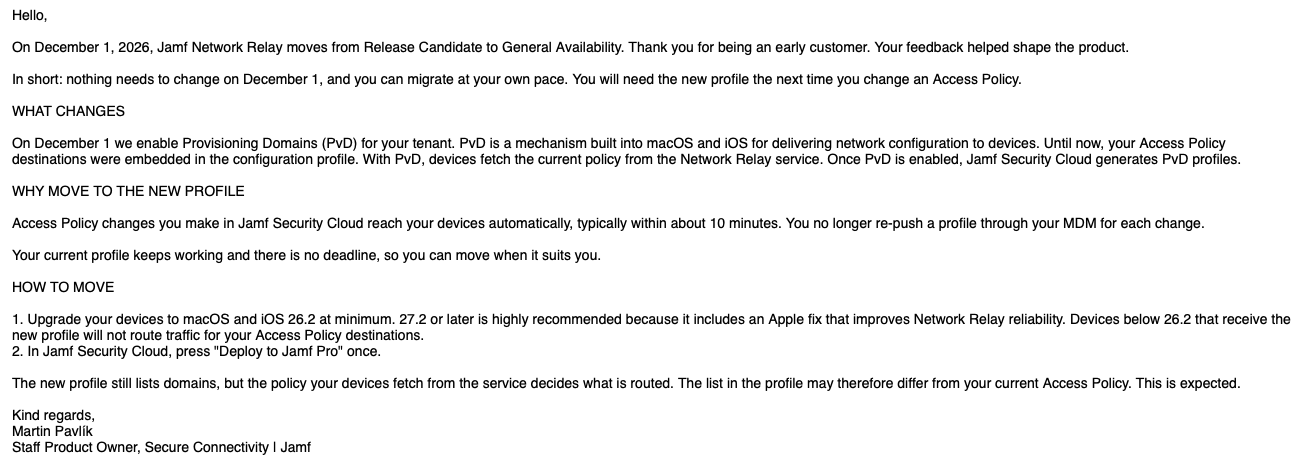
Jamf’s email to early customers says Network Relay will move from release candidate to general availability on December 1, 2026. Existing profiles will keep working. After Jamf introduces the new Provisioning Domains profile, the next Access Policy change will require that profile so the Mac can fetch updated routing policy. The email calls for at least macOS or iOS 26.2 and a one-time Deploy to Jamf Pro action after the tenant receives the change. Check which profile your tenant currently offers before migrating the test Mac.
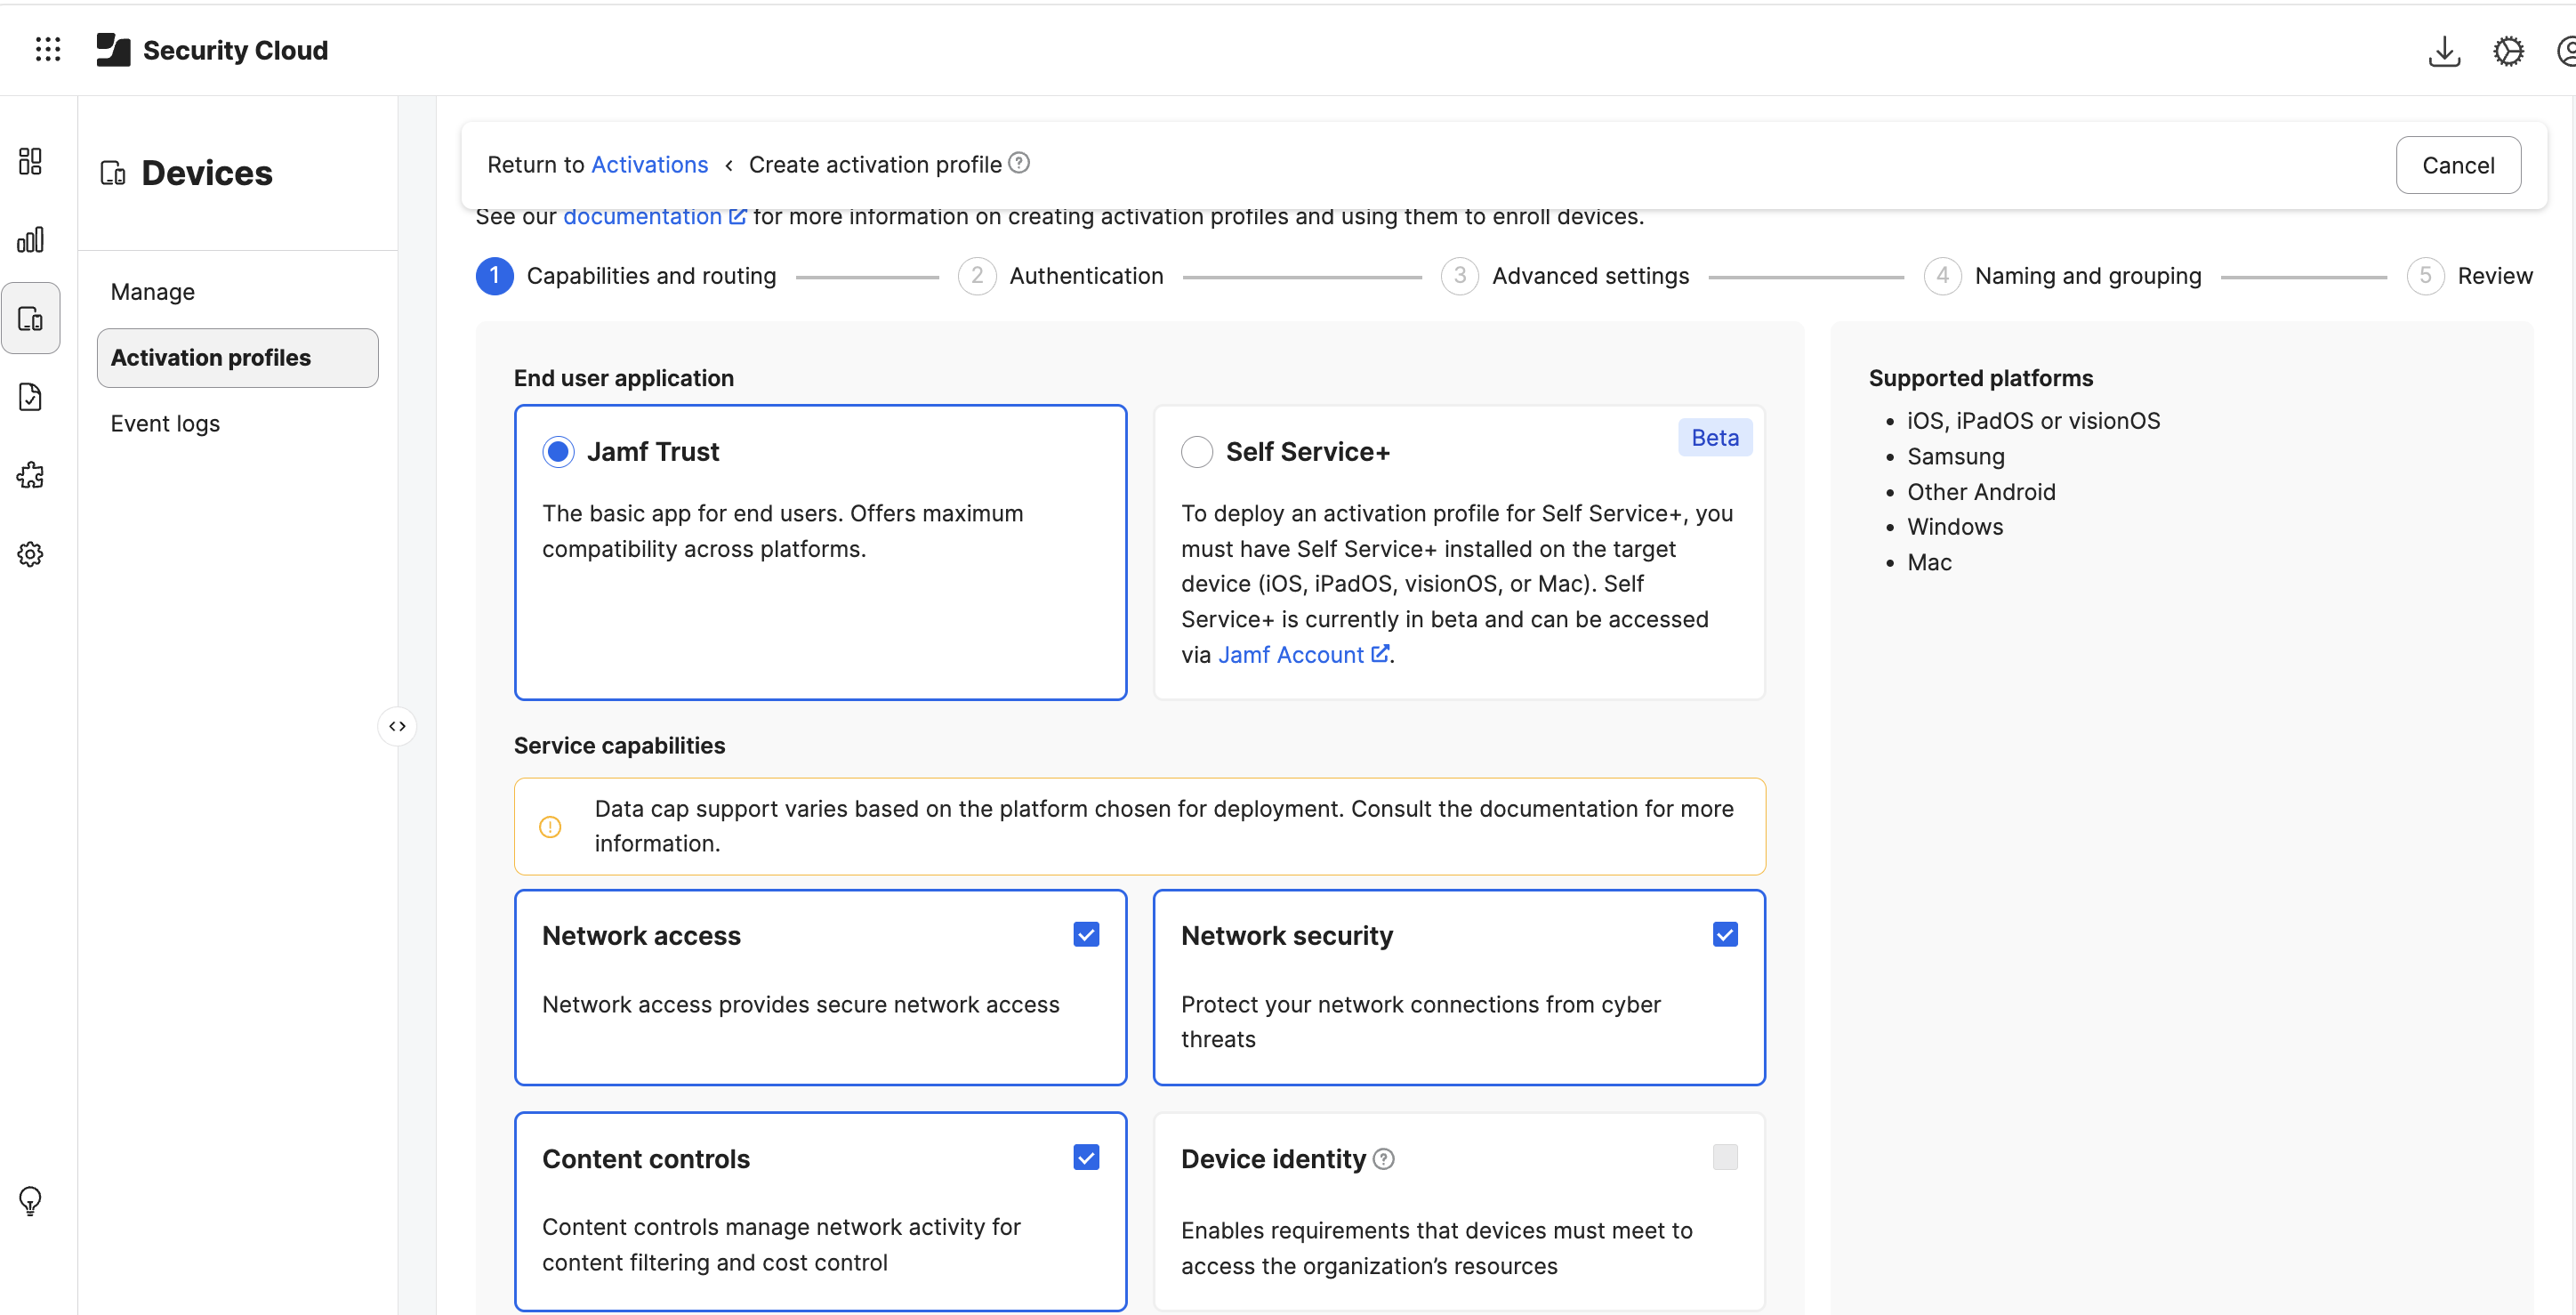
Put the Mac in a small Jamf Pro test group. In Security Cloud > Devices > Activation profiles > Create profile, choose Network access under Capabilities and routing. That enables the connection the Mac will use for protected resources. My screenshot also shows Network security and Content controls selected. Set those according to the security services you use. The destination and its access rule come later in Policies > Access.
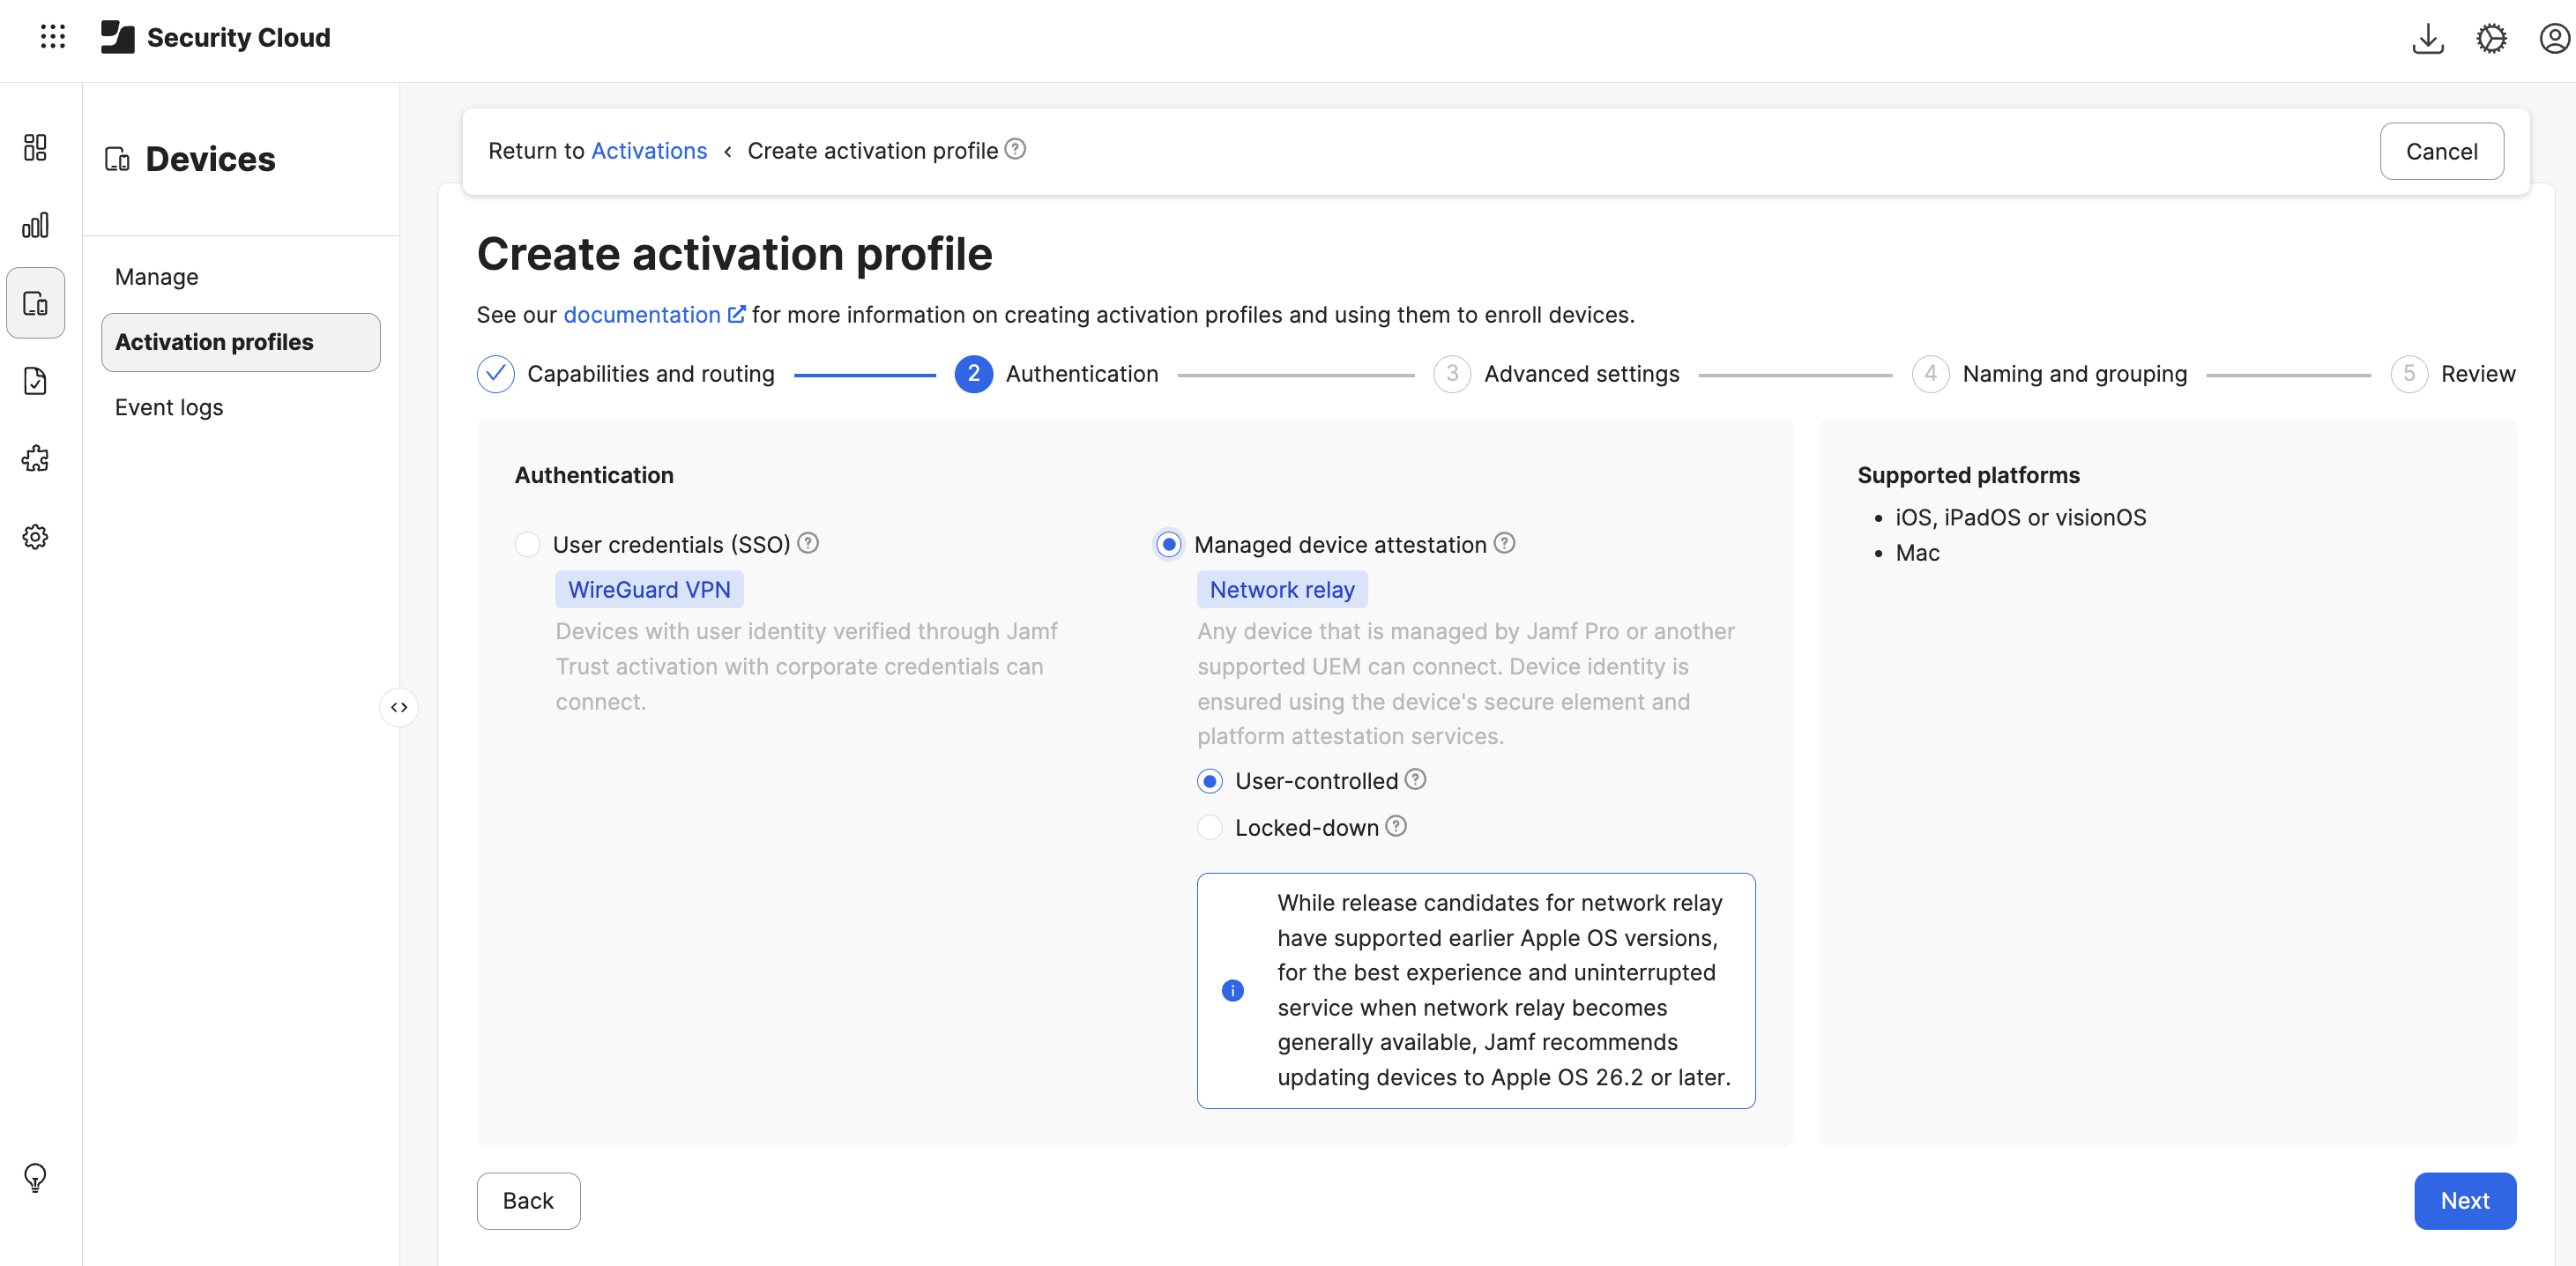
Under Authentication, choose Managed device attestation — Network relay. My screenshot shows User-controlled beneath Relay, which lets the user control the connection. Jamf’s attested-device setup guide uses Locked-down for an always-on connection. Choose the mode you intend to deploy.
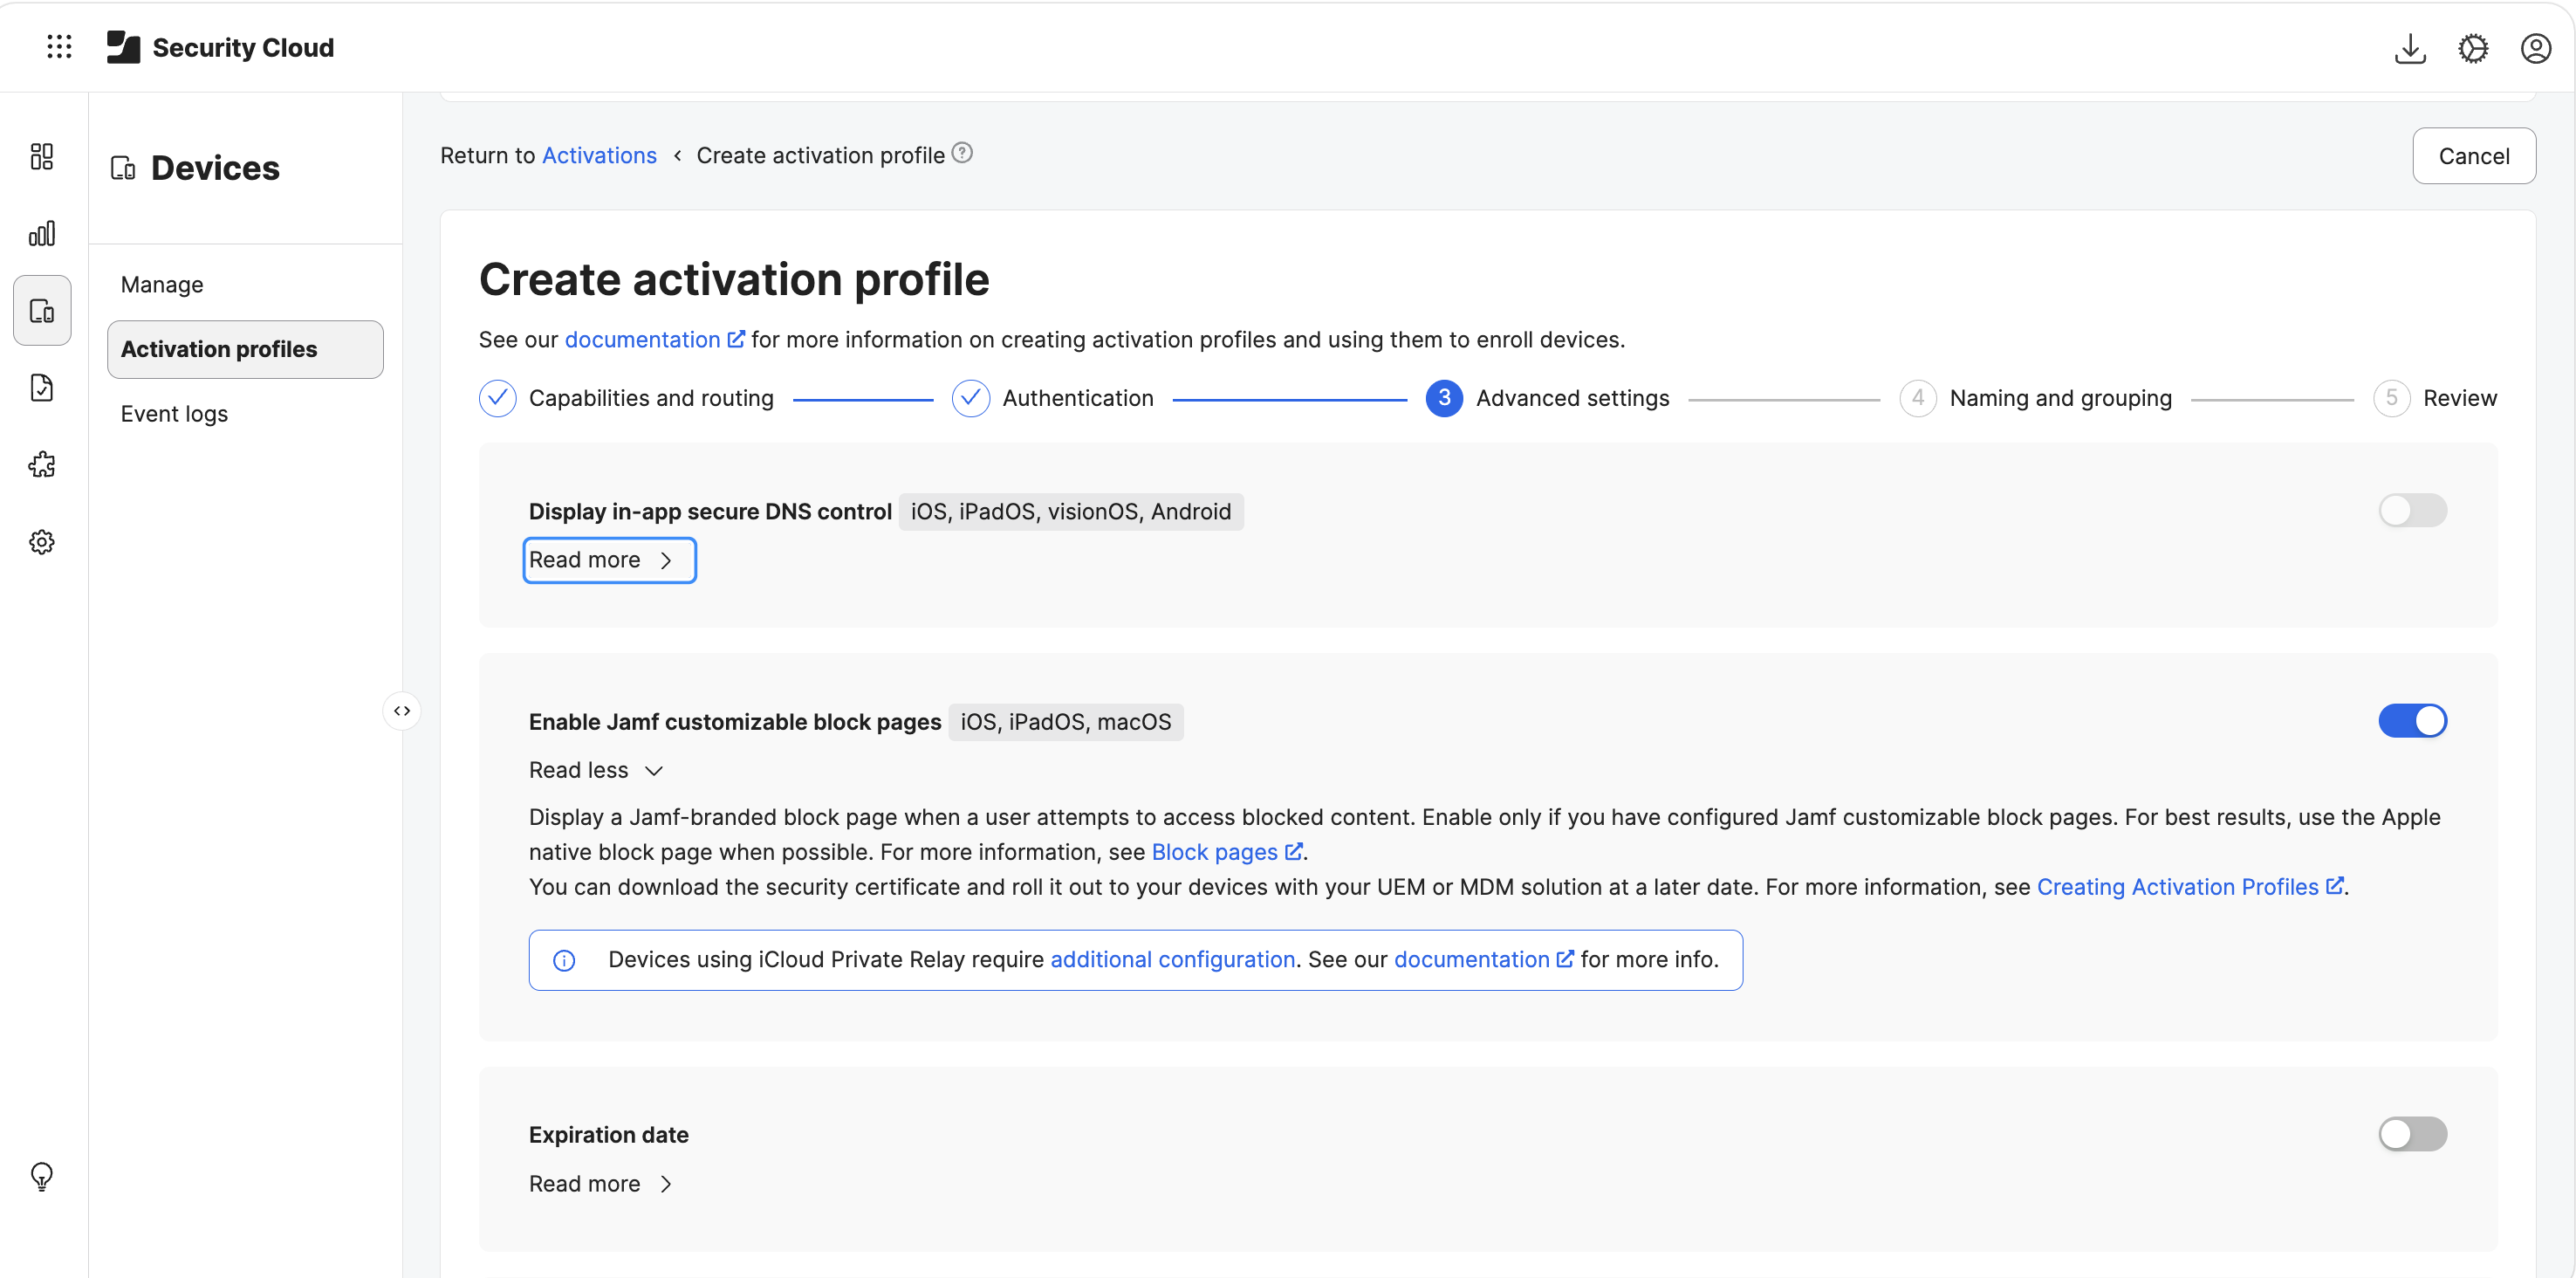
At Advanced settings, choose the DNS controls, block page, and expiration that fit this activation profile. My screen has Secure DNS control off, block pages on, and no expiration date. For a custom block page on Apple devices, deliver its root certificate through MDM.
At Naming and grouping, name the profile something you will recognize on the Mac, such as Relay access test, and assign the test device group. My screenshot shows the fields before I entered a name or changed the Default group. If UEM Connect synchronizes groups from Jamf Pro, check its mapping too: Jamf says that sync can replace the group chosen in this wizard.
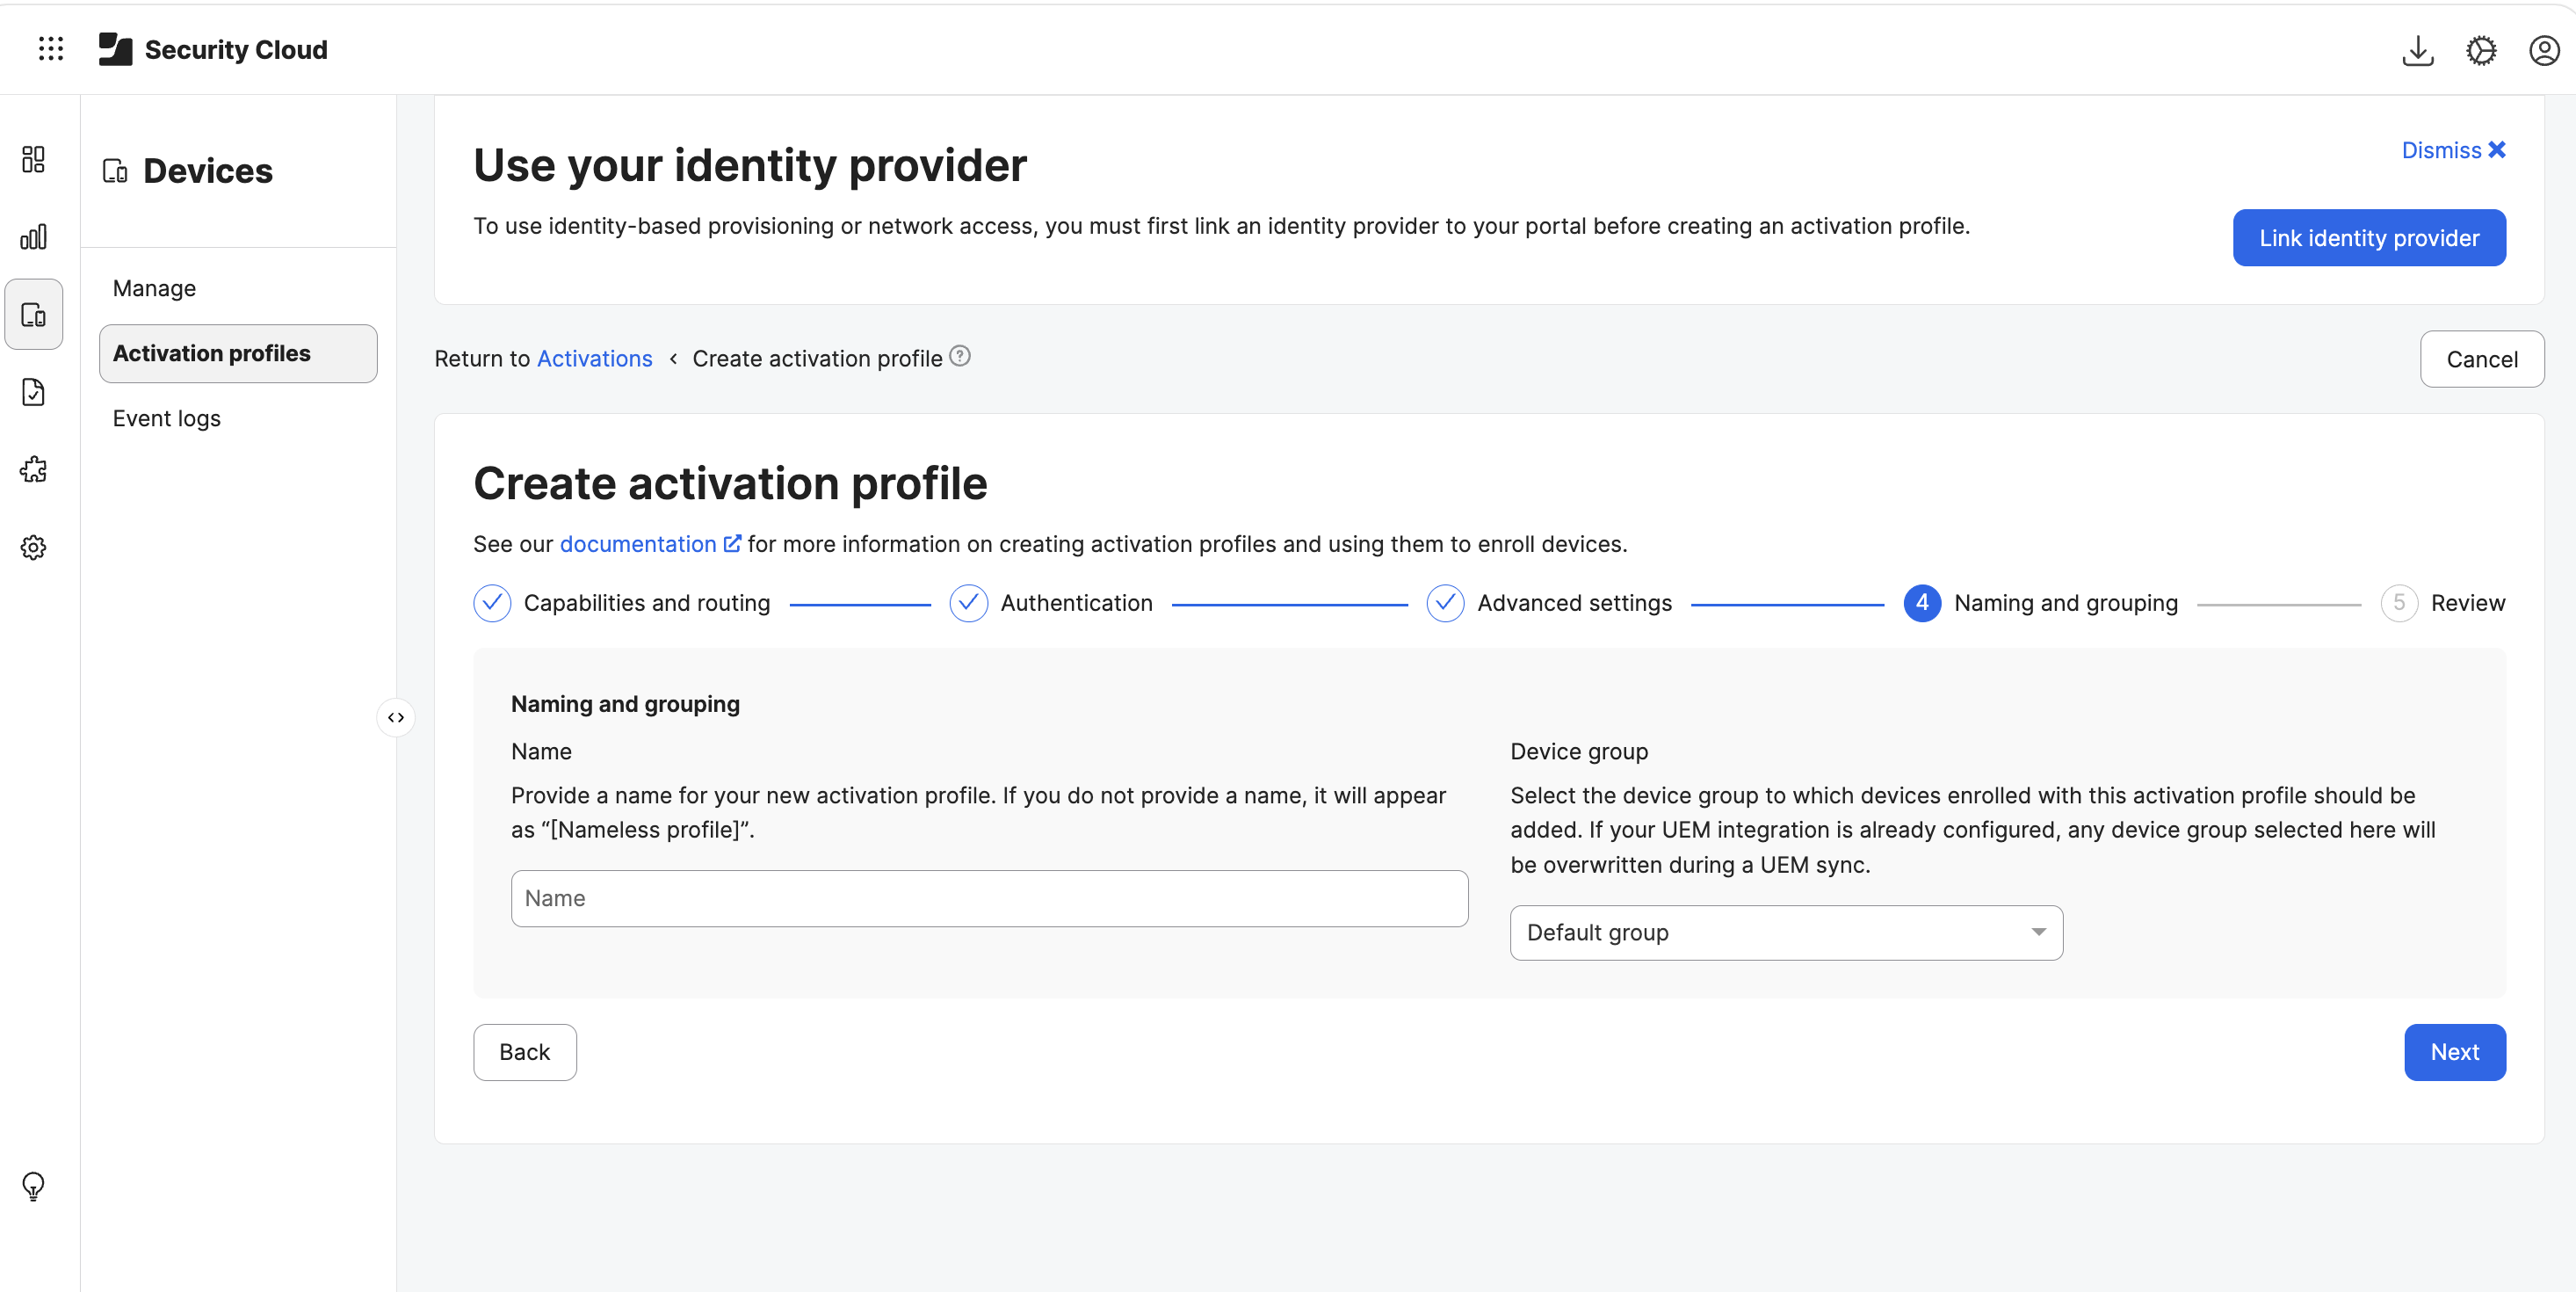
The Review screen should now show the name, group, Network access, and Managed device attestation you chose. My image says “[Nameless profile]” because I captured the wizard before saving.
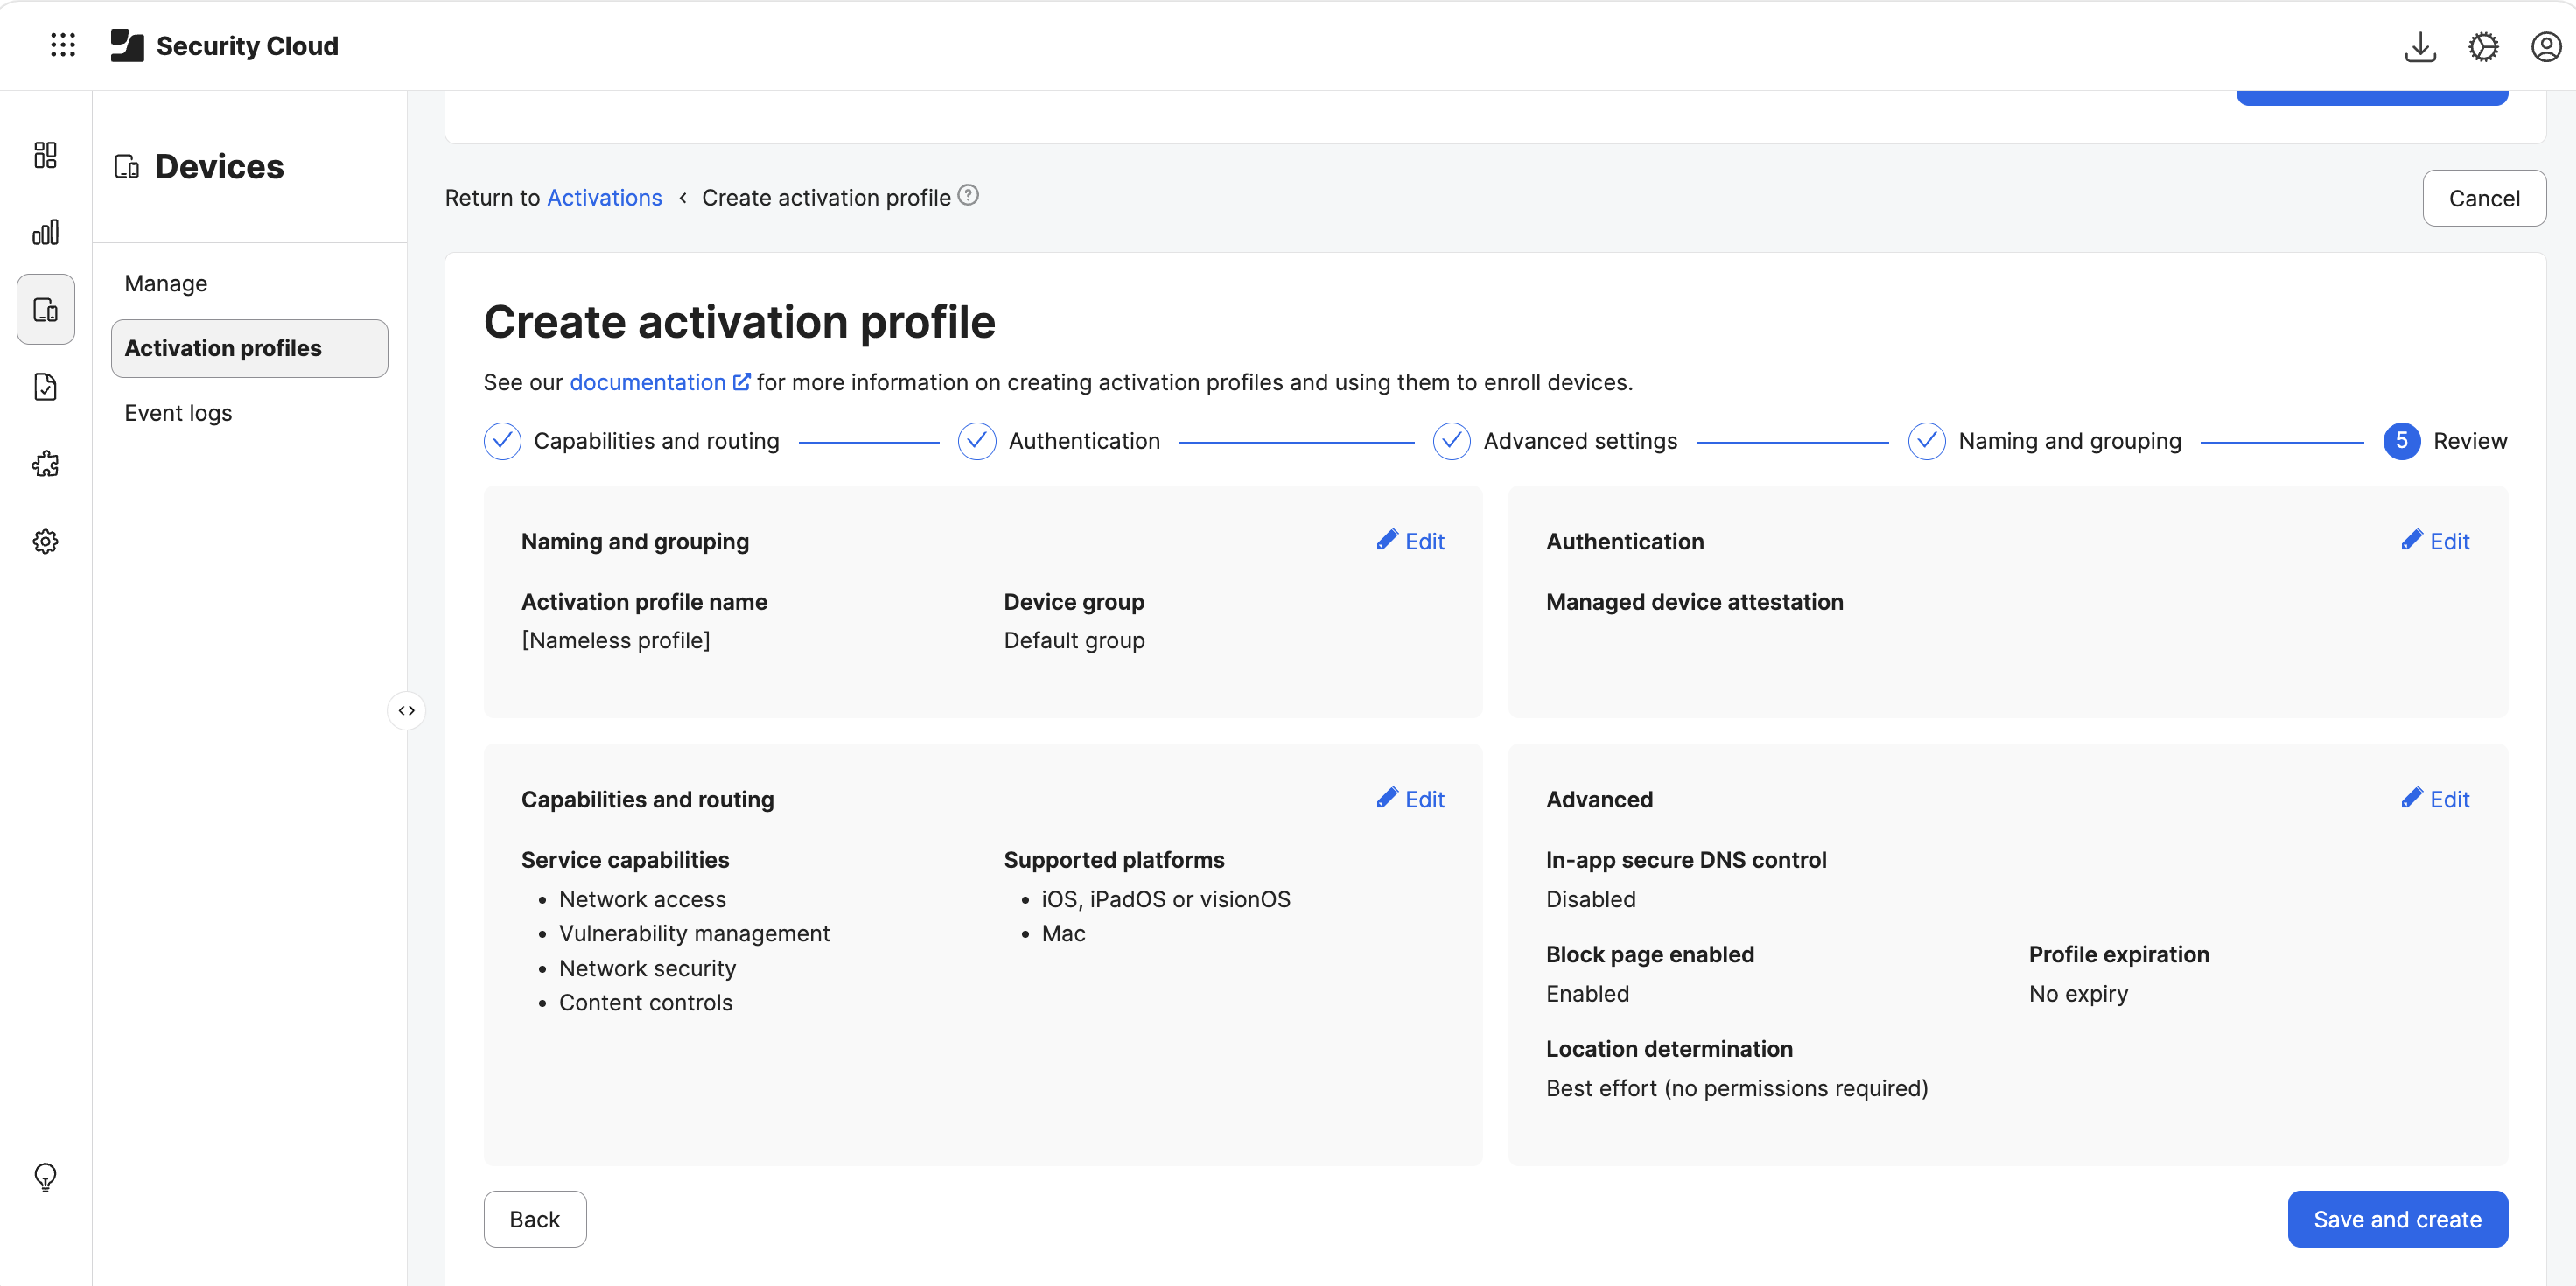
Save the activation profile. Then follow Jamf’s Jamf Pro deployment procedure: open the saved profile, select Managed Deployment > Jamf Pro, download its macOS configuration profile, upload it under Jamf Pro > Computers > Configuration Profiles, and scope it to the test Mac. If UEM Connect deploys the profile for you, confirm the scope in Jamf Pro.
The downloaded profile tells macOS to request a certificate through ACME and to route selected domains through Network Relay. After Jamf Pro delivers it, the Mac creates a private key, Apple attests to the device, and Jamf’s ACME service issues the certificate. Apple documents the attestation process. The Mac presents that certificate when it connects to Jamf’s Relay service. The protected app handles the person’s sign-in.
On the Mac, check System Settings > General > Device Management for the installed profile and System Settings > VPN & Relays for the Relay entry. Check Keychain Access for the issued client certificate. Complete those three checks before setting up the destination policy.
Give the Mac a destination and an access rule
Pick one site for the test and copy its hostname from the address bar. For a SharePoint Online site, that will look like yourtenant.sharepoint.com; use your own tenant’s name. Keep the rule limited to that hostname so you can tell which requests it handles.
Open Security Cloud > Policies > Access > Access policy and click Create policy. Under Custom app, click Define app. Give the policy a name such as SharePoint Relay test, choose a category, and click Next. Enter the hostname in Application hostnames, click Add, and continue. Jamf’s custom-app procedure shows these fields. Use a hostname here; Jamf says direct IP and subnet rules require the Jamf Trust app.
At Device group permissions, choose Selected device groups, select the test group from the activation profile, click Add, and continue. On Security, enable Access requires device to be managed if your Jamf Pro devices sync through UEM Connect. Enable Access requires device risk validation and set Deny access to devices starting at the following risk level to Medium. Leave Access requires Jamf Trust to be enabled off for this Relay connection. Jamf’s risk-control procedure says the risk option needs a managed Apple device with a Network Threat Protection profile. Scope that profile to the test Mac before expecting the Medium-risk rule to work.
On the routing screen choose Encrypt and route via ZTNA and select a gateway that can reach the site. A public SharePoint hostname can use an internet gateway; a private hostname needs a gateway connected to that private network. Keep Standard traffic routing unless the app needs Jamf’s legacy routing mode. Continue to the review screen and click Save and create app. Open the site from the test Mac, then find its allowed request in Reports > Access > Event Log before running EICAR. The entry shows whether your hostname and test group reached this policy.
Configure Jamf Protect for the EICAR test
EICAR uses Protect’s built-in threat database. You configure the response in a plan, not by writing a custom EICAR detection. In the Jamf Protect macOS Security portal, open Actions and inspect the default action configuration. Under Jamf Protect Cloud, enable collection for all alert types so the test event appears in Protect. Jamf’s evaluation guide uses that default configuration for testing.
Open Plans > Create Plan. Name it Relay EICAR test and give it a description that identifies the test Mac. Under Endpoint Threat Prevention, choose Block and report. Under the plan’s advanced settings, select the action configuration you just checked from Actions, then click Save. Jamf’s plan procedure lists these controls. If the test Mac already has Protect, edit its assigned plan instead of scoping two plans to it.
In Jamf Pro > Settings > Jamf Apps > Jamf Protect, open the synced test plan. Click Edit, open Scope, add the test Mac, and click Save. If Automatically deploy the Jamf Protect PKG with plans is selected in Jamf Pro’s Protect settings, Jamf Pro installs the agent with the plan. Otherwise deploy the Protect package through a Jamf Pro policy. Jamf’s deployment guide calls for both the plan profile and agent on the Mac. Check the computer in Protect after it checks in so you know it received the new plan.
EICAR is a deliberately harmless anti-malware test file. Jamf Protect recognizes it through its threat-prevention database with the Block and report plan setting above. Jamf’s EICAR test procedure downloads it from secure.eicar.org. On the test Mac, you can download it from EICAR’s page or run:
curl --fail --silent --show-error --output "$HOME/Desktop/eicar" https://secure.eicar.org/eicar.com
Protect may stop the download or block the file when you try to open it. If the file reaches the Desktop, follow Jamf’s test by making it executable with chmod +x "$HOME/Desktop/eicar" and running zsh "$HOME/Desktop/eicar". Then open Jamf Protect > Alerts and find the threat-prevention event for that Mac. This confirms the Mac-side detection.
Connect the Protect signal to the Access Policy
Jamf’s published ZTNA risk-signaling workflow shows how a Protect alert can change an Access Policy decision. In Protect, the admin enables Add to Jamf Pro Smart Group on a behavioral Analytic. A matching Smart Computer Group in Jamf Pro gains the Mac when that Analytic fires. A SmartGroupComputerMembershipChange webhook sends the change to a cloud function, which calls Security Cloud’s Risk API to set the Mac’s risk to Medium. The Access Policy above then denies the resource. When the Mac leaves the Smart Group after remediation, the function resets its risk. Jamf demonstrates this integration with the FlashDownloadNotSignedByAdobe Analytic. Its alert-action reference assigns the Smart Group action to Analytics.
To configure Jamf’s documented path, create the Smart Computer Group with the Jamf Protect - Smart Groups extension attribute, enable the Analytic’s Smart Group action, then create a Jamf Pro webhook targeted at that group. In Security Cloud > Integrations > Risk API, enable the API and generate a key for the webhook processor. Jamf’s guide includes the cloud function and webhook settings; keep its API credentials out of screenshots and logs. Run the guide’s Analytic test and check the Protect alert, Smart Group membership, Security Cloud risk under Reports > Security > Device View, and denied request in Reports > Access > Event Log.
For the JNUC EICAR sequence, the threat-prevention alert needs a route to Security Cloud’s Risk API. The public EICAR test guide covers detection, and the published risk-signaling guide covers an Analytic trigger. The lab’s EICAR alert-to-risk configuration remains the step to verify before using that file as the access-policy trigger.
Put it into motion
The Mac connects through Network Relay, and Security Cloud checks the destination against its Access Policy. Jamf Protect detects the test activity. The configured risk-signaling integration updates the Mac’s risk in Security Cloud, so that same policy denies its next request. Once the detection is resolved and the risk signal is cleared, the policy allows access again.
Sources
- Jamf: Network Relay release-candidate announcement
- Jamf: Current WireGuard-based ZTNA offering
- Jamf: Zero-Touch Secure Access for Apple Fleets
- Jamf Engineering: Network Relay and device attestation
- Apple Platform Security: Attestation process
- Jamf: Activation Profile Settings
- Jamf: Access Policy
- Jamf: Adding a New Custom Application
- Jamf: Denying Access to Apps When Devices Are Potentially Unsafe
- Jamf: Testing Endpoint Threat Prevention
- EICAR: Anti-malware test file
- Jamf: Creating a Protect Plan
- Jamf: Deploying Jamf Protect
- Jamf: Implement ZTNA Risk Signaling
- Jamf: Alert Actions
Related Posts

When Chromium Mistakes Your VPN for a Local Network
Turning off Jamf Trust fixed the webinar, which normally would have sent me straight to its routing policies. This time the route was fine: Chromium was treating Jamf's ZTNA broker addresses as a local network, and an Edge and Chrome preference corrected it.
Apple Software Updates Need a Blueprint Before the MDM Commands Fade
Apple software update management is moving away from command-first MDM workflows. Jamf Blueprints and Declarative Device Management give Mac admins a better place to express update intent, scope, enforcement, and visibility.

Jamf Moves Platform SSO Into the Enrollment Gate
Jamf's attended Simplified Setup for Platform SSO changes Mac enrollment by making identity registration part of Setup Assistant before the MDM profile is installed.

Check out this new JAMF Script upload tool
Digambar Ghosalkar's Jamf Script Uploader is useful because it moves Jamf Pro script work out of manual browser copy/paste and into a repeatable API-backed workflow.

Two PPPC Tools I Would Add After the Profile Looks Right
A follow-up on two tools worth adding to a PPPC troubleshooting workflow: PPPC_Analyser for inspecting app privacy requirements and QuickJamfDeploy for forcing the Jamf management framework into place during deployment.

Audit Jamf API Roles Before They Become Forgotten Access
A read-only Jamf Pro API role audit script that reports role privilege reach, write-capable access, review priority, and API client inventory without changing Jamf.

Review the Smart Group Before You Scope the Policy
Review your Smart Group before you ever scope a Jamf policy. Validate inventory, understand your signals, test exclusions, and prove the group works before it reaches production.
Build Jamf DDM Update Blueprints for macOS and iOS
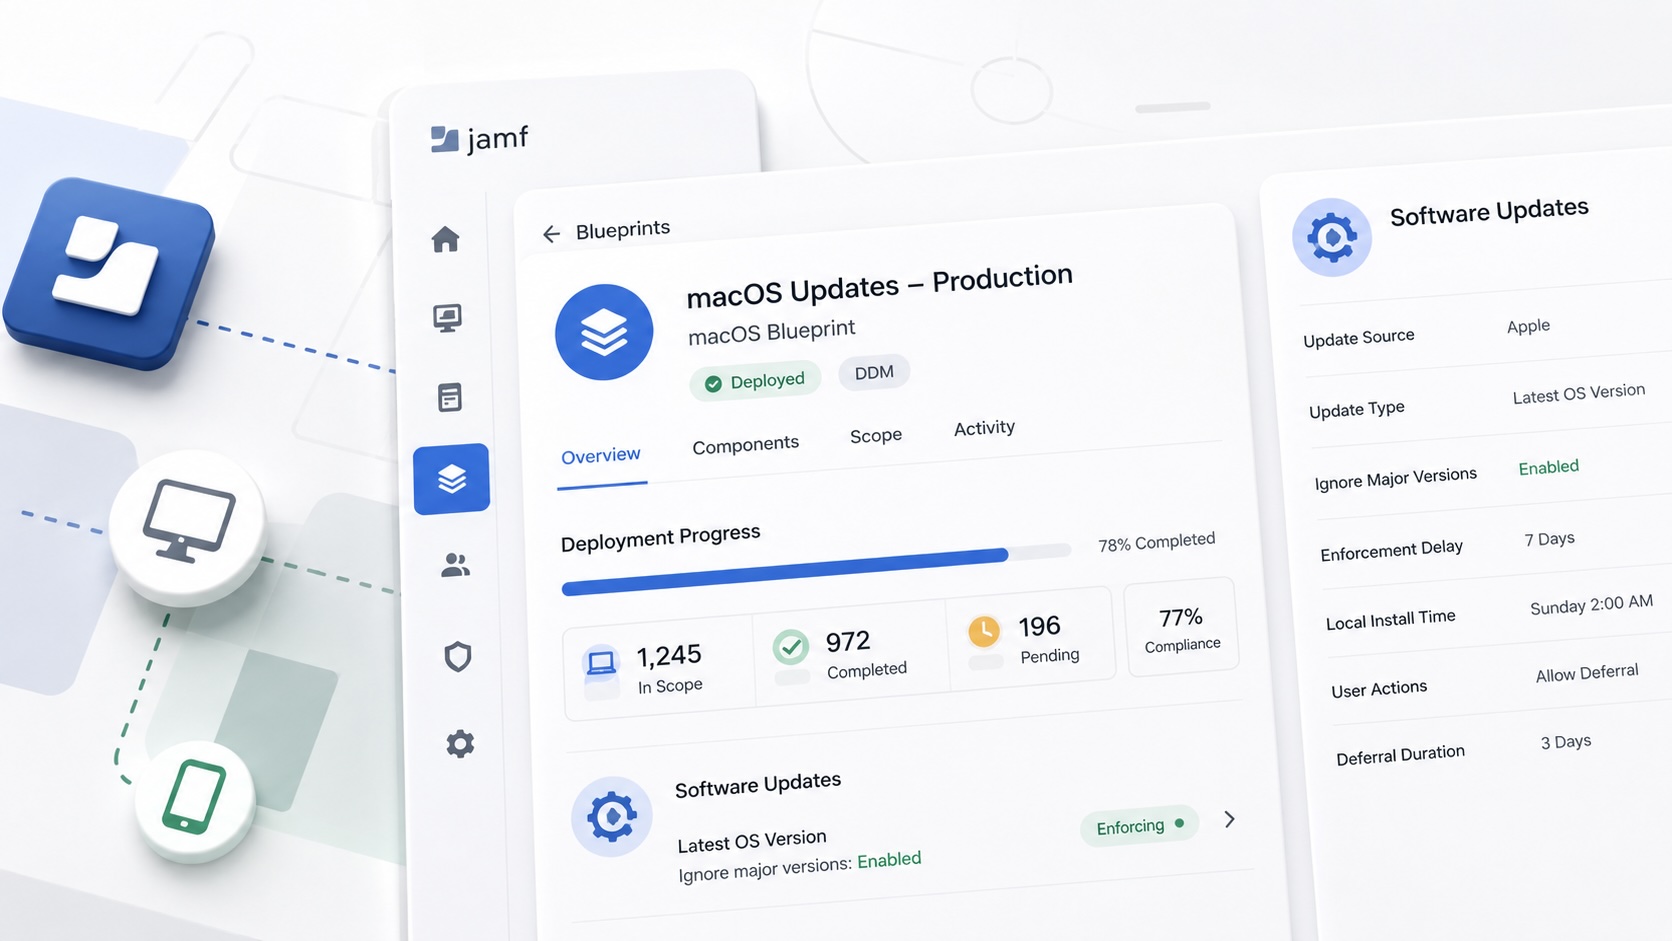
How I set up Jamf software update blueprints for macOS and iOS using Declarative Device Management, staged scope, clear enforcement timing, and visible deployment progress.

Review the Package Before You Build the Policy
A Jamf-focused package review workflow for checking installer signing, package contents, scope, validation, and rollback before a policy reaches production Macs.

Jamf Was My Mac Evidence Layer for CMMC
How Jamf Compliance helped support the Mac portion of a CMMC assessment, and why I added a small read-only CSV summary script for auditor-ready failed-result evidence.
